You may wonder how many types of surface treatments are available for machined parts. The answer depends on the finish you need. When you ask how many types of surface treatments there are for machined parts, you discover that each method alters the appearance, texture, or functionality of your part. Here are some of the most common finishes you can choose:
- Black oxide helps prevent rust and cuts down on shine.
- Bead blast gives parts a smooth, satin look.
- Electroplating and electroless plating both add a metal layer for protection and better appearance.
- Knurling makes surfaces easier to grip.
- Passivating helps stop corrosion.
- Thread rolling presses threads into a shaft.
- Burnishing creates a bright, mirror-like finish.
If you want your parts to last longer, resist damage, or look better, you should know how many types of surface treatments there are for machined parts. Each finish gives your part a special advantage. When you decide how many types of surface treatments there are for machined parts, you can pick the best one for your needs.
Key Takeaways
- Surface finishes protect machined parts from rust, wear, and damage while enhancing their appearance.
- There are at least eight main types of surface treatments, including electroplating, anodizing, and powder coating.
- Each finish offers unique benefits, such as corrosion resistance, improved aesthetics, or enhanced durability.
- Choosing the right finish depends on the material, function, and environment where the part will be used.
- Consider the aesthetic preferences, budget, and production scale when selecting a surface finish.
- Industry-specific requirements can guide your choice; for example, aerospace parts often need anodizing for weight savings.
- Consulting with machining experts can help ensure you select the best surface treatment for your needs.
- Combining different finishes can provide additional protection and improve the overall performance of your machined parts.
Table of Contents
How Many Types of Surface Treatments Are There for Machined Parts?
When you look at the world of machined parts, you find a wide range of surface treatments. Most manufacturing standards officially recognize eight main types of surface treatments. Each finish changes the way your part performs, looks, or lasts.
Common Surface Finishes for Machined Parts
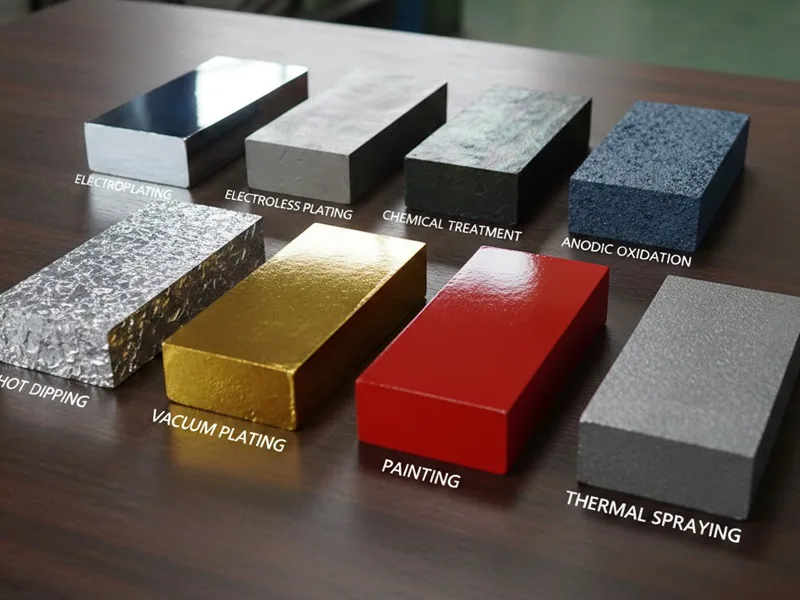
You can choose from many finishes, but these are the most widely used:
- Electroplating
- Electroless Plating
- Chemical Treatment
- Anodic Oxidation
- Hot Dipping
- Vacuum Plating
- Painting
- Thermal Spraying
Tip: Each finish gives your part a unique set of properties. For example, electroplating adds a protective metal layer, while anodic oxidation improves corrosion resistance and appearance.
You might also see other finishes like bead blasting, passivation, powder coating, brushing, polishing, black oxide, and specialized coatings. These options let you match the finish to your part’s function and environment.
Here is a quick look at what makes each finish different:
| Finish Type | Main Benefit | Typical Use |
|---|---|---|
| Electroplating | Adds a metal layer for protection | Electrical parts, hardware |
| Anodic Oxidation | Boosts corrosion resistance | Aluminum parts, consumer goods |
| Painting | Improves appearance, resists rust | Machinery, vehicles, appliances |
| Thermal Spraying | Increases wear and heat resistance | Engine parts, tools |
| Passivation | Reduces corrosion | Stainless steel, medical devices |
| Bead Blasting | Creates a smooth, matte surface | Visible parts, decorative items |
| Black Oxide | Prevents rust, reduces glare | Fasteners, tools |
| Polishing | Gives a mirror-like finish | Decorative, precision components |
You can also compare finishes by their surface characteristics:
| Characteristic | Description |
|---|---|
| Roughness | Measures tiny bumps and dips on the surface. |
| Waviness | Shows larger, wave-like patterns from tools or machines. |
| Lay | Tells you the direction of the surface pattern, which can affect sealing or friction. |
Why Surface Treatments Matter
You want your machined parts to last, perform well, and look good. The right surface finish helps you reach these goals. Surface treatments do more than just change how a part looks. They protect against rust, wear, and damage. They also improve how your part works in its environment.
- Surface finish affects how long your part resists fatigue and cracking.
- A good finish can stop corrosion and stress-related failures.
- Some finishes make your part more resistant to wear and friction.
- Post-machining treatments can boost the in-service performance of your parts.
Note: If you skip or choose the wrong finish, your part may develop roughness or micro-cracks. This can lower its fatigue resistance and shorten its life. By picking the right finish and optimizing your process, you help your parts perform better and last longer.
When you select a finish, think about what your part needs to do. Do you need it to resist rust, look shiny, or handle heavy use? Each finish offers a special advantage. By understanding your options, you can make the best choice for your application.
Overview of Metal Surface Treatments for Machined Parts

What Are Metal Surface Treatments?
When you work with machined parts, you want them to look good, last longer, and perform better. Metal surface treatments are special processes that you apply to the surface of a part to improve its appearance, durability, and function. These treatments often serve as the final step in manufacturing. You use them to remove imperfections, clean the surface, and add protective layers. You can choose from many types, such as electroplating, chemical treatment, anodic oxidation, and hot dipping. Each method prepares the surface for better adhesion of paints or coatings and helps eliminate flaws left by machining. Engineers often select these treatments to boost mechanical or electrical properties, making your parts ready for tough jobs or special environments.
Benefits for Machined Parts
You gain many advantages when you use metal surface treatments on your parts. Here are some of the main benefits:
- You protect the surface from environmental or chemical damage.
- You extend the life of your components.
- You create a barrier against corrosion, which is key for parts exposed to moisture or harsh chemicals.
- You improve wear resistance, so your parts last longer under friction or heavy use.
- You make it easier for paints or coatings to stick, which helps with further finishing.
- You enhance the look of your parts, giving them a smooth, shiny, or matte finish.
Surface treatments do more than just make your parts look better. They help your parts resist rust, reduce wear, and keep working well even in tough conditions.
You also improve the overall quality and reliability of your machined parts. For example, a good finish can stop micro-cracks from forming, which helps prevent early failure. By choosing the right treatment, you make sure your parts meet the demands of your application.
Applications in Machining
You see metal surface treatments used in many industries. Each industry has its own needs, but the goal is always to improve performance and durability. Here is a table showing some common treatments, where you find them, and what they provide:
| Surface Treatment | Industries/Applications | Typical Requirements |
|---|---|---|
| Anodizing | Aerospace, Medical | Corrosion resistance, wear resistance |
| Plating | Industrial, Decorative | Protective layer, aesthetic appeal |
| Powder Coating | Outdoor applications | Durability, corrosion resistance |
| Brushed Finish | Industrial, Commercial | Aesthetics, corrosion protection |
| Polished Finish | Industrial, Commercial | Attractive appearance, smooth finish |
You might use anodizing for aircraft parts that need strong corrosion resistance. Plating is common in electronics and decorative hardware. Powder coating works well for outdoor equipment because it stands up to weather and rust. Brushed and polished finishes are popular in commercial products where appearance matters.
AFI Industrial Co., Ltd offers a wide range of surface finishes for different materials and industries. You can find the right solution for your needs, whether you want to protect your parts, improve their look, or meet strict industry standards.
Detailed Guide to Each Surface Finish
Shot Peening / Gritting

Shot peening stands out as one of the most effective surface finishing processes for boosting the durability of machined parts. You use this method to create a compressive stress layer on the surface, which helps prevent cracks and extends the life of your components. In shot peening, you blast the part with small metallic, glass, or ceramic particles. This impact causes tiny dents, which make the surface stronger and more resistant to fatigue.
You often see shot peening in industries like aerospace, automotive, and heavy machinery. It is especially useful for parts such as turbine blades, springs, and landing gear that face high stress and repeated use. By choosing this process, you can:
- Delay or prevent cracks in high-stress parts.
- Increase resistance to fatigue and stress-corrosion cracking.
- Extend the service life of your components, even in tough environments.
For high-performance spring applications, shot peening offers distinctive advantages, such as improved fatigue resistance, making it indispensable in offshore drilling rigs, naval defense equipment, and other demanding environments.
Operational Procedure Steps
- Clean the machined part to remove oil, dirt, or old coatings.
- Load the part into the shot peening machine.
- Select the right shot material (metal, glass, or ceramic) and size.
- Adjust the machine settings for pressure and coverage.
- Blast the surface evenly, making sure all areas receive the same treatment.
- Inspect the part for a uniform, smooth and uniform surface.
- Rinse and dry the part to remove any remaining shot particles.
Sandblasting / Bead Blasting
Sandblasting and bead blasting are two popular surface finishing processes that help you clean, smooth, or texture the surface of machined parts. Both methods use high-pressure air to shoot abrasive particles at the part, but they differ in the type of abrasive and the finish they produce.
Sandblasting uses sharp, hard particles to remove more material and create a rougher finish. Bead blasting uses round glass beads to give a softer, satin-like appearance. You might choose bead blasting when you want a uniform, bright finish without damaging thin walls or delicate features.
Here is a comparison to help you decide which process fits your needs:
| Aspect | Bead Blasting | Sandblasting |
|---|---|---|
| Material Removal | Minimal (0.005–0.015 mm) | Significant and unpredictable |
| Surface Finish | Uniform satin finish (Ra ~ 1.5 μm) | Rougher surfaces (Ra 1-22 μm) |
| Pressure | Lower (40-60 PSI) | Higher (70-140 PSI) |
| Effect on Thin Walls | Safer, less heat buildup | Risk of warping and damage |
| Anodizing Preparation | Better, no embedding of contaminants | Can leave abrasive particles |
| Appearance | Maintains base color, brighter finish | Darker, grayer finish |
You use these metal surface finishing techniques to prepare parts for painting, anodizing, or further coating. Bead blasting is ideal when you want a smooth and uniform surface that looks clean and professional.
Operational Procedure Steps
- Place the part in a blasting cabinet or booth.
- Choose the right abrasive (sand or glass beads) for your desired finish.
- Set the correct air pressure for the process.
- Hold the blasting nozzle at the right distance and angle.
- Move the nozzle in steady, overlapping passes to cover the entire surface.
- Inspect the part for even coverage and desired texture.
- Clean the part to remove any leftover abrasive.
Mechanical Polishing / Buffing

Mechanical polishing and buffing are classic surface finishing processes that give your machined parts a high-gloss, mirror-like finish. You use these methods to remove scratches, tool marks, and minor imperfections. Polishing uses abrasive wheels or belts, while buffing uses softer pads and polishing compounds.
You often choose mechanical polishing when you want:
- High brightness and improved surface finish.
- Reduced product adhesion, which helps keep surfaces clean.
- Better surface cleanliness and higher aesthetic appeal.
This finish is common for parts that need to look attractive, such as decorative hardware, kitchen equipment, or medical devices. You also use it as a pre-treatment before electropolishing or other advanced finishing steps.
Tip: Mechanical polishing is practical and cost-effective for simple shapes or when you want to integrate it into your existing manufacturing process.
Operational Procedure Steps
- Secure the part on a workbench or in a fixture.
- Select the right abrasive wheel or belt for the initial polishing.
- Polish the surface using steady, even pressure.
- Switch to finer abrasives for a smoother finish.
- Use a buffing wheel and polishing compound for the final shine.
- Wipe the part clean to remove any residue.
- Inspect the part for a flawless, reflective surface.
These surface finishing processes help you achieve the desired look and performance for your machined parts. By understanding each method, you can select the best finish for your application, whether you need corrosion protection, a black oxide finish, or a smooth and uniform surface.
Magnetic Abrasive Polishing (MAP)
Magnetic Abrasive Polishing (MAP) is a high-precision finishing process that uses a magnetic field to control abrasive particles. You use this method to polish the surfaces of machined parts, especially the inside of tubes or hard-to-reach areas. In MAP, a magnetic device creates a strong field that attracts abrasive particles, forming a flexible brush. As the part rotates, this magnetic brush moves back and forth, gently removing tiny defects and smoothing the surface.
You benefit from MAP when you need:
- High precision in finishing operations.
- A reduced risk of cracks on the workpiece surface.
- Effective polishing of internal surfaces, such as tubes or cylinders.
MAP is popular in industries like aerospace, medical, and automotive, where you need flawless surfaces inside small or complex parts.
Operational Procedure Steps
- Clean the machined part to remove any oil or debris.
- Place the part in the MAP machine and secure it.
- Add the magnetic abrasive particles to the work area.
- Activate the magnetic field to form the abrasive brush.
- Start the machine to rotate the part and move the brush along the surface.
- Adjust the speed and movement for even polishing.
- Inspect the part for a smooth, defect-free finish.
- Remove any leftover abrasive and clean the part.
Tip: MAP is especially useful for polishing the inside of tubes, where traditional methods cannot reach.
Mass Finishing (Tumbling)
Mass finishing, also called tumbling, is a process where you place many machined parts in a rotating or vibrating barrel with abrasive media. As the barrel moves, the media rubs against the parts, smoothing edges, removing burrs, and giving a uniform finish. This method is ideal for small, sturdy components and lets you finish many parts at once.
You often use tumbling for:
- Deburring sharp edges on small metal parts.
- Cleaning and polishing hardware, fasteners, or stamped pieces.
- Achieving a consistent and repeatable finish on batches of parts.
Here’s a quick look at the process and what sizes of parts you can finish:
| Tumbling Process Description | Parts Size Range |
|---|---|
| Provides a consistent and repeatable finish | 3 mm³ up to 8” x 8” x 24” |
Operational Procedure Steps
- Sort and clean the parts to remove dirt or oil.
- Load the parts and abrasive media into the tumbling barrel.
- Add water or compound if needed for cleaning or polishing.
- Set the machine to the correct speed and time.
- Start the tumbling process and let the barrel rotate or vibrate.
- Check the parts for the desired finish.
- Rinse and dry the finished parts.
- Inspect for uniformity and remove any remaining media.
Tumbling is a cost-effective way to finish large batches of small machined parts.
Passivation

Passivation is a chemical process that you use to boost the corrosion resistance of machined metal parts, especially stainless steel. During passivation, you remove surface contaminants like free iron that can cause rust. The process restores and strengthens the natural oxide layer on the metal, making it much harder for rust or oxidation to start.
You should use passivation when:
- You want to maximize the corrosion resistance of stainless steel parts.
- Your parts will face moisture, chemicals, or harsh environments.
- You need to prevent premature failure due to rust or surface contamination.
Passivation is common in industries like medical devices, food processing, and marine equipment.
Benefits of passivation include:
- Enhanced corrosion resistance from a stable oxide layer.
- Protection against rust and oxidation.
- Longer part life, even in tough conditions.
Operational Procedure Steps
- Clean the part to remove oils, grease, and dirt.
- Rinse the part with water to remove cleaning agents.
- Immerse the part in a passivation solution (usually nitric or citric acid).
- Allow the part to soak for the recommended time.
- Rinse thoroughly with clean water to remove all acid.
- Dry the part completely to prevent water spots or new contamination.
- Inspect the surface for a uniform, clean finish.
Note: Passivation is a key step for stainless steel parts that need to resist corrosion in demanding environments.
Phosphating (Manganese/Zinc)
Phosphating is a chemical surface treatment that you use to improve the corrosion resistance and wear properties of machined metal parts. You can choose between manganese and zinc phosphating, depending on your needs. Both processes create a phosphate layer on the surface, but they offer different benefits and suit different applications.
Here’s a comparison to help you decide which type fits your project:
| Feature | Manganese Phosphate | Zinc Phosphate |
|---|---|---|
| Color | Dark gray to black | Light gray to dark gray |
| Thickness | Typically 5 to 25 microns | Can range from 1 to 75 microns |
| Surface | Porous and rough | Finer and smoother |
| Wear Resistance | Superior, ideal for high-wear applications | Moderate, not as effective for wear |
| Corrosion Resistance | Good, especially with sealants | Excellent, especially as a base for paints |
| Applications | Engine components, gears, weapons | Automotive parts, steel beams, appliances |
| Cost | Generally higher due to complexity | Typically lower, more cost-effective |
You often use manganese phosphating for parts that need to handle heavy wear, such as gears and engine components. Zinc phosphating works well when you want a cost-effective way to boost corrosion resistance, especially before painting.
Operational Procedure Steps
- Clean the machined part thoroughly to remove oil, dirt, and rust.
- Rinse the part with water to eliminate cleaning residues.
- Immerse the part in a phosphating solution (manganese or zinc-based) at the recommended temperature.
- Allow the part to soak for the specified time to form the phosphate layer.
- Rinse the part again to remove any remaining chemicals.
- Dry the part completely.
- Optionally, apply a sealant or oil to enhance corrosion and wear resistance.
Tip: Always choose the phosphating type based on your part’s function—manganese for wear, zinc for corrosion protection.
Chromate Conversion (Alodine)

Chromate conversion, also known as Alodine, is a chemical treatment you use mainly for aluminum and magnesium machined parts. This process forms a thin, protective oxide layer on the surface. You benefit from this finish when you need to boost corrosion resistance without changing the part’s dimensions.
Here’s what makes chromate conversion stand out:
| Benefit | Description |
|---|---|
| Corrosion Resistance | Enhances protection against corrosion for aluminum machined parts. |
| Thin and Uniform Coating | Forms a minimal thickness coating that preserves dimensional accuracy. |
| Improved Adhesion | Enhances adhesion properties for paints and primers. |
| Electrical Conductivity | Retains the metal’s electrical conductivity while providing a protective layer. |
| Quick Application Process | Allows for a fast application process at room temperature. |
| Compatibility | Works well with a wide range of metals, particularly aluminum and magnesium alloys. |
You often see chromate conversion on aerospace, electronics, and automotive parts, where you need both corrosion protection and electrical conductivity.
Operational Procedure Steps
- Clean the part to remove oils, dirt, and oxidation.
- Rinse with water to ensure a clean surface.
- Immerse the part in the chromate conversion solution at room temperature.
- Let the part soak for the recommended time to form the protective layer.
- Rinse thoroughly with water to remove excess chemicals.
- Dry the part completely.
- Inspect for a uniform, thin coating.
Chromate conversion is a fast, reliable way to protect aluminum parts and prepare them for painting or further finishing.
Zinc/Nickel Plating

Zinc and nickel plating are two popular electroplating methods you use to protect machined parts from corrosion and wear. Both processes deposit a thin metal layer onto the surface, but each offers unique advantages.
Here’s a quick comparison:
| Feature | Zinc Plating | Nickel Plating |
|---|---|---|
| Corrosion Resistance | Excellent | Good |
| Hardness & Wear Resistance | Good | Excellent |
| Aesthetic Appeal | Matte/Dull Finish | Sleek, Lustrous Finish |
| Electrical Conductivity | Good | Excellent |
| Environmental Impact | More Sustainable | Less Sustainable |
| Cost-Effectiveness | More Cost-Effective | More Expensive |
You choose zinc plating when you need strong corrosion protection, especially in environments with moisture or chemicals. Nickel plating is your go-to for parts that require high hardness, wear resistance, and a shiny, attractive finish.
Operational Procedure Steps
- Clean and degrease the machined part to remove all contaminants.
- Rinse the part with water.
- Activate the surface with an acid dip if needed.
- Place the part in the plating bath (zinc or nickel solution).
- Apply the correct electrical current to deposit the metal layer.
- Monitor the process to achieve the desired thickness and finish.
- Rinse the part thoroughly after plating.
- Dry and inspect the part for uniform coverage and quality.
Zinc plating gives you excellent corrosion protection at a lower cost, while nickel plating provides a harder, more durable surface for demanding applications.
Hard Chrome Plating
Hard chrome plating gives your machined parts a tough, shiny surface that stands up to wear, friction, and harsh environments. You use this finish when you need a part to last longer, resist scratches, or handle heavy loads. Hard chrome is not just about looks—it adds real strength and protection.
You get several key benefits from hard chrome plating:
- Increased hardness (up to HRC 65-70)
- Excellent sliding wear and abrasion resistance
- Low friction for moving parts
- Enhanced corrosion resistance
- High heat resistance
- Strong bond to the base metal
You often see hard chrome plating on parts that face extreme stress or need a smooth, durable surface. Here is a quick look at where you might use it:
| Performance Benefits | Ideal Applications |
|---|---|
| 65-70 Rockwell hardness | Molding dies (organic and metallic) |
| Very low coefficient of friction | Capital machinery |
| Corrosion resistant | Converting rolls |
| Best wear and low friction combination | Material transfer systems |
| High heat mitigation | Product handling, logistics systems |
| Superior bond strength | Shafts, spindles, axles, bearings |
| Mission-critical surfaces | |
| Firearm bolts, pins, barrels | |
| Aerospace landing gear, actuators, valves |
Tip: You can also find hard chrome on hydraulic cylinder rods, pump shafts, printing rollers, and automotive or aerospace components.
Operational Procedure Steps
- Clean and degrease the machined part to remove all oils and dirt.
- Mask any areas you do not want to plate.
- Place the part in a chrome plating bath with the correct solution.
- Apply a direct current to deposit the chrome layer.
- Monitor the process to reach the desired thickness (usually 0.02–0.25 mm).
- Remove the part, rinse thoroughly, and dry.
- Inspect the surface for uniformity and thickness.
- Remove masking and perform any final polishing if needed.
Hard chrome plating gives your parts a hard, smooth, and long-lasting finish that stands up to tough jobs.
Gold/Silver/Palladium Plating
Gold, silver, and palladium plating add more than just a shiny look to your machined parts. You use these precious metal finishes when you need top-level corrosion resistance, excellent electrical conductivity, or special thermal properties. These finishes are common in electronics, aerospace, and medical devices.
Here’s a table showing what makes each metal unique and where you might use them:
| Metal | Unique Properties | Common Uses |
|---|---|---|
| Gold | Corrosion resistance, excellent electrical and thermal conductivity, long-lasting | Electronics (circuit boards, connectors), medical equipment, aerospace (heat/corrosion protection) |
| Silver | Highest electrical conductivity, good corrosion resistance, antimicrobial | Electrical contacts, connectors, medical devices, RF/microwave components |
| Palladium | Corrosion resistant, hard, diffusion resistant | Coating for copper objects, industrial parts needing durability |
You choose gold plating for connectors that must never corrode or lose signal. Silver plating works well for electrical contacts and medical tools. Palladium is a good choice when you need a hard, durable, and corrosion-resistant layer.
Operational Procedure Steps
- Clean and degrease the part to remove all contaminants.
- Rinse thoroughly with water.
- Activate the surface with a mild acid dip if needed.
- Place the part in the appropriate plating bath (gold, silver, or palladium).
- Apply the correct electrical current to deposit the metal layer.
- Monitor the process for the right thickness and finish.
- Rinse and dry the part.
- Inspect for a bright, even coating.
Gold, silver, and palladium plating give your parts a premium finish with outstanding performance in demanding environments.
Electroless Nickel Plating (ENP)

Electroless nickel plating (ENP) is a unique process that coats your machined parts with a uniform nickel-phosphorus layer—without using electricity. You get a precise, even coating, even on complex shapes or inside small holes. ENP stands out for its excellent corrosion resistance, smooth finish, and ability to meet tight tolerances.
Here’s how ENP compares to traditional electrolytic nickel plating:
| Feature | Electroless Nickel Plating (ENP) | Electrolytic Nickel Plating |
|---|---|---|
| Method of Application | Chemical reducing agent | Electric current |
| Deposit Thickness | Uniform and precise | Thicker at corners and edges |
| Corrosion Resistance | Superior (due to phosphorus) | Standard |
| Lubricity | Enhanced | Standard |
| Tolerance Specifications | +/- .0001 inches | Less precise |
| Ductility | More ductile | Comparable |
| Coating Versatility | All metals | Limited substrates |
| Salvageability | Excellent for salvage | Not specified |
You benefit from ENP when you need:
- Uniform thickness on all surfaces
- Superior corrosion and wear resistance
- Improved lubricity for moving parts
- Tight tolerance control
You often use ENP for pump parts, valves, molds, electronic connectors, and any part with complex geometry.
Operational Procedure Steps
- Clean and degrease the part to remove all oils and dirt.
- Rinse thoroughly with water.
- Activate the surface with a mild acid dip if required.
- Immerse the part in the ENP bath containing nickel ions and a reducing agent.
- Maintain the correct temperature and pH for the chemical reaction.
- Allow the nickel layer to deposit evenly over the entire surface.
- Remove the part, rinse, and dry.
- Inspect for a smooth, uniform coating.
ENP gives you a reliable, high-performance finish—especially when you need even coverage and strong protection for your machined parts.
Hot-Dip Galvanizing

Hot-dip galvanizing is a surface finish you use to protect machined steel parts from rust and corrosion. You dip the cleaned steel part into a bath of molten zinc at about 860 °F (460 °C). The zinc forms a strong, metallurgical bond with the steel, creating a durable coating that shields the part from moisture and chemicals.
You often choose hot-dip galvanizing for construction hardware, outdoor equipment, and any part that faces harsh weather. This finish stands out because it covers every surface, even hard-to-reach areas, and provides long-lasting protection.
Key Benefits of Hot-Dip Galvanizing:
- Lower overall cost compared to other coatings, making it an economical choice for large projects.
- Superior durability and corrosion resistance, which means your parts last longer and need less maintenance.
- The coating protects all surfaces, including edges and corners.
- The process is quick and works in many weather conditions.
- The unique structure of the zinc layer resists mechanical damage.
Operational Procedure Steps
- Clean the steel part using chemical or mechanical methods to remove oil, dirt, and rust.
- Flux the cleaned part to eliminate any remaining oxides and prepare the surface for zinc bonding.
- Immerse the part in a molten zinc bath at about 860 °F (460 °C).
- Allow the zinc to react with the steel, forming a strong, protective coating.
- Remove the part and let it cool. The zinc reacts with oxygen and carbon dioxide in the air, creating a tough zinc carbonate layer.
- Inspect the part for complete coverage and uniform thickness.
Hot-dip galvanizing gives you a cost-effective, reliable way to protect steel machined parts, especially when you need durability in outdoor or industrial environments.
Electrophoretic Deposition (E-Coat)
Electrophoretic deposition, or E-Coat, is a modern surface finishing process you use to apply a thin, even coating to metal parts. You place the part in a water-based paint bath and apply an electric current. Charged paint particles move toward the part and deposit a uniform layer over every surface, even inside complex shapes.
You see E-Coat used widely in the automotive and appliance industries. It is especially valuable for parts with intricate designs, where traditional painting methods might miss hidden areas.
Main Features and Benefits of E-Coat:
- Excellent corrosion protection, forming a barrier that keeps out moisture and chemicals.
- Uniform coating thickness, even on complex or hidden surfaces.
- Environmentally friendly, with low VOC emissions and minimal waste.
- Cost-effective for mass production, with high automation and paint transfer efficiency.
- Suitable for magnesium alloys and other conductive materials.
Operational Procedure Steps
- Clean and degrease the machined part to remove all contaminants.
- Place the part in the E-Coat bath filled with water-based paint.
- Apply an electric current to the bath. Charged paint particles move toward the part and deposit evenly.
- Rinse the part to remove excess paint.
- Cure the coated part in an oven to harden the finish.
- Inspect the part for a smooth, uniform coating.
E-Coat gives you a reliable, eco-friendly way to protect machined parts, especially when you need consistent coverage on complex shapes.
Carburizing / Nitriding

Carburizing and nitriding are two heat treatment processes you use to harden the surface of machined steel parts. Both methods improve wear resistance and extend the life of your components, but they work in different ways.
Carburizing adds carbon to the surface of the steel by heating it in a carbon-rich environment at high temperatures (850°C to 1050°C). This creates a thick, hard layer that resists wear and impact. Nitriding introduces nitrogen into the surface at a lower temperature (about 570°C), forming a thinner but very hard layer. Nitriding causes less distortion and is ideal for parts that need precise dimensions.
| Treatment Type | Process Description | Temperature Range | Hardening Layer Thickness | Key Benefits |
|---|---|---|---|---|
| Carburizing | Dissolves carbon into the metal surface | 850°C to 1050°C | Thicker than nitriding | Improves wear, impact resistance, and fatigue strength |
| Nitriding | Introduces nitrogen to form a hard layer | About 570°C | 8μm to 20μm | Increases surface hardness, reduces distortion |
You use these treatments for gears, shafts, and other parts that need a tough, wear-resistant surface but a strong, flexible core.
Operational Procedure Steps
- Clean the machined steel part to remove oils and dirt.
- For carburizing, place the part in a carbon-rich environment and heat to 850°C–1050°C for the required time.
- For nitriding, place the part in a nitrogen-rich environment and heat it to about 570°C.
- Allow the carbon or nitrogen to diffuse into the surface, forming a hard layer.
- Cool the part carefully to avoid distortion.
- Inspect the part for proper case depth and hardness.
Carburizing and nitriding help you create machined parts that stand up to heavy use, friction, and impact, making them essential for high-performance applications.
Nitrocarburizing (QPQ)
Nitrocarburizing, often called QPQ (Quench-Polish-Quench), is a surface treatment you use to make machined parts tougher and more resistant to wear and corrosion. This process diffuses both nitrogen and carbon into the surface of steel parts at a relatively low temperature. You get a hard, smooth outer layer that protects the part from damage and extends its life.
Main advantages of nitrocarburizing (QPQ):
- You achieve superior wear resistance and surface hardness, which means your parts last longer under friction.
- You boost the fatigue strength, so parts can handle repeated stress without cracking.
- You improve corrosion resistance, making your parts less likely to rust or degrade in harsh environments.
- You maintain excellent dimensional stability, so your parts keep their precise shape.
- You can apply this process to complex shapes and internal surfaces, not just flat or simple parts.
- You save time and money because the process is efficient and does not require expensive equipment.
- You avoid harmful chemicals like cyanide, making the process safer and more environmentally friendly.
You often use QPQ for automotive components, hydraulic parts, firearm barrels, and any machined part that needs to resist wear and corrosion.
Operational Procedure Steps
- Clean the part thoroughly to remove oil, dirt, and rust.
- Place the part in a special furnace and heat it in a nitrogen and carbon-rich atmosphere.
- Quench the part in an oil or salt bath to harden the surface.
- Polish the part to achieve a smooth, glossy finish.
- Repeat the quenching process to further enhance the surface properties.
- Inspect the part for uniform hardness and appearance.
- Dry and package the part for use or further assembly.
Nitrocarburizing (QPQ) gives you a durable, high-performance surface that stands up to tough working conditions.
Boronizing (Boriding)
Boronizing, also known as boriding, is a surface hardening process you use to make metal parts extremely resistant to wear and abrasion. In this process, you diffuse boron atoms into the surface of steel, cast iron, or other metals at high temperatures. The result is a very hard, ceramic-like layer that protects the part from scratching, erosion, and chemical attack.
You find boronizing especially useful in industries where parts face extreme wear or high temperatures. Here are some common applications:
- Automotive: You can boronize gears, camshafts, and valve components to extend their service life and reduce maintenance.
- Aerospace: You use boronizing for turbine blades, landing gears, and engine parts that must withstand heat and friction.
- Cutting tools and dies: Boronized tools cut and shape hard materials more effectively and last longer.
- Mining and earthmoving: Drill bits, shovels, and conveyor parts benefit from boronizing because it reduces downtime and boosts performance in abrasive environments.
- Oil and gas: Valves, pumps, and other equipment exposed to corrosive fluids last longer when boronized.
Boronizing gives you a surface that is much harder than traditional heat treatments, making it ideal for parts that must resist both wear and corrosion.
Operational Procedure Steps
- Clean the part to remove all contaminants.
- Place the part in a boron-rich powder or paste.
- Heat the part in a furnace to a high temperature (usually 800–1000°C).
- Hold the part at the temperature for several hours to allow boron to diffuse into the surface.
- Cool the part slowly to avoid cracking.
- Remove any remaining boron compound and clean the part.
- Inspect the surface for uniform hardness and thickness.
Boronizing creates a tough, long-lasting surface that protects your machined parts in the harshest environments.
Aluminizing
Aluminizing is a surface treatment you use to coat machined parts with a layer of aluminum. This process helps protect steel and other metals from oxidation, corrosion, and high temperatures. You often choose aluminizing for parts that operate in hot, corrosive environments, such as power plants, chemical processing, and exhaust systems.
When you aluminize a part, you form a strong bond between the aluminum and the base metal. This bond creates a barrier that shields the part from rust and chemical attack. Aluminized surfaces also reflect heat, which helps parts last longer in high-temperature applications.
Operational Procedure Steps
- Clean the part to remove oil, dirt, and scale.
- Place the part in contact with aluminum powder or foil.
- Heat the part in a furnace to a temperature where aluminum can diffuse into the surface (typically 900–1000°C).
- Hold the part at the temperature for the required time to form the aluminized layer.
- Cool the part and remove any excess aluminum material.
- Inspect the surface for a uniform, protective coating.
- Test the part for corrosion and heat resistance as needed.
Aluminizing gives your machined parts a durable, heat-reflective surface that stands up to extreme conditions.
Black Oxide (Bluing)

Black oxide, also known as bluing, is a chemical surface treatment you use to improve the corrosion resistance of steel machined parts. This finish creates a thin, dark layer of magnetite (Fe₃O₄) on the surface. You often choose black oxide when you want to reduce glare, add mild corrosion protection, and give your parts a sleek, uniform appearance.
Main Benefits:
- Adds a professional, matte black look to your parts.
- Reduces light reflection and glare.
- Provides mild corrosion resistance, especially when you apply oil or wax after treatment.
- Maintains the part’s dimensions because the coating is very thin.
Typical Applications:
- Fasteners, tools, and firearm components.
- Automotive and machinery parts that need a non-reflective finish.
- Decorative hardware and fixtures.
Tip: Black oxide is ideal for parts that need a dark, attractive finish without changing their size or shape.
Operational Procedure Steps
- Clean the machined part to remove oil, grease, and dirt.
- Immerse the part in a hot alkaline cleaning solution to remove any remaining contaminants.
- Rinse the part thoroughly with water.
- Place the part in a heated black oxide solution (usually sodium hydroxide and oxidizing salts) at around 285°F (140°C).
- Allow the part to soak for 10–30 minutes, depending on the desired depth of color.
- Rinse the part again with water to remove any chemicals.
- Apply a protective oil or wax coating to enhance corrosion resistance.
- Dry and inspect the part for a uniform, black finish.
Dacromet:
Dacromet is a modern, water-based coating you use to protect machined parts from corrosion. This finish contains zinc and aluminum flakes in a special binder. When you apply Dacromet, you get a silver-gray, non-electrolytic coating that stands up to harsh environments.
Main Benefits:
- Provides excellent corrosion resistance, even in salt spray conditions.
- Offers a thin, uniform coating that does not change part dimensions.
- Resists heat and chemicals better than many traditional coatings.
- Does not cause hydrogen embrittlement, making it safe for high-strength fasteners.
Typical Applications:
- Automotive bolts, nuts, and brake components.
- Construction hardware and outdoor equipment.
- Marine and wind power parts are exposed to moisture and salt.
Note: Dacromet is a popular choice for parts that need long-lasting protection without the risk of hydrogen embrittlement.
Operational Procedure Steps
- Clean and degrease the machined part to remove all contaminants.
- Dip, spray, or spin-coat the part with the Dacromet solution.
- Drain excess coating to ensure an even layer.
- Bake the coated part in an oven at 300–350°C (570–660°F) to cure the coating and bond the metal flakes.
- Cool the part and inspect for a uniform, silver-gray finish.
- Test the part for corrosion resistance if required.
Thermo-Chemical Diffusion
Thermo-chemical diffusion is a group of surface treatments you use to change the chemical composition of a machined part’s surface. These processes, such as carburizing, nitriding, and various types of anodizing, help you improve hardness, wear resistance, and corrosion protection.
Sulfuric Acid Anodizing

Sulfuric acid anodizing is a process you use mainly for aluminum parts. This treatment creates a thick, porous oxide layer on the surface, which you can dye in different colors or leave as a natural matte finish. The oxide layer improves corrosion resistance and makes the part more durable.
Main Benefits:
- Increases corrosion and wear resistance.
- Allows for coloring and improved paint adhesion.
- Maintains tight tolerances because the layer is thin and uniform.
Typical Applications:
- Aerospace and automotive aluminum components.
- Consumer electronics and decorative parts.
- Food processing equipment.
Operational Procedure Steps
- Clean the aluminum part to remove oils and dirt.
- Rinse thoroughly with water.
- Immerse the part in a sulfuric acid bath at a controlled temperature and voltage.
- Allow the oxide layer to form for the required time (usually 20–60 minutes).
- Rinse the part with water to remove the acid.
- Optionally, dye the part for color or seal the pores for extra protection.
- Dry and inspect the part for a uniform, matte finish.
Hard coat Anodizing
Hard coat anodizing is a special type of anodizing you use when you need a thicker, harder oxide layer on aluminum parts. This process uses higher current and lower temperatures to create a dense, wear-resistant surface.
Main Benefits:
- Provides superior wear and abrasion resistance.
- Offers excellent corrosion protection, even in harsh environments.
- Produces a thicker oxide layer (up to 100 microns).
Typical Applications:
- Hydraulic cylinders, pistons, and gears.
- Military and aerospace components.
- Industrial machinery parts.
Operational Procedure Steps
- Clean and degrease the aluminum part.
- Rinse with water to remove cleaning agents.
- Place the part in a cold sulfuric acid bath with high current density.
- Allow the oxide layer to build up to the desired thickness (often 30–100 microns).
- Rinse thoroughly with water.
- Seal the surface to close pores and enhance durability.
- Dry and inspect for a hard, uniform finish.
Tip: Hard coat anodizing is your best choice when you need aluminum parts to resist heavy wear and corrosion.
Micro-Arc Oxidation (MAO/PEO)
Micro-Arc Oxidation (MAO), also called Plasma Electrolytic Oxidation (PEO), is a high-tech surface treatment you use to create a hard, ceramic-like layer on metals such as aluminum, magnesium, and titanium. You apply this process to machined parts when you need superior wear resistance, corrosion protection, and electrical insulation. MAO stands out because it forms a thick, dense oxide layer that bonds tightly to the base metal. This layer can withstand extreme environments, making it ideal for aerospace, automotive, and electronics applications.
Main Benefits:
- You achieve a surface hardness much higher than traditional anodizing.
- The coating resists abrasion, corrosion, and high temperatures.
- The process creates a porous outer layer, which you can seal or dye for extra protection or appearance.
- You can use MAO on complex shapes and internal surfaces.
Typical Applications:
- Aerospace components that face friction and heat.
- Automotive engine parts and pistons.
- Medical implants and devices.
- Electronic housings need insulation.
Operational Procedure Steps
- Clean the machined part to remove all oils and debris.
- Place the part in an electrolyte bath designed for MAO.
- Apply a high-voltage electrical current to the part. This creates micro-arc discharges on the surface.
- Allow the oxide layer to grow as the micro-arcs form and reform the surface.
- Monitor the process to control coating thickness and properties.
- Rinse the part with water to remove any remaining electrolyte.
- Dry and inspect the part for a uniform, ceramic-like finish.
- Optionally, seal or dye the coating for added protection or color.
Tip: MAO gives you a tough, long-lasting surface that performs well in harsh conditions. You can use it to upgrade the durability of your machined aluminum or titanium parts.
Nickel/Gold Plating
Nickel and gold plating are advanced electroplating processes you use to enhance the surface of machined parts. Nickel plating provides a hard, corrosion-resistant layer with a bright, attractive finish. Gold plating adds excellent electrical conductivity, corrosion resistance, and a premium appearance. You often use these finishes for electronic connectors, medical devices, and aerospace components where reliability and performance matter most.
Main Benefits:
- Nickel plating increases hardness and wear resistance.
- Gold plating offers unmatched corrosion protection and electrical conductivity.
- Both finishes improve the appearance and value of your parts.
- You can plate complex shapes and fine features with uniform coverage.
Typical Applications:
- Electrical contacts and connectors.
- Medical instruments and implants.
- Aerospace and defense components.
- Decorative hardware and jewelry.
Operational Procedure Steps
- Clean and degrease the machined part to remove all contaminants.
- Rinse thoroughly with water.
- Activate the surface with an acid dip if needed.
- Place the part in a nickel plating bath and apply the correct electrical current to deposit the nickel layer.
- Rinse the part to remove any nickel solution.
- Transfer the part to a gold plating bath and apply the proper current to deposit a thin gold layer.
- Rinse and dry the part.
- Inspect for a bright, even coating.
Note: Gold plating is especially valuable for parts that require high conductivity and corrosion resistance, such as connectors in computers and mobile devices.
Chemical Polishing
Chemical polishing is a surface finishing process you use to smooth and brighten machined metal parts without mechanical abrasion. You immerse the part in a special chemical solution that dissolves microscopic peaks on the surface faster than the valleys. This action creates a shiny, smooth finish that improves both appearance and performance. Chemical polishing works well for parts with complex shapes or delicate features that are hard to polish mechanically.
Main Benefits:
- You achieve a uniform, glossy finish even on intricate parts.
- The process removes minor surface defects and tool marks.
- Chemical polishing improves corrosion resistance by creating a clean, passive surface.
- You can use it on metals like aluminum, copper, and stainless steel.
Typical Applications:
- Decorative hardware and lighting fixtures.
- Medical and dental instruments.
- Precision components in electronics and optics.
- Food processing equipment.
Operational Procedure Steps
- Clean the machined part to remove grease, oil, and dirt.
- Rinse thoroughly with water.
- Immerse the part in the chemical polishing solution for the recommended time.
- Monitor the process to achieve the desired level of brightness and smoothness.
- Remove the part and rinse it immediately with water to stop the reaction.
- Neutralize any remaining chemicals with a suitable solution.
- Dry and inspect the part for a uniform, shiny finish.
Tip: Chemical polishing is a fast, cost-effective way to enhance the look and performance of your machined parts, especially when you need a flawless surface on complex shapes.
Brush Plating
Brush plating gives you a way to apply a metal coating to specific areas of a machined part without dipping the whole part in a plating bath. You use a handheld tool with a brush or pad soaked in plating solution. You move the tool over the area you want to plate. The process uses a low-voltage power supply to deposit the metal onto the surface.
Main Benefits:
- You can repair worn or damaged spots on large or assembled parts.
- You control the thickness and location of the coating.
- You avoid masking or disassembling the entire part.
- You save time and reduce waste compared to tank plating.
Typical Applications:
- Repairing shafts, bearing seats, or threads on-site.
- Adding wear-resistant or corrosion-resistant layers to small areas.
- Restoring dimensions on expensive or hard-to-replace parts.
Tip: Brush plating works well for quick repairs and touch-ups, especially when you cannot move the part to a plating shop.
Operational Procedure Steps
- Clean the area you want to plate. Remove all oil, dirt, and corrosion.
- Mask off areas you do not want to plate.
- Attach the part to the negative terminal of the power supply.
- Soak the brush or pad in the plating solution.
- Connect the brush to the positive terminal.
- Move the brush over the target area in slow, even strokes.
- Monitor the process to control the coating thickness.
- Rinse and dry the plated area.
- Inspect the finish for coverage and quality.
Vacuum Sputtering
Vacuum sputtering is a high-tech surface finish you use to deposit thin, even coatings on machined parts. You place the part in a vacuum chamber. A target material (like aluminum, titanium, or gold) gets bombarded with ions, causing atoms to “sputter” off and land on your part. This forms a thin, uniform film.
Main Benefits:
- You get precise control over coating thickness and composition.
- You can coat complex shapes and internal surfaces.
- The process creates strong, pure, and high-performance films.
Typical Applications:
- Electronics (circuit boards, connectors, sensors).
- Optical components (mirrors, lenses, filters).
- Decorative finishes on consumer products.
- Wear-resistant or anti-reflective coatings on tools and machine parts.
Note: Vacuum sputtering is ideal when you need a thin, high-quality coating that enhances performance or appearance.
Operational Procedure Steps
- Clean and dry the machined part thoroughly.
- Place the part and target material inside the vacuum chamber.
- Evacuate the chamber to create a high vacuum.
- Apply a voltage to generate a plasma. Ions strike the target material.
- Atoms from the target material sputter off and deposit onto your part.
- Control the process to achieve the desired coating thickness.
- Vent the chamber and remove the coated part.
- Inspect the surface for uniformity and adhesion.
Anti-Tarnish Treatment
Anti-tarnish treatment helps you keep metal surfaces bright and free from discoloration. You use this process mainly for silver, copper, or other metals that tarnish when exposed to air. The treatment forms a thin, invisible layer that blocks oxygen and moisture from reaching the metal.
Main Benefits:
- You prevent tarnish and keep parts looking new.
- You reduce cleaning and maintenance needs.
- The treatment does not change the appearance or dimensions of your part.
Typical Applications:
- Electrical contacts and connectors.
- Jewelry and decorative hardware.
- Precision machined parts made from silver, copper, or brass.
Tip: Use anti-tarnish treatment after plating or polishing to extend the life and appearance of your machined parts.
Operational Procedure Steps
- Clean the part to remove all oils, dirt, and oxidation.
- Rinse thoroughly with water.
- Immerse the part in the anti-tarnish solution for the recommended time.
- Remove and rinse the part again to eliminate any residue.
- Dry the part completely.
- Inspect the surface for a clear, untarnished finish.
You can use anti-tarnish treatments as a final step to protect your machined parts and keep them looking their best.
CVD/PVD Coating
Chemical Vapor Deposition (CVD) and Physical Vapor Deposition (PVD) are advanced surface coating technologies you use to enhance the performance of machined parts. Both methods deposit thin, hard films onto the surface, but they work differently. CVD uses chemical reactions at high temperatures to form a coating, while PVD uses physical processes like evaporation or sputtering in a vacuum.
You choose CVD/PVD coatings when you want to improve hardness, wear resistance, and corrosion protection. These coatings also reduce friction, which helps moving parts last longer. You often see CVD/PVD coatings on cutting tools, molds, medical devices, and aerospace components.
Main Benefits:
- You get a very hard, wear-resistant surface.
- The coating improves corrosion resistance.
- The thin film does not change part dimensions.
- You can coat complex shapes and internal surfaces.
Typical Applications:
- Cutting tools (drills, end mills, inserts)
- Precision gears and bearings
- Medical implants and surgical instruments
- Aerospace and automotive parts
Operational Procedure Steps
- Clean and degrease the machined part to remove all contaminants.
- Place the part in a vacuum chamber (for PVD) or a reaction chamber (for CVD).
- For PVD, heat the target material and create a plasma to vaporize it. For CVD, introduce reactive gases at high temperature.
- The vapor or gas reacts and deposits a thin film onto the part’s surface.
- Control the process to achieve the desired coating thickness and properties.
- Cool the part and remove it from the chamber.
- Inspect the coating for uniformity and adhesion.
Tip: CVD/PVD coatings give your machined parts a tough, long-lasting surface without adding bulk or weight.
Nano-coatings
Nano-coatings use nanotechnology to create ultra-thin, high-performance layers on machined parts. These coatings contain particles or structures measured in nanometers—about 1,000 times smaller than a human hair. You use nano-coatings to add special properties like super-hardness, self-cleaning, or anti-bacterial effects.
You benefit from nano-coatings when you need advanced protection or unique surface features. These coatings can make parts more resistant to scratches, corrosion, and even fingerprints. You often see nano-coatings in electronics, medical devices, automotive parts, and high-end consumer products.
Key Benefits:
- You get enhanced hardness and scratch resistance.
- The coating can repel water, oil, and dirt (hydrophobic/oleophobic).
- Nano-coatings can provide anti-bacterial or anti-fingerprint properties.
- The ultra-thin layer does not affect part size or shape.
Common Applications:
- Touchscreens and optical lenses
- Medical implants and surgical tools
- Automotive glass and trim
- High-precision machined components
Operational Procedure Steps
- Clean the machined part thoroughly to remove all dust, oil, and debris.
- Apply the nano-coating using spraying, dipping, or vapor deposition.
- Allow the coating to bond and cure, sometimes using heat or UV light.
- Inspect the surface for a uniform, invisible layer.
- Test the part for the desired properties, such as water repellency or scratch resistance.
Nano-coatings help your machined parts stay cleaner, last longer, and perform better in demanding environments.
Diamond-Like Carbon (DLC)
Diamond-Like Carbon (DLC) is a special type of coating that gives your machined parts many of the properties of real diamond. DLC coatings are extremely hard, smooth, and resistant to wear and corrosion. You use DLC when you need a surface that can handle heavy friction, high speeds, or harsh chemicals.
DLC coatings are popular in the automotive, aerospace, medical, and electronics industries. You often find them on engine parts, gears, bearings, cutting tools, and even watch components.
Main Advantages:
- You get a super-hard, low-friction surface.
- DLC resists wear, scratching, and corrosion.
- The coating reduces friction, which helps moving parts last longer.
- DLC is biocompatible, making it safe for medical implants.
Typical Uses:
- Automotive engine parts (pistons, cams)
- Cutting tools and dies
- Medical implants and surgical instruments
- High-performance bearings and gears
Operational Procedure Steps
- Clean and prepare the machined part to remove all contaminants.
- Place the part in a vacuum chamber.
- Use a plasma-based process (like PVD or PECVD) to deposit the DLC layer.
- Control the process to achieve the right thickness and hardness.
- Remove the part and inspect the coating for smoothness and adhesion.
- Test the part for wear resistance and friction reduction.
Note: DLC coatings give your machined parts a diamond-tough surface that stands up to the most demanding jobs.
High-Velocity Oxy-Fuel
High-Velocity Oxy-Fuel (HVOF) is a powerful surface finishing process you can use to apply extremely hard and wear-resistant coatings to machined parts. In this method, you spray powdered coating material onto the part using a high-speed jet of hot gases. The process creates a dense, strong layer that bonds tightly to the surface. You often choose HVOF when you need to protect parts from abrasion, corrosion, or high temperatures.
Main Benefits:
- You get a coating that is much harder and more durable than many other finishes.
- The process produces a very dense layer with low porosity, which means better protection.
- HVOF coatings resist wear, corrosion, and heat, making them ideal for tough environments.
Typical Applications:
- Aerospace components like turbine blades and landing gear.
- Industrial rollers, pump shafts, and valves.
- Oil and gas equipment that faces harsh chemicals and abrasion.
- Cutting tools and mining machinery.
Tip: HVOF coatings can extend the life of your machined parts, reduce maintenance, and improve performance in demanding applications.
Operational Procedure Steps
- Clean the machined part thoroughly to remove all oil, dirt, and old coatings.
- Mask any areas you do not want to coat.
- Load the part into the HVOF spraying booth.
- Select the right powder material for your application (such as tungsten carbide or chromium carbide).
- Set up the HVOF gun with the correct fuel and oxygen mixture.
- Ignite the gun to create a high-speed jet of hot gases.
- Feed the powder into the jet, which melts and accelerates the particles toward the part.
- Move the gun in steady, overlapping passes to build up the coating evenly.
- Allow the part to cool, then remove the masking.
- Inspect the coating for thickness, uniformity, and adhesion.
Note: Always follow safety procedures when working with HVOF equipment, as the process involves high temperatures and fast-moving particles.
Electropolishing
Electropolishing is a chemical finishing process you use to smooth and brighten the surface of machined metal parts. Unlike mechanical polishing, electropolishing removes a thin layer of material using an electric current in a special solution. This process creates a shiny, clean, and corrosion-resistant surface. You often use electropolishing for stainless steel, aluminum, and other metals that need a flawless finish.
Main Benefits:
- You achieve a mirror-like, ultra-smooth surface.
- The process removes tiny burrs and sharp edges, making parts safer and easier to clean.
- Electropolishing improves corrosion resistance by creating a clean, passive surface layer.
- The finish reduces product adhesion, which helps in the food, medical, and pharmaceutical industries.
Typical Applications:
- Medical devices and surgical instruments.
- Food processing and dairy equipment.
- Pharmaceutical machinery.
- Precision parts in electronics and aerospace.
Tip: Electropolishing is ideal for parts with complex shapes or internal features that are hard to polish mechanically.
Operational Procedure Steps
- Clean the part to remove all oils, dirt, and surface contaminants.
- Rinse the part thoroughly with water.
- Attach the part to the positive terminal (anode) of the power supply.
- Immerse the part in the electropolishing bath, which contains a special acid solution.
- Connect a suitable cathode to the negative terminal and place it in the bath.
- Apply the correct voltage and current for the required time.
- Monitor the process to ensure even material removal and desired brightness.
- Remove the part from the bath and rinse immediately with water.
- Neutralize any remaining acid with a suitable solution.
- Dry and inspect the part for a smooth, bright, and defect-free finish.
Electropolishing gives you a high-quality, corrosion-resistant surface that meets strict industry standards.
Comparing Surface Treatments for Machined Parts
Durability and Protection
When you choose a surface treatment for your machined parts, you want to know how well it will protect your part and how long it will last. Each finish offers a different level of durability and protection. Here is a table to help you compare some of the most common options:
| Surface Treatment | Durability Level | Protection Level | Typical Applications |
|---|---|---|---|
| Fine Grinding | High | Moderate | Shafts needing wear resistance |
| Electropolishing | High | High | Corrosion-sensitive components |
| Anodizing | Moderate | High | Aluminum enclosures |
| Hard Anodization | High | High | Tight tolerance shafts |
| Electroplating | Moderate | High | Fasteners in corrosive environments |
| Powder Coating | Low | Moderate | Enclosures needing aesthetic finish |
| Sand Blasting | Moderate | Moderate | Enclosures for corrosion resistance |
| Geomet | High | Very High | Automotive fasteners |
You can see that some finishes, like Geomet and electropolishing, give you very high protection and durability. Others, such as powder coating, focus more on appearance but still offer moderate protection. When you need your parts to last in harsh environments, choose a finish with high durability and protection.
Appearance and Texture
The way your part looks and feels can be just as important as how it performs. Surface finishes change the appearance and texture of your machined parts. Here are some popular choices:
- Satin finish gives you a refined, clean look. It works well for products that people touch often and want to keep looking nice.
- Textured finish is best when you need durability and want to hide small imperfections. It is great for parts used in tough environments.
- Bead-blasted finish creates a matte, tactile surface. This is perfect for precision parts that need wear resistance.
- Oxidized or patina finish stands out for its unique look. It adds mood and depth instead of shine.
You can match the finish to your product’s style and function. For example, a bead-blasted finish works well for tools, while a satin finish is ideal for consumer electronics.
Cost and Lead Time
Cost and lead time are important when you plan your project. Some finishes are quick and affordable, while others take more time and cost more. Here is a table to help you compare:
| Surface Treatment | Cost Range | Lead Time |
|---|---|---|
| Bead Blasting | Low-cost | Short lead time |
| Passivation | Inexpensive | Short lead time |
| Anodising Type II | Reasonable price | Longer lead time |
| Powder Coating | Variable | Longer lead time |
| Electropolishing | Higher | Longer lead time |
| Zinc Coating (Galvanising) | Variable | Longer lead time |
If you need a fast turnaround, bead blasting or passivation are good choices. For more advanced finishes like electropolishing or powder coating, expect a higher cost and longer wait. AFI Industrial Co., Ltd supports a wide range of surface treatments, so you can find the right balance between quality, appearance, and budget for your project.
Best Uses by Industry
When you select a surface finish for your machined parts, you want to match the treatment to your industry’s needs. Each industry faces unique challenges, so the right finish helps your parts last longer, perform better, and meet strict standards.
Here is a table that shows which surface finishes work best for some major industries and their typical applications:
| Industry | Recommended Surface Finishes | Applications |
|---|---|---|
| Aerospace | Anodizing, Electroless Nickel Plating, Chemical Conversion Coating (Alodine), Ceramic Coatings | Aluminum components, landing gear, airframes, avionics, engine elements |
| Automotive | Zinc/Nickel Plating, Powder Coating, Phosphating, Dacromet, Hard Chrome Plating | Fasteners, brake parts, body panels, engine parts, exterior hardware |
| Medical Devices | Electropolishing, Passivation, Titanium Anodizing, Electroless Nickel Plating | Surgical tools, implants, instruments, brass device components |
| Electronics | Gold/Silver Plating, Electroless Nickel Plating, Anti-Tarnish Treatment | Connectors, circuit boards, contacts, micro-components |
| Industrial Equipment | Hard Chrome Plating, Thermal Spraying, Black Oxide, Phosphating | Shafts, gears, rollers, hydraulic parts, tools |
Tip: Always check your industry’s standards before choosing a finish. Some industries, like aerospace and medical, require certifications for surface treatments.
You can see that aerospace parts often need anodizing for aluminum, electroless nickel plating for high-wear components, and chemical conversion coatings for corrosion resistance. Ceramic coatings help reduce friction and wear in engine elements.
In the automotive industry, you use zinc or nickel plating to protect fasteners and brake parts from rust. Powder coating and phosphating give body panels and hardware a durable, attractive finish. Dacromet and hard chrome plating help engine parts and exterior hardware resist corrosion and wear.
For medical devices, you want the smoothest, cleanest surfaces. Electropolishing removes micro-roughness from surgical tools and implants. Passivation boosts corrosion resistance for instruments exposed to fluids. Titanium anodizing improves wear resistance and biocompatibility for orthopedic implants. Electroless nickel plating extends the life of brass components in devices.
Electronics manufacturers rely on gold and silver plating for connectors and contacts because these metals conduct electricity well and resist tarnish. Electroless nickel plating and anti-tarnish treatments keep micro-components reliable and long-lasting.
Industrial equipment faces heavy use and tough environments. Hard chrome plating and thermal spraying protect shafts, gears, and rollers from wear. Black oxide and phosphating add mild corrosion resistance and improve the look of tools and hydraulic parts.
- Aerospace: Choose anodizing, electroless nickel plating, or ceramic coatings for critical parts.
- Automotive: Use zinc/nickel plating, powder coating, or Dacromet for rust and wear protection.
- Medical Devices: Select electropolishing, passivation, or titanium anodizing for clean, safe surfaces.
- Electronics: Pick gold or silver plating for top conductivity and anti-tarnish protection.
- Industrial Equipment: Go with hard chrome plating or thermal spraying for maximum durability.
By matching the right surface finish to your industry, you make sure your machined parts meet performance, safety, and quality standards. AFI Industrial Co., Ltd supports all these finishes, helping you get the best results for your application.
How to Choose the Right Surface Finish for Your Machined Parts

Material Compatibility
When you select a surface finish, you need to start with the material of your machined parts. Not every finishing process works with every material. Some finishes, like anodizing, only work on aluminum. Others, such as black oxide, are best for steel. If you try to use the wrong finish, you might damage your part or waste time and money.
Here are some important points to consider:
- Check the initial roughness of your part and the final finish you want.
- Think about the properties of your material and which finishes are compatible.
- Look at the size and shape of your part. Some finishes work better on simple shapes.
- Consider how many parts you need to finish and your cost targets.
You can follow these steps to make a smart choice:
- Identify your material so you know which finishes are possible.
- Decide what you want the finish to do—should it look good, resist rust, or both?
- Research that finishes work with your material.
- Think about how the finish will look.
- Check if the finish will hold up under wear or friction.
- Find out if the finish needs special care or cleaning.
- Test the finish on a sample part if you can.
- Think about the environmental impact of the process.
- Make sure the finish fits your budget.
Tip: Always match the finishing technique to your material for the best results.
Functional Requirements
You should also think about what your part needs to do. The function of your machined parts will guide your choice of finish. For example, if your part moves against other parts, you may want a finish that reduces friction. If your part faces moisture or chemicals, you need a finish that resists corrosion.
Ask yourself these questions:
- Does the part need to be hard or wear-resistant?
- Will it face high temperatures or chemicals?
- Should it conduct electricity or insulate against it?
- Does it need to look a certain way for your product?
Choose a finish that matches these needs. For example, hard chrome plating gives you a tough, wear-resistant surface. Electropolishing makes parts smooth and easy to clean. Powder coating adds color and protects against rust.
Application Environment of parts
The environment where your part will work matters a lot. Some finishes protect against rain, salt, or chemicals. Others are better for dry, indoor use. If your part will be outside, you need a finish that stands up to weather and UV light. If it will be near food or medicine, you need a finish that is safe and easy to clean.
Consider these factors:
- Will the part face water, salt, or chemicals?
- Is it exposed to sunlight or high heat?
- Does it need to meet health or safety rules?
- Will it be cleaned often or used in a sterile area?
Note: The right finish helps your part last longer and perform better in its real-world setting.
If you are not sure which finish to pick, talk to a machining expert. Companies like AFI Industrial Co., Ltd can help you choose the best surface finish for your needs.
Aesthetic Preferences
When you choose a surface finish for your machined parts, you should think about how you want your parts to look. The finish you select changes the color, shine, and texture of your part. Some finishes give you a bright, mirror-like surface. Others create a matte or satin look. If you want your parts to stand out, you can pick a finish that adds color or a unique pattern.
Here are some common aesthetic finishes and what they offer:
| Finish Type | Appearance | Best For |
|---|---|---|
| Polishing | High-gloss, mirror-like | Decorative, visible components |
| Bead Blasting | Matte, satin | Modern, clean look |
| Anodizing | Colored, smooth | Consumer electronics, jewelry |
| Black Oxide | Dark, non-reflective | Tools, fasteners, hardware |
| Brushed Finish | Linear texture, soft shine | Appliances, panels, handles |
Tip: If you want your product to look high-end, choose a finish like polishing or anodizing. For a rugged or industrial look, bead blasting or black oxide works well.
You should also consider how the finish matches your brand or product style. If you need a consistent look across many parts, talk to your machining provider about color matching and surface uniformity.
Budget and Production Scale
Your budget and the number of parts you need will affect your choice of surface finish. Some finishes cost more because they take longer or use expensive materials. Others are quick and affordable, making them better for large production runs.
- Low-cost, fast finishes: Bead blasting, passivation, and black oxide are usually inexpensive and work well for high-volume orders.
- Mid-range finishes: Anodizing and powder coating cost more but offer better protection and color options.
- Premium finishes: Electropolishing, hard chrome plating, and gold plating are more expensive. You might choose these for parts that need top performance or a luxury look.
| Finish Type | Cost Level | Best For |
|---|---|---|
| Bead Blasting | Low | Large batches |
| Anodizing | Medium | Mid-size production |
| Electropolishing | High | Small, high-value runs |
If you have a tight budget, pick a finish that gives you the protection you need without extra cost. For custom or small-batch parts, you can invest in a premium finish for added value.
Industry-Specific Recommendations
Each industry has its own needs for surface finishes. You should match your finish to your industry’s standards and the part’s job.
- Aerospace: Use anodizing or electroless nickel plating for corrosion resistance and weight savings.
- Automotive: Choose zinc plating, phosphating, or Dacromet for rust protection on fasteners and body parts.
- Medical Devices: Pick electropolishing or passivation for smooth, clean surfaces that resist bacteria.
- Electronics: Use gold or silver plating for connectors that need high conductivity.
- Industrial Equipment: Go with hard chrome plating or thermal spraying for parts that face heavy wear.
Note: Always check if your industry has rules or certifications for surface finishes. If you are unsure, ask a machining expert like AFI Industrial Co., Ltd for advice. They can help you pick a finish that meets your needs and industry standards.
By considering appearance, budget, and industry requirements, you can choose the right surface finish for your machined parts. This ensures your parts look good, last longer, and perform their best.
You have many surface treatment options for machined parts—at least eight main types, plus several specialized finishes. Each finish gives your part unique benefits. Always match the finish to your part’s material and job. If you feel unsure, talk with a machining expert. You get better results and longer-lasting parts when you choose the right surface treatment for your needs.
FAQ
You use a surface finish to protect your part, improve its appearance, and boost performance. The right finish helps prevent rust, wear, and damage.
Start by checking your part’s material and function. Think about the environment, appearance, and budget. Ask your machining provider for advice if you feel unsure.
No. Some finishes only work on certain materials. For example, anodizing works on aluminum, not steel. Always match the finish to your material.
Yes. Some finishes add a thin layer to your part. Always check the thickness of the finish and adjust your design if needed.
The lifespan depends on the finish type, part use, and environment. Protective finishes like hard chrome or powder coating can last for years with proper care.
Yes! You can combine finishes for extra protection or appearance. For example, you might plate a part, then add a passivation layer.
Bead blasting or passivation usually offers the best value for large orders. These finishes are quick, affordable, and provide good protection.
