Passivate stainless steel is a process where stainless steel parts are immersed in a chemical bath, typically containing either nitric acid or citric acid. If you’re wondering what passivation of stainless steel is, it’s a method that removes contaminants and impurities from the surface while forming a thin, protective chromium oxide layer. This layer is essential because it helps prevent rust and corrosion, significantly extending the lifespan of the parts.
The table below highlights the two most common acids used for the passivation of stainless steel:
| Acid Type | Effectiveness |
|---|---|
| Citric Acid | Environmentally friendly, less toxic, provides excellent rust protection, meets strict industry standards, and is ideal for sensitive applications. |
| Nitric Acid | Delivers outstanding rust protection, maintains a clean surface, passes rigorous salt spray tests, and forms a durable chromium oxide layer. |
In summary, if you’re asking what is passivation of stainless steel, it’s a reliable and proven technique to enhance the durability and performance of stainless steel components.
Key Takeaways
- Passivation takes away dirt and forms a strong chromium oxide layer on stainless steel. This stops rust and helps the part last longer.
- You can use citric acid if you want a safer and greener choice. Use nitric acid if you need stronger rust protection. Pick the one that fits your needs.
- Always clean stainless steel parts very well before passivation. This helps the protective layer stick and work better.
- Be careful when using acids. Wear gloves and goggles. Work where there is lots of fresh air.
- Wash and dry the parts fully after passivation. This keeps the protective layer safe and stops rust from forming.
- Keep passivated parts in a clean and dry place. Do not store them near things that can cause corrosion. This helps keep their protection strong.
- Make sure to label packages with clear handling and storage directions. This helps people take care of passivated parts the right way.
- Check and take care of the passivation process often. This helps you get good results and stops problems like contamination.
Table of Contents
What Is Passivation of Stainless Steel?
Passivation Procedure Overview
Passivation helps protect metal parts from rust and damage. Chemical passivation is a treatment that takes away dirt and other bad stuff from stainless steel. This process uses acids like nitric or citric acid to clean the surface and get rid of free iron. After cleaning, the chromium in the steel meets air and makes a thin, invisible layer called chromium oxide. This layer is not rust. It works like a shield to stop corrosion and keeps your parts looking new.
- Chemical passivation takes away iron and other bad things from the surface.
- The process leaves a surface with more chromium.
- Chromium mixes with oxygen in the air and forms a protective chromium oxide layer.
- This layer is not the same as rust and helps stop corrosion.
Chemical passivation is more than just cleaning. It makes a surface that fights rust and damage. The process helps stainless steel stay strong against corrosion. It also removes tiny bits that could start rust, so your parts last longer.
Why Passivate Stainless Steel Parts?
You might ask why you need to passivate stainless steel parts if they already seem strong. The answer is in how these parts are made. Cutting, grinding, and turning can put free iron on the surface. These actions can also mess up the chromium oxide layer. If you skip chemical passivation, your parts might lose their power to fight rust, reduce the corrosion resistance of stainless steel, and start to rust.
Let’s see how the passivating treatment and the untreated parts compare:
| Feature | Untreated Parts | Passivated Parts |
|---|---|---|
| Corrosion Resistance | Can rust and change color | Stays clean and free from rust |
| Surface Cleanliness | Might have dirt and leftovers | Much cleaner and free from bad stuff |
| Durability and Longevity | Gets weaker over time | Lasts longer and stays strong |
Passivation is very important for parts made by machines. You want your parts to work well and last a long time. Chemical passivation helps your parts keep their strength and appearance, even in hard places.
Tip: Always use chemical passivation after machining to bring back the full power to fight rust in your stainless steel parts.
When you learn about passivation, you see it is not just cleaning. It is a key step that protects your parts, stops rust, and helps your equipment work well.
Supplies and Safety
Items needed for stainless steel passivation

You need certain supplies to do passivation safely. First, gather these items:
- Stainless steel parts that need passivation
- Passivation acid, either nitric acid or citric acid
- Clean containers that are not made of metal
- Distilled or deionized water for rinsing
- Tools to measure the right amount of acid
- Plastic or glass rods for stirring
- A thermometer to check the bath temperature
- Timer to keep track of how long parts soak
- Drying racks or clean towels for drying parts
Use good quality chemicals and containers for the best results. This is very important when working with machine-made parts. Good supplies help stop contamination and make sure the finish looks the same.
Tip: Make sure your containers and tools are clean. They should not have rust, oil, or dirt before you start.
Safety Precautions
You must be careful when using acids and chemicals. Always read the labels and follow the directions. Do not mix acids with anything else unless the instructions say it is okay. Work in a place with fresh air so you do not breathe in fumes. Keep clean water close by in case you spill or splash.
Keep all chemicals in their original bottles. Store them away from kids and pets. When you finish, throw away used acids and rinse water the right way. Never pour chemicals down the drain unless you know it is safe.
Note: If acid gets on your skin or clothes, wash with lots of water right away. Get medical help if you need it.
Personal Protective Equipment
You must wear the right gear every time you use chemicals for passivation. Safety rules say you need:
- Gloves to keep your hands safe from acids
- Eye protection, like goggles or a face shield
Wear a long-sleeved lab coat or apron and closed-toe shoes, too. This gear keeps your skin and eyes safe from splashes and fumes. Never skip these steps, even if you use citric acid, which is less strong than nitric acid.
Remember: Wearing the right safety gear is the best way to stop accidents during passivation.
If you follow these rules, your workspace will be safer. You will also help your passivation work turn out well. Using the right supplies and safety steps protects you and your stainless steel parts.
Cleaning and Preparation
Cleaning Stainless Steel Parts

You need to clean your stainless steel parts very well before passivation. Cleaning is not just a simple step. It is very important for good results. If you skip or rush cleaning, you might leave behind things that can hurt the protective layer.
After machining, your parts can have different kinds of dirt. These can come from the shop or from making the parts. The most common problems are:
- Iron pieces left from cutting or grinding. These can make your parts rust.
- Grease and coolant from machining. These can stop the acid from touching the metal.
- Fats or oils that mix with acids. These can make bubbles during passivation and cause a weak protective layer.
To help your stainless steel parts last longer, you must get rid of all these things. Pay extra attention to parts made by machines. Tiny metal bits or oil can hide in small spaces. Use a soft brush or a cloth that does not leave lint to clean these spots. For tricky shapes, you can use ultrasonic cleaning. This uses sound waves in water to shake off dirt and oil from hard places.
Tip: Always check your parts under bright light before moving on. If you see any dirt, clean them again.
Degreasing and Rinsing
After cleaning, you need to remove any leftover oils or fats. This is called degreasing. It helps the passivation work better. Follow these steps for the best results:
- Put your parts in a degreasing bath. Use a 5% sodium hydroxide solution heated to 160°F to 180°F (71°C to 82°C). Soak for 30 minutes.
- Rinse the parts well with clean water. Make sure no degreaser is left.
- Put the parts in a 20% nitric acid solution with sodium dichromate at 120°F to 140°F (49°C to 60°C) for 30 minutes. This helps remove tough dirt.
- Rinse the parts again with water.
- Put the parts back in the sodium hydroxide bath for 30 more minutes.
- Rinse the parts one last time and dry them fully.
These steps make sure your stainless steel parts have no grease, oil, or dirt. Clean parts let the passivation acid touch the metal and make a strong, even layer.
Note: Always rinse between steps. If you leave chemicals on, they can react with the passivation acid and make it weaker.
By cleaning and degreasing your parts this way, you help the passivation process work well. Your stainless steel parts will be ready for a strong, rust-resistant finish.
Passivation Process Steps
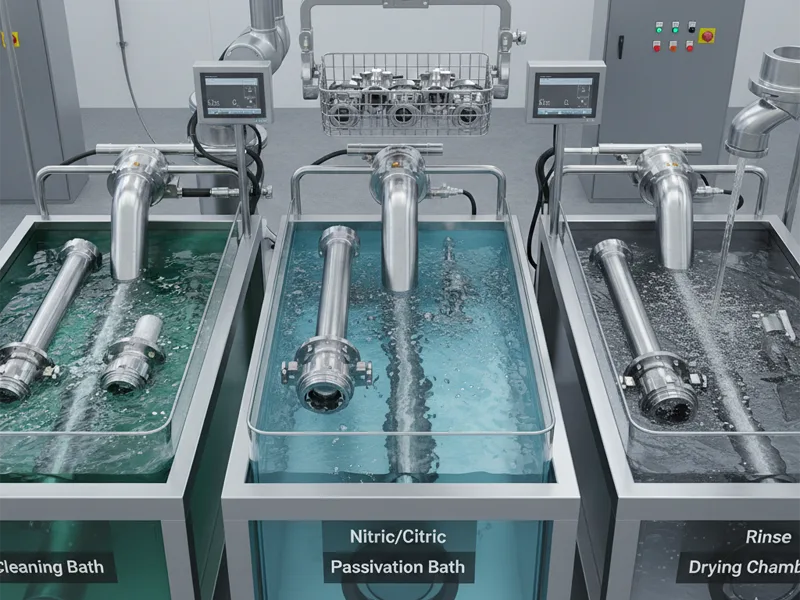
Acid Bath Options (Nitric or Citric)

There are two main acid baths you can use for passivation. These are nitric acid and citric acid. Each one has its own good points. Your choice depends on what you need, how safe you want to be, and the environment.
| Acid Type | Concentration | Temperature Range (°F) | Time (Minutes) |
|---|---|---|---|
| Nitric Acid 1 | 20-25% by volume | 120-130 | 20 |
| Nitric Acid 2 | 20-45% by volume | 70-90 | 30 |
| Nitric Acid 3 | 20-25% by volume | 120-140 | 20 |
| Nitric Acid 4 | 45-55% by volume | 120-130 | 30 |
| Citric Acid 1 | 4-10% by weight | 140-160 | 4 |
| Citric Acid 2 | 4-10% by weight | 120-140 | 10 |
| Citric Acid 3 | 4-10% by weight | 70-120 | 20 |

Nitric acid baths work fast and make a strong layer. You may have to change gaskets more often because nitric acid is harsh. If you see rust, you might need a stronger acid. Citric acid baths are safer and break down naturally. Many people use citric acid for parts that need to be very clean.
Tip: For parts made by machines, always check the acid bath’s strength and heat. Make sure it matches your part’s needs. This helps stop damage or changes in size.
Immersion and Timing
You must soak your stainless steel parts in the acid bath for a set time. The passivation works best if you use the right time and heat for your acid.
Here are the steps for passivation:
- Wash the parts with water and soap.
- Rinse them well with clean water.
- Put the parts in the acid bath:
- For nitric acid: Soak for 20–30 minutes at the right heat and strength.
- For citric acid: Soak for 4–20 minutes, based on the heat and strength.
- Rinse the parts again with clean water.
- Dry the parts all the way.
If you soak the parts longer, the protective layer gets better. A longer soak makes the layer thicker and stronger. The layer also gets denser, so your parts fight rust better.
Note: For parts with tight sizes, do not soak too long. Too much time can change the size. Always watch the process closely.
Rinsing and Drying
After the acid bath, you need to rinse and dry your parts well. This step stops dirt and makes sure the passivation works.
| Step | Best Practice | Description |
|---|---|---|
| 1 | Use clean water | Pick water with no chlorides. Distilled or deionized water is best. |
| 2 | Rinse thoroughly | Use two rinse baths. The first takes away most acid; the second makes sure all is gone. |
| 3 | Thoroughly dry | Dry parts fully before you touch or test them. This stops dirt from getting on them. |
Always use clean water with no chlorides for rinsing. Two rinse baths work better than just one. The first bath takes away most acid. The second bath makes sure nothing is left. Drying is very important too. If you leave parts wet, they can get dirty or have water spots. This can hurt the protective layer.
Tip: For very exact parts, use filtered air or a clean oven to dry. This keeps dust and dirt away while drying.
If you follow these passivation steps, your stainless steel parts will get a strong and even protective layer. Careful work at each step helps your parts stay safe from rust and last a long time.
Precautions after passivation
Rinse Thoroughly and Dry Thoroughly

After you finish passivation, rinsing and drying are very important. You need to rinse each part with clean, distilled, or deionized water. This step washes away any acid or chemical left on the surface. If you leave even a little acid, it can hurt the protective layer and cause rust later.
It is best to use two rinse baths. The first bath takes off most of the acid. The second bath makes sure nothing is left behind. Always use water without chlorides. Chlorides can make small holes in stainless steel.
Dry your parts all the way before you touch or store them. Use filtered air, a clean oven, or towels that do not leave lint. If you leave parts wet, water spots or stains can show up. These marks can make the protective film weak and let rust start.
Tip: Do not stack wet parts together. Water between parts can cause rust, even on new passivated stainless steel.
Allow to Form a Passive Film
After rinsing and drying, let your parts sit in clean air. This gives time for the passive film to form. The chromium in stainless steel reacts with oxygen and makes a thin, invisible layer. This layer helps stainless steel fight rust.
Do not touch the parts with your bare hands during this time. Oil and sweat from your skin can leave marks and stop the film from forming right. Put the parts on clean racks or trays that are not metal. Let them sit for at least 24 hours so the layer gets strong.
Note: Do not hurry this step. The passive film needs time to get strong and even. If you use the parts too soon, you might damage the protective layer.
Avoid Contact With Contaminants
After passivation, your stainless steel parts are clean and protected. But they can still get dirty or scratched. You need to keep them away from things that can hurt the passive film.
Common things that can cause problems are:
- Free iron from carbon steel tools, grinding dust, or fixtures.
- Scratches or cuts from using carbon steel chains, forklift tines, or workbenches with nails.
- Clamps or fixtures that scratch the surface and create places where rust can start.
- Contact with harsh chemicals, acids, or water.
To keep your parts safe:
- Only use stainless steel or plastic tools and racks.
- Store parts in a dry place with good air.
- Do not stack or drag parts on rough surfaces.
- Wear clean gloves so you do not get oil or dirt on the parts.
Remember: Even a small scratch or iron bit can start rust. Handle your passivated parts carefully to keep them strong and working well.
Handle and Store With Care
After you finish passivating your stainless steel parts, you need to handle and store them with extra care. The protective layer you just created is thin but strong. If you treat your parts the wrong way, you can damage this layer and lose the benefits of passivation.
You should always use clean gloves when you touch passivated parts. Your hands have oils and sweat that can leave marks or even start corrosion. Pick up each part gently. Never drag or drop them on hard surfaces. Scratches or dents can break the protective film and create spots where rust can start.
When you move passivated parts, use soft trays or plastic bins. Avoid metal containers that might scratch the surface. If you need to stack parts, place a clean, soft cloth or plastic sheet between each one. This keeps them from rubbing against each other.
Tip: Always check your storage area before putting away passivated parts. The space should be dry, clean, and free from dust or chemicals. Moisture and chemicals in the air can attack the protective layer and cause problems later.
You should also keep your parts away from corrosive agents. Do not store them near acids, cleaning chemicals, or salt. Even fumes from these substances can damage the passivation layer. If you work in a shop with lots of different materials, label your storage bins clearly. This helps everyone know which bins hold passivated stainless steel.
Here are some best practices for handling and storage:
- Use only stainless steel or plastic tools and racks to move parts.
- Avoid contact with corrosive agents that can damage the passivation layer.
- Handle parts with care to prevent physical mishandling that could remove the oxide layer.
- Store passivated parts in containers that prevent contact with foreign objects.
- Keep storage areas dry and free from dust, moisture, and chemicals.
- Separate parts with soft materials to prevent scratches.
If you follow these steps, you will help your stainless steel parts stay clean and rust-free. Careful handling and smart storage protect your investment and keep your parts ready for use. Remember, the way you treat your passivated parts after processing is just as important as the passivation itself.
Packaging details
Selection of Packaging Materials

Picking the right packaging is the first thing you should do. This helps keep your passivated stainless steel parts safe. You want to stop moisture, dust, and rust from getting to your parts. Good packaging makes a wall that blocks out bad things.
- Vapor Corrosion Inhibitors (VCI): These materials let out special chemicals. The chemicals make a shield on the metal. This shield keeps water away and stops rust. You can get VCI in paper, bags, or plastic film. Use them to wrap or line your boxes.
- Desiccants: These are small packs that soak up water from the air. Less water in the air means less rust. Put desiccants inside the bag or box with your parts for extra safety.
- Protective Films: Some films, like ARMOR VCI SEA Film™, give strong protection. These films have many layers. They work well in tough places and keep your parts safe for a long time.
Tip: Pick your packaging based on how long you will store or ship your parts. If you need to store parts for a long time or in a tough place, use both VCI and desiccants for the best safety.
Isolation and Protection
You need to keep your passivated stainless steel parts away from things that can hurt them. Clean parts are very important. Before you pack, make sure your parts have no grease, oil, or dirt. Any dirt left can hurt the passivation layer and make rust start.
After passivation, rinse your parts well to get rid of chemicals. Dry them all the way so no water spots or stains are left. Water left on the parts can cause rust, even after passivation. Always use clean gloves when you touch the parts. This stops fingerprints or oil from getting on the surface.
When you pack, put soft, gentle materials between each part. Foam sheets, bubble wrap, or plastic dividers work well. These keep your parts from rubbing together. If you stack parts, put a soft layer between each one. This stops scratches and keeps the protective oxide layer safe.
Remember: Keeping your parts apart and protected helps them stay new and work well, even after a long time in storage or shipping.
External Labeling
Clear labels on your packages help everyone handle your passivated stainless steel parts the right way. Use waterproof labels that do not smear or fall off. Write or print these things on each package:
- Part name and number
- Date of passivation
- Batch or lot number
- Handling instructions (like “Handle with gloves” or “Keep dry”)
- Storage needs (for example, “Store in a dry, cool place”)
Good labels help stop mistakes. Workers know how to move and store the parts without hurting the protective layer. Labels also help you keep track of batches and check quality.
Note: Good labels are part of a strong quality plan. They help you follow each part from making it to delivery, so your process is better.
Storage Environment
You need to watch the storage environment for passivated stainless steel parts. The right place keeps your parts safe from rust and stains. Bad storage can ruin your parts, even with good packaging.
Key things for a good storage environment:
- Humidity Control:
Keep the storage area dry at all times. Too much humidity can cause water droplets on metal. Water can hurt the protective oxide layer and cause rust. Use dehumidifiers or air conditioning if it is humid. Try to keep humidity under 50%. - Temperature Stability:
Store your parts where the temperature stays steady. Big temperature changes can make water form on metal. Going from cold to warm quickly can cause condensation. Keep the temperature between 60°F and 80°F (16°C to 27°C). - Cleanliness:
Dust and dirt can land on your parts and harm the passivation layer. Clean the storage area often. Sweep the floors and wipe the shelves. Use closed containers or cabinets to keep out dust. - Air Quality:
Do not store parts near chemicals or cleaning agents. Fumes from these things can damage the protective film. Good airflow helps get rid of bad vapors in the air. - Separation from Corrosive Materials:
Never put passivated stainless steel near carbon steel or salt. These can bring in things that cause rust. Use racks or shelves made from stainless steel or plastic.
Tip: Put a humidity card in storage bins or cabinets. The card changes color if humidity goes up, so you can fix it fast.
Sample Storage Environment Checklist:
| Factor | Best Practice | Why It Matters |
|---|---|---|
| Humidity | Below 50% | Stops condensation and rust |
| Temperature | 60–80°F (16–27°C) | Prevents moisture from forming |
| Cleanliness | Regular cleaning | Keeps dust and dirt off parts |
| Air Quality | Good ventilation, no fumes | Protects the oxide layer |
| Material Contact | No contact with corrosives | Avoids cross-contamination |
Check your storage area every week. Look for leaks, puddles, or mold. Fix any problems right away. If you store parts for a long time, check them often for spots or stains.
Remember: The right storage is just as important as passivation. Good storage keeps your stainless steel parts ready and looking new.
Troubleshooting and Best Practices
Common Passivation Issues
You might run into problems when you passivate stainless steel. Knowing what can go wrong helps you fix mistakes and keep your parts from rusting.
| Issue | Resolution |
|---|---|
| Heat treating in a reducing atmosphere | Avoid such conditions during passivation |
| Welding introducing contaminants | Implement strict controls during assembly and welding processes |
| Need for regular sodium dichromate treatments | Maintain passivation layer integrity |
| Improper cleaning | Ensure thorough cleaning before passivation |
| Contaminated passivation solution | Regularly check and replace passivation bath chemicals |
Some mistakes happen often:
- Heat treating in the wrong air can mess up the chrome oxide layer.
- Machining or welding can bring in dirt or other bad stuff.
- Grinding or polishing the wrong way can leave things stuck on the surface.
- Not cleaning well enough can make the passivation bath dirty. This can let in chlorides, which might cause a “flash attack.” That can turn your stainless steel black or make tiny pits.
Tip: Always look at your parts for dirt or stains before you start passivation. If you see any, clean them again.
Tips for Consistent R
To get good results every time, you need to follow smart steps, especially for parts made by machines.
| Best Practice | Description |
|---|---|
| Meticulous Cleaning | Use a specialist alkaline cleaner or organic solvent to eliminate oil contaminants completely. |
| Critical Descaling and Damage Removal | Mechanically or chemically remove heat discoloration and oxide scales to expose a pure surface. |
| Control Surface Roughness | Maintain smooth surfaces to prevent corrosion microcells and promote a high-density passive coating. |
| Use High-Purity Water | Employ deionized water with low chloride ion concentrations to avoid secondary contamination. |
You should also:
- Write down all your passivation steps and settings. This helps you do the same thing next time.
- Check the acid strength and look for dirt in your passivation bath often.
- Teach your team so everyone knows what to do.
- Pick materials that make a protective oxide layer, like stainless steel.
- Make parts with simple shapes so cleaning and rinsing are easier.
- Choose smooth finishes to help passivation work better.
Note: For quality checks, use tests like salt spray, humidity, or copper sulfate. These tests show if your passivation process really stops rust.
If you follow these tips and steps, you can stop common problems and get strong, rust-free stainless steel parts every time.
To keep stainless steel parts from rusting, you need to do a few important things. First, clean every surface well so there is no grease or dirt left. Next, put the parts in the right acid bath for your job. After that, rinse and dry the parts all the way before you touch or store them.
Make sure you wear safety gear and check your work to see if it turned out right.
If you ask experts for help, you can make sure you follow rules like ASTM A967 and AMS 2700. Doing things this way gives you good results for a long time. Your parts will not rust as fast, will last longer, and will meet important rules.
| Benefit | Description |
|---|---|
| Enhanced Corrosion Resistance | Makes parts better at fighting rust by taking away bad stuff and making a strong oxide layer. |
| Extended Lifespan | Helps parts last longer, so you do not have to fix or replace them as much. |
| Improved Cleanliness | Gets rid of dirt on the surface, so parts are cleaner and easier to keep nice. |
| Regulatory Compliance | Helps you follow safety and health rules in jobs like making medicine. |
| Cost-effectiveness | Saves money over time because you spend less on fixing and get better use from your parts. |
FAQ
Passivation takes away dirt from the surface. It also makes a thin chromium oxide layer. This layer helps stop rust and corrosion. Your parts will last longer, even in hard places.
You can passivate small parts at home if you are careful. Always wear gloves and goggles. Work where there is fresh air. For big or important parts, let experts do it.
You can test your parts with water or copper sulfate. If the water spreads out smoothly and no copper shows up, it worked. For the best check, use tests that experts use.
Passivation does not change how big or small your parts are. It only works on the outside. If you use the right time and heat, your parts stay the same.
Passivate after you cut, weld, or see rust. If your parts are in tough places, do passivation often. Make it part of your care plan.
Austenitic and martensitic stainless steels get the most help. These types can get free iron when you make them. Passivation brings back their power to fight rust.
Tip: Always rinse with distilled or deionized water. Tap water has things that can make rust or stains on your parts.
