In the world of custom metal manufacturing, whether it is CNC machining, die casting, or metal stamping, precision is not merely a goal; it is the baseline requirement. A sound quality management system is the fundamental guarantee of quality for metal parts manufacturers.
Quality is not achieved through inspection alone; it must be manufactured into the part at every stage, from the raw material composition to the final surface finish. This guide outlines precisely how a top-tier manufacturer ensures integrity, compliance, and precision throughout the entire production lifecycle.
For every metal product we manufacture for our customers, we adhere to international quality standards such as ISO 9001 (ensuring stable production), ISO 14001 (environmental protection), and IATF 16949 (automotive parts). With a complete quality management system for metal parts manufacturing, we can monitor every step from start to finish and utilize machinery to achieve precise results.
| Standard | Description |
|---|---|
| ISO 9001 | This rule is for quality systems in companies that make things or provide services for planes, space, and defense. These jobs can also use metal parts. |
| ISO 14001 | This rule gives steps for planning, doing, checking, and keeping a company’s plan for the environment. It is important for quality in making things. |
| IATF 16949 | This is a world rule for quality systems in car making. It can also be used when making metal parts. |
| ISO 13485 | This rule is for groups that make medical tools. It shows how important quality is in special jobs. |
| AS9100D | This rule is for quality systems in companies that make things or give services for planes, space, and defense. These jobs can also use metal parts. |
Table of Contents
Quality Standards & Documentation
A robust QMS is built on a foundation of internationally recognized standards and meticulous documentation. Without a defined framework, consistency is impossible.

Defining Requirements & ISO Compliance
Industry & Customer Specs
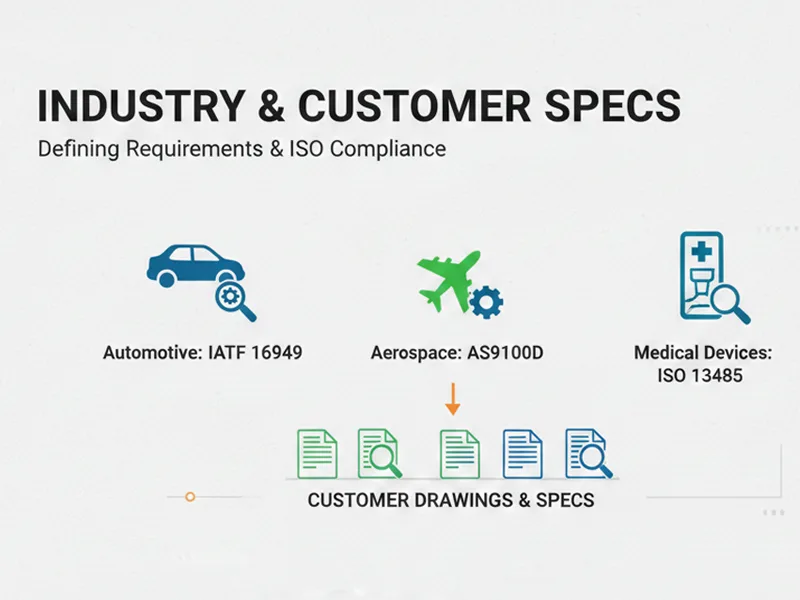
First, we need to know what our industry and customers want. Every field has its own rules. For example, car, plane, and medical device makers use different ISO standards. We look at customer drawings and specs closely. Every project begins with a “Contract Review.” This is a technical audit where engineering drawings (GD&T) are analyzed against industry standards such as ASTM, DIN, or JIS. We identify critical-to-quality (CTQ) dimensions and ensure that specific industry requirements are fully integrated into the project scope. If we make metal parts for cars, we follow IATF 16949. If we make parts for planes, we use AS9100D. These standards help us follow the law and keep people safe.
| ISO Standard | Core Requirements |
|---|---|
| ISO 9001 | Customer focus, leadership commitment, process approach, risk-based thinking, continuous improvement, performance evaluation. |
| ISO 14001 | Environmental policy, legal compliance, environmental objectives, lifecycle perspective, operational controls, monitoring, and reporting. |
| ISO 45001 | Hazard identification, worker participation, compliance with legal requirements, emergency preparedness, incident investigation, and continuous monitoring. |
| ISO 50001 | Energy policy, energy review, baseline and performance indicators, energy objectives, operational controls, and continuous improvement. |
| ISO 3834 | Competent personnel, inspection and testing, equipment maintenance, documentation, and welding procedures. |
| ISO 1090 | Structural design compliance, factory production control, traceability, inspection and testing, documentation. |
Each standard cares about something special. We need to make sure each product we produce matches these rules.
Internal Benchmarks
The company also needs to establish its own internal rules. We set quality objectives. We stipulate that each batch of goods must pass a dimensional inspection before moving to the next stage. We use checklists and records for tracking purposes. When we set these objectives, our team knows what constitutes an “acceptable” standard.
QMS Documentation & AQL Criteria
SOPs & Checklists

We utilize Standard Operating Procedures (SOPs) for every machine interaction. These are not general guidelines but specific, step-by-step instructions for setup, operation, and maintenance. Operators utilize digital checklists before a machine starts running, ensuring that the correct fixtures, coolants, and tooling are in place.
Tip: Ask your team to help make these documents. They know the real steps and can find missing parts.
| Step | Description |
|---|---|
| 1 | Write down what your company needs and what quality rules you must follow based on world standards. |
| 2 | Make a plan for how your company will keep products and services good. |
| 3 | Get important workers to help make and use quality rules so everyone understands and follows them. |
| 4 | Check your quality system often to make sure you follow the rules and find ways to get better. |
AQL Tables for Inspection

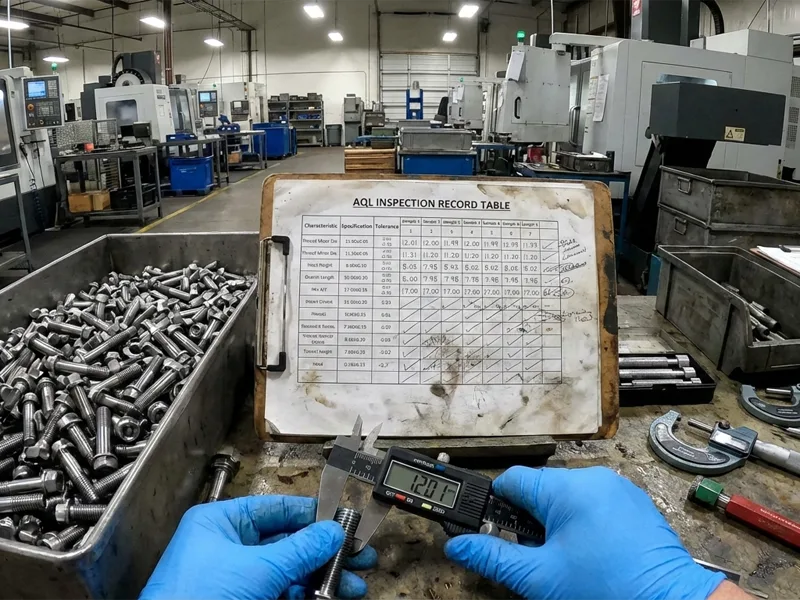
While critical aerospace components may require 100% inspection, high-volume production typically relies on statistical sampling. We adhere to ISO 2859-1 standards to determine Acceptable Quality Limits (AQL). This dictates the sample size based on the total lot size and the required stringency.
Core Logic of AQL Sampling Plans
AQL does not demand “zero defects.” Instead, it statistically permits a minimal proportion of nonconforming items within a lot to balance inspection costs and risk control.
Three Key Parameters
Lot Size: The total number of parts produced in this batch.
Inspection Level: Typically uses “General Inspection Level II.” For extremely high-value products or those requiring destructive testing, “Special Inspection Level S-1/2/3/4” is used.
AQL Values: Tolerance levels for different defect types:
Critical Defects: AQL 0.01 or 0 (generally not permitted, e.g., severe safety hazards).
Major Defects: AQL 1.0 or 1.5 (affecting functionality, assembly, or lifespan).
Minor Defects: AQL 2.5 or 4.0 (cosmetic scratches, minor oxidation, etc., that do not affect functionality).
| Batch (Lot Size) | Special Inspection Level (S-1) | General inspection level (I) | General inspection level (II) | General inspection level(III) |
| 2 ~ 8 | A | A | A | B |
| 9 ~ 15 | A | A | B | C |
| 16 ~ 25 | A | B | C | D |
| 26 ~ 50 | A | C | D | E |
| 51 ~ 90 | B | C | E | F |
| 91 ~ 150 | B | D | F | G |
| 151 ~ 280 | B | E | G | H |
| 281 ~ 500 | B | F | H | J |
| 501 ~ 1,200 | C | G | J | K |
| 1,201 ~ 3,200 | C | H | L | M |
| 3,201 ~ 10,000 | C | J | M | N |
| 10,001 ~ 35,000 | C | K | N | P |
Ac (Accept): Number of accepted items (if the number of defective items ≤ Ac, the entire batch is acceptable).
Re (Reject): Number of rejected items (if the number of defective items ≥ Re, the entire batch is unacceptable).
| Character code | Sample size | AQL 0.65 (Ac/Re) | AQL 1.0 (Ac/Re) | AQL 1.5 (Ac/Re) | AQL 2.5 (Ac/Re) | AQL 4.0 (Ac/Re) |
| A | 2 | 0 / 1 | 0 / 1 | 0 / 1 | 0 / 1 | 0 / 1 |
| B | 3 | 0 / 1 | 0 / 1 | 0 / 1 | 0 / 1 | 0 / 1 |
| C | 5 | 0 / 1 | 0 / 1 | 0 / 1 | 0 / 1 | 0 / 1 |
| D | 8 | 0 / 1 | 0 / 1 | 0 / 1 | 0 / 1 | 1 / 2 |
| E | 13 | 0 / 1 | 0 / 1 | 0 / 1 | 1 / 2 | 1 / 2 |
| F | 20 | 0 / 1 | 0 / 1 | 1 / 2 | 1 / 2 | 2 / 3 |
| G | 32 | 0 / 1 | 1 / 2 | 1 / 2 | 2 / 3 | 3 / 4 |
| H | 50 | 1 / 2 | 1 / 2 | 2 / 3 | 3 / 4 | 5 / 6 |
| J | 80 | 1 / 2 | 2 / 3 | 3 / 4 | 5 / 6 | 7 / 8 |
| K | 125 | 2 / 3 | 3 / 4 | 5 / 6 | 7 / 8 | 10 / 11 |
| L | 200 | 3 / 4 | 5 / 6 | 7 / 8 | 10 / 11 | 14 / 15 |
| M | 315 | 5 / 6 | 7 / 8 | 10 / 11 | 14 / 15 | 21 / 22 |
- AQL tells you how many to check and how many mistakes are allowed.
- You can see if the quality is good without checking every part.
- You save time and money by checking only some parts.
- AQL gives clear rules for passing or failing a shipment.
Note: Always keep AQL tables and check records. Auditors and customers might want to see them.
Complete Quality Management for Metal Parts Manufacturing
We make a strong plan to make sure quality is good at every step. Complete Quality Management for Metal Parts Manufacturing checks everything from the start to the end. We look at raw materials and do a final check before shipping. Machining is very important for making parts exact and dependable.
Raw Material Quality Assurance

Supplier Evaluation & Traceability
We select suppliers who consistently provide high-quality raw materials.
- Review the supplier’s records to ensure the traceability of the raw materials.
- Request a Material Test Report (MTR) for each batch of raw materials; the report must include the heat number.
- Every label on the raw materials must clearly indicate the heat number. You must verify that the labels, material test reports, and packing lists match.
We can use different audits to check suppliers:
| Audit Type | What It Covers | Recommended For |
|---|---|---|
| On-site audit | Physical review of supplier documentation, sourcing, and QA | High-risk or large orders |
| Virtual audit | Remote review via video or document sharing | Moderate orders or tight budgets |
| Third-party audit | Independent verification | Aerospace, defense, regulated sectors |
Tip: We will maintain records of supplier audits and traceability checks. This will help in quickly resolving any issues that may arise in the future.
Incoming Inspection with AQL
Before material reaches the shop floor, it undergoes Incoming Quality Control (IQC). We verify the dimensional accuracy of bar stock and, crucially, verify chemical composition using X-Ray Fluorescence (XRF) analyzers or OES (Optical Emission Spectroscopy). This prevents the costly error of machining the wrong alloy.
Follow these steps for checking new materials:
- Make sure materials match the specs with papers and by looking.
- Mark and write down any bad materials.
- Only let good materials go into production.
| Method | Description |
|---|---|
| Material Inspections | Check materials when they arrive, look at packing slips, and Certificates of Conformance. |
| Equipment Inspections | Set and check tools before using them. |
| Non-destructive Testing (NDT) | Use inside checks or pressure tests to find problems without hurting the material. |
In-Process Control with Machining
Operator Training & Certification
Our machinists are not just button pushers; they are certified technicians. They are trained in GD&T (Geometric Dimensioning and Tolerancing) and are authorized to stop the production line immediately if a deviation is detected.
| Training Topic | Impact on Machining Quality |
|---|---|
| Safety Practices | Fewer accidents at work |
| Machine Setup and Operation | Makes machining more exact |
| Blueprint Reading | Helps workers understand what to make |
- Certification proves workers have the right skills.
- Training helps everyone follow the rules.
- Good training helps you reach your quality goals.
Process Monitoring & Data Collection
We implement “First Article Inspection” (FAI) for every production run. The machine does not run continuously until the first part is verified and signed off. During the run, we utilize “Patrol Inspection,” where QC inspectors roam the floor checking parts at set intervals to catch tool wear or thermal drift.
We teach workers how to use quality control systems. Let them write down every step, from setting up tools to checking finished parts.
Note: Good data helps us find out why problems happen and fix them.
Final Product Testing & Inspection
Visual, Dimensional, Functional Tests
- Dimensional: Using CMM (Coordinate Measuring Machines) for complex geometries and video measuring systems for micro-parts.
- Visual: Checking for burrs, scratches, or finish inconsistencies under magnification.
- Functional: Go/No-Go gauges for threads and fit-checks with mating parts.
We pick the right test for the part and what the customer wants.
Documentation & Traceability
We keep good records for every batch.
1. Use traceability systems with labels and tracking software.
2. Check your records with audits.
3. Keep audit trails and follow rules for keeping documents.
We make sure every part can be traced back to its material and batch. This helps us answer customer questions and pass audits.
Tip: Good records and traceability protect our business and help customers trust us.
Complete Quality Management for Metal Parts Manufacturing gives us a clear way from raw material to finished part. We use machining, checks, and records to make sure we always get good results.
Leveraging Technology & Machining for Quality
Today, making metal parts uses technology to keep the quality high. Digital tools and advanced machining help control each step. You can check from raw materials to finished parts. This way supports Complete Quality Management for Metal Parts Manufacturing. It helps us give reliable results.
Digital QMS & Automation
Integration with ERP/MES
Our Quality Management System is not an isolated silo; it is integrated with our Enterprise Resource Planning (ERP) and Manufacturing Execution Systems (MES). If a lot fails an inspection step in the software, the system automatically locks the inventory, preventing it from being shipped.
- Real-time visibility helps us track orders and production.
- Better quality management means we watch quality and keep records.
- Fast defect finding lets us fix problems quickly.
- Demand forecasting matches production with what is needed.
- Customer service gets better because we can trace problems.
Automated Inspection Tools

Automation changes how we check parts. We use sensors, cameras, and smart machines to inspect parts fast. Automated systems work all day and check big batches. Machines do not get tired and lower human mistakes, and find defects early.
- Machines inspect faster than people.
- Sensors and imaging give exact measurements.
- Real-time monitoring helps us spot problems and adjust quickly.
- Automation cuts labor costs and waste.
- Tools like ATOS ScanBox and Creaform Metrology Suite use 3D scanning for better measurements.
Statistical Process Control (SPC)
Real-Time Monitoring
We use SPC to watch machining in real time, collect data from machines, and conduct inspections. Software helps us see trends or problems. We act fast if something goes wrong, check things like diameter, length, hardness, and coating thickness.
- Continuous checks help us make better choices.
- Machine studies at the start help us find ways to improve.
- Real-time monitoring let’s team fix issues quickly.
- SPC lowers rejections, saves money, and improves traceability.
SPC Charts & Tables
We utilize Control Charts (X-bar and R charts) to visualize process stability.
- Cp and Cpk indices: These metrics tell us if the process is capable of meeting tolerances.
- Trend Analysis: If the data shows a drift toward the upper tolerance limit (even if parts are still passing), we stop and adjust. This is predictive maintenance for quality.
| Chart Type | Description |
|---|---|
| P Chart | Tracks the share of bad items in a sample. Good for watching defects. |
| NP Chart | Counts the number of bad items in a sample. Useful for different sample sizes. |
| C Chart | Watches the number of defects per unit, like scratches or mistakes. |
| U Chart | Shows the average number of defects per unit or product. |
Note: Using digital QMS, automation, and SPC together gives you a strong quality system. We can find problems early, cut waste, and keep machining steady. This supports Complete Quality Management for Metal Parts Manufacturing and helps us meet customer needs every time.
Building a Quality-Driven Culture
Tools and documents are useless without a workforce dedicated to excellence.
Leadership & Employee Engagement

Setting Expectations
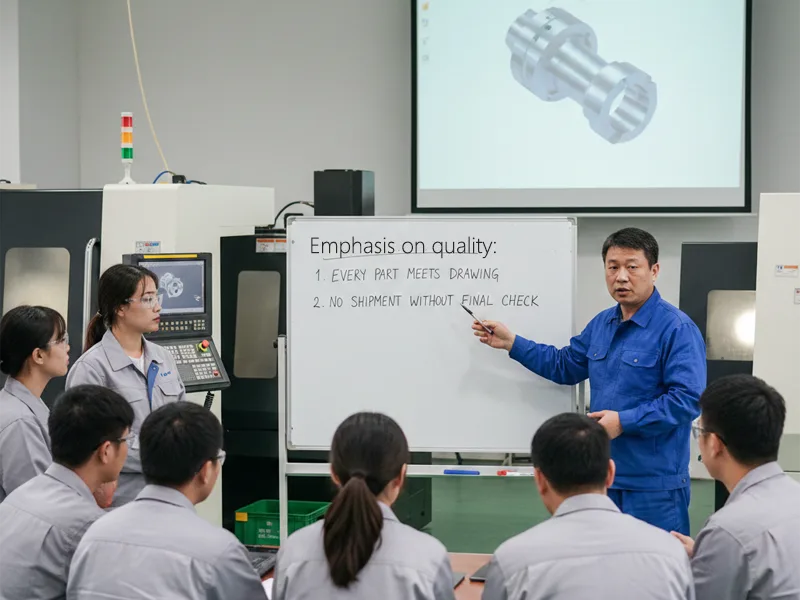
What are the quality standards for each task? Use simple goals, like “every part must meet the drawing” or “no shipment leaves without a final check.” When the company sets these standards, our team knows what to aim for. All of us know that quality is not just a rule but a daily habit.
Quality Circles & Recognition
Involving everyone will build a strong corporate culture. We organize regular “Quality Circles”—small groups of operators and engineers who meet to solve specific production problems. Successes in reducing scrap rates are publicly recognized and rewarded.
Cross-Functional Collaboration
Sharing Best Practices
When a complex machining challenge is solved in the turning department, the lesson is documented and shared with the milling department. This cross-pollination of knowledge raises the baseline competency of the entire shop.
Sharing effective experiences allows every employee in the company to improve faster. We promote best practices within the company by following these steps:
- Build a Quality Management System that matches world standards.
- Train our team on quality rules and how to use them.
- Check our work with regular audits and look for ways to get better.
- Use technology, like sensors or smart software, to track and improve quality.
We regularly hold small workshops where different teams can showcase how they solve problems. For example, the machining team demonstrated how they use new gauges to inspect parts, and the inspection team shared tips for improving inspection speed. This helps everyone learn and adopt better methods.
Involving All Departments
Quality is not just the job of the QC department. Procurement, sales, and logistics all play a role in ensuring specifications are understood, materials are correct, and parts are packaged safely. To ensure product quality, every department needs to work together:
- Set a clear goal that every team understands.
- Open up ways for teams to talk and share updates.
- Make sure each person knows their job and how it helps the group.
- Use digital tools to connect teams and share data.
- Meet often to check progress and fix issues.
- Encourage open talk and sharing of ideas.
Continuous Improvement & Auditing
A QMS is a living system. It must evolve to become more efficient and effective.
Internal Audits & Lean Tools
Audit Schedules & Checklists
Regular inspections are key to maintaining a robust quality system. We schedule these inspections on a calendar to ensure that every task in the workshop is checked. We use checklists to avoid missing any steps. The team is informed of the audit content in advance and prepares accordingly. We pay particular attention to critical tasks such as processing and inspection, which are crucial for quality and safety.
| Best Practice | Description |
|---|---|
| Planning and Preparation | Set audit goals, decide what to check, and train your team. |
| Risk-Based Approach | Focus on jobs that affect quality and rules the most. |
| Standardized Checklists | Use checklists for every audit to keep things the same. |
| Real-Time Data Collection | Use mobile devices to collect data and fix problems fast. |
| Document Findings | Keep all audit reports in one place so you can find them easily. |
| Corrective and Preventive Actions (CAPA) | Fix problems quickly and keep track of what you do. |
| Continuous Improvement | Use audit results to spot trends and make your shop better. |
| Training and Competency | Make sure auditors know the new rules and how to use the new tools. |
We conduct rigorous internal audits to verify compliance with ISO 9001 standards. These are not “gotcha” moments, but opportunities to identify gaps in our processes.
Kaizen, 5S, Six Sigma
We apply Lean Manufacturing principles:
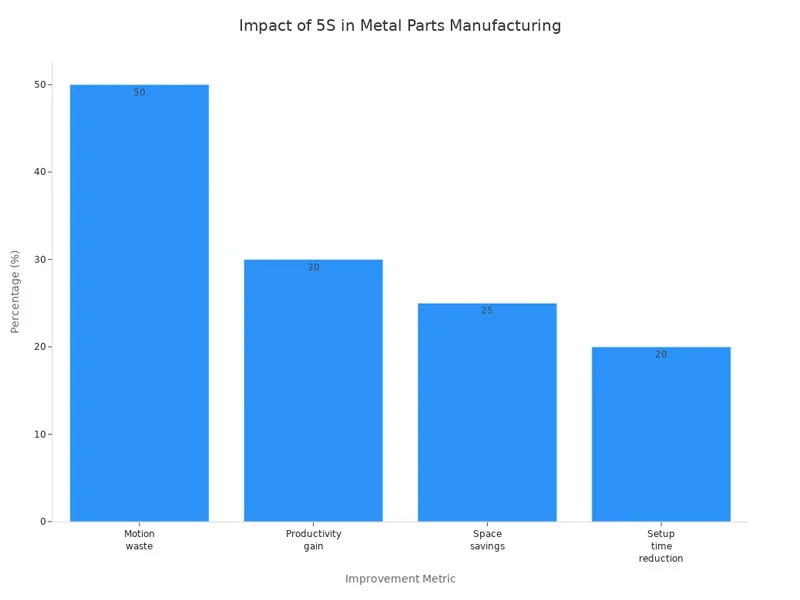
5S: A clean, organized shop floor reduces errors and accidents.
Kaizen: Continuous, incremental improvements suggested by staff.
Six Sigma: Using data to eliminate defects and reduce variability.

Monitoring KPIs & Data-Driven Improvement
Quality Metrics & Dashboards
We track Key Performance Indicators (KPIs) such as:
- First Pass Yield (FPY): The percentage of parts that pass inspection the first time.
- Customer Reject Rate (PPM): Parts Per Million defects.
- Cost of Poor Quality (COPQ): The financial impact of scrap and rework.
Using Data for Ongoing Improvement
Through audits, lean tools, and data, we build a continuously improving system that ensures every step complies with regulations and customer requirements.
Data is not just stored; it is analyzed. If a specific geometry consistently causes high reject rates, we re-engineer the manufacturing process, change the tooling strategy, or update the CAM program.
In custom metal manufacturing, quality is the currency of trust. By adhering to these rigorous standards, leveraging advanced technology, and fostering a culture of continuous improvement, we ensure that your parts are delivered exactly to specification, every single time.
FAQ
The required standards vary by industry. ISO 9001 is the general standard for quality management. For specific sectors: IATF 16949 is required for automotive parts, AS9100D for aerospace and defense, and ISO 13485 for medical devices. Following these standards ensures compliance with safety and legal regulations.
High-volume production uses statistical sampling based on ISO 2859-1. Instead of checking every single part, a specific sample size is chosen based on the lot size. The batch is accepted if the number of defects is below the Ac (Acceptance) limit and rejected if it reaches the Re (Rejection) limit, balancing inspection costs with risk control.
Quality manufacturers use a multi-step verification process. This includes reviewing Certificates of Conformance and packing slips. Leading suppliers also use Spectroscopy (material analysis) to verify the actual chemical composition of the alloy before machining begins to prevent using the wrong material.
FAI (First Article Inspection) is conducted at the start of a production run to verify that the machine setup is correct before mass production begins. Patrol Inspection involves QC inspectors roaming the floor at set intervals to check parts during the run, catching issues like tool wear or thermal drift in real-time.
For complex shapes that standard calipers cannot measure, manufacturers use CMM (Coordinate Measuring Machines) and 3D scanning technology. For micro-parts, video measuring systems are used, while functional checks for threads and fits are performed using Go/No-Go gauges.
SPC uses data collection and control charts (like X-bar and R charts) to monitor the manufacturing process in real-time. By analyzing trends, technicians can see if a process is drifting toward a tolerance limit—even if the parts are still “good”—and make adjustments before actual defects occur.
Traceability ensures that every finished part can be tracked back to its specific material batch and production date. Using labels and ERP/MES software, manufacturers maintain a digital audit trail. This is critical for responding to customer inquiries, passing audits, and isolating specific batches if a quality issue is discovered later.


