You can cut metal safely if you use the right tools for metal cutting. Always think about safety before you start your metal cutting project. Anyone can learn metal cutting technology. Take it slow and do one step at a time during the metal cutting process. Some people make easy mistakes when they pick the wrong way to cut the material. Sometimes, they forget to get ready before cutting. If you miss small details in your metal cutting, the parts may not fit. Be patient and follow each step. You will feel more sure of yourself with every cut you make in metal cutting.
Key Takeaways
- Always stay safe by wearing goggles, gloves, and long sleeves before you start cutting metal.
- Pick the right tools for your metal type and thickness. Manual tools are good for beginners. Power tools work better for harder jobs.
- Make sure your workspace is clean and neat. A tidy area helps stop accidents and lets you focus better.
- Measure and mark where you want to cut. Check your measurements twice so you do not waste material.
- Cut slowly and keep your speed steady. Let the tool do the work so your cuts are clean and neat.
- Look at your cuts to see if they are straight and smooth. Use a file or sandpaper to fix any rough edges or burrs.
- If you have problems like crooked cuts or tool trouble, check your technique and equipment to fix it.
- Ask for help if you do not know how to use a tool or do a technique. Learning from others can make you safer and better at metal cutting.
Table of Contents
Safety First
Before you start cutting metal, you need to think about safety. Many people get hurt each year because they skip important steps. You can avoid most accidents by following a few simple rules. Let’s break down what you need to know.
Personal Protective Equipment
You should always wear the right gear when working with metal. Safety glasses protect your eyes from flying sparks and tiny pieces of metal. Gloves keep your hands safe from sharp edges. Long sleeves and pants help shield your skin from burns and cuts. Sometimes, you may need ear protection if your tools make a lot of noise. If you work in a place with lots of dust or fumes, a mask or respirator helps you breathe safely.
Here’s a quick look at the main types of protection and their standards:
| Type of Protection | Standard Code | Description |
|---|---|---|
| Eye and Face Protection | ANSI/ISEA Z87.1 | Impact resistance, coverage, and optical quality for safety glasses and goggles. |
| Respiratory Protection | OSHA 1910.134 | Rules for respirator use, fit testing, and medical checks. |
| Ear Protection | ANSI/ASA S3.19-1974 | Hearing protection standards, showing noise reduction levels. |
| Head Protection | ANSI/ISEA Z89.1 | Hard hat rules for impact and penetration resistance. |
| Protective Clothing | NFPA 70E | Flame-resistant clothing guidelines for arc flash hazards. |
Tip: Always check your gear before you start. If something looks damaged, replace it right away.
Workspace Safety
A clean workspace keeps you safe. You should clear away any clutter, tools, or scraps before you begin. Make sure your floor stays dry and free of oil or grease. Good lighting helps you see what you are doing. If you work in a busy area, let others know you are cutting metal so they can stay clear.
Accidents often happen when people ignore workspace safety. Here are some numbers that show why you should care:
| Metric | Value Range |
|---|---|
| Incidence Rate | 40.7 to 85.8 per thousand workers |
| Frequency Rate | 18.3 to 37.3 per million hours |
| Severity Rate | 0.19 to 0.34 per thousand hours |
| Percentage of Limb Injuries | 62% (31.8% upper, 30.3% lower) |
| Superficial Injuries | 40.9% of total injuries |
| Accidents from Objects | 45.5% of total accidents |
| Contributing Factors | 65.2% from small tools/machines |
Note: Most injuries happen to hands and arms. Keep your workspace tidy and always know where your hands are.
Common Hazards
Cutting metal comes with some real safety concerns. You might face sparks, sharp edges, or flying debris. Sometimes, tools slip or break. Heavy pieces of metal can fall. Slippery floors or tangled cords can cause you to trip.
Here’s a chart that shows the most common hazards and how often they cause injuries:

The top five causes of lost time injury in 2023 include:
- Use of manual tools
- Slipping
- Moving machinery
- Falling objects
- Falling from a height
You can avoid most of these problems by staying alert and following safety rules. Always pay attention to your surroundings and never rush. If you feel unsure, stop and ask for help.
Remember: Safety is not just about rules. It’s about making sure you go home with all your fingers and toes at the end of the day.
Metal Cutting Tools
When you start cutting metal, you need to pick the right tools. Some tools work better for thin sheets, while others handle thick pipes or rods. Let’s look at the main types of metal cutting tools you’ll use as a beginner.
Manual Tools
Manual tools give you control and help you learn the basics. You don’t need much experience to use them, and they’re great for small projects.

Hacksaw
A hacksaw is a classic tool for cutting metal rods, pipes, and bolts. You hold the frame and move the blade back and forth. Hacksaws are reliable and cost-effective for small jobs. You can use them for straight cuts, but they struggle with thick or hard metals. Many beginners start with a hacksaw because it’s simple and safe.
Tin Snips
Tin snips look like heavy-duty scissors. You use them to cut thin metal sheets, gutters, and roofing. They come in straight and curved varieties. Tin snips work best on soft metals like aluminum or thin steel. If you want to cut shapes or curves, tin snips make it easy.
Aviation Shears
Aviation shears are stronger than tin snips. You use them for longer cuts in sheet metal. They handle tougher materials and give you more leverage. If you need to cut thicker sheets or make long, straight cuts, aviation shears are a good choice.
Tip: Start with manual tools if you’re new to metal cutting. You’ll learn how metal reacts and build confidence before moving to power tools.
Power Tools
Power tools help you cut metal faster and with less effort. You need to follow safety rules and pay attention to your surroundings.

Angle Grinder
An angle grinder is a popular tool in machine shops. You use it for cutting, grinding, and polishing metal. Angle grinders work well on thick pipes, rods, and even sheet metal. They’re versatile and powerful, but you need to handle them carefully to avoid injuries.
Jigsaw
A jigsaw uses a small blade that moves up and down. You use it for cutting curves or shapes in thin metal sheets. Jigsaws are easy to control and work best on soft metals. If you want to make detailed cuts, a jigsaw is a handy tool.
Bandsaw
A bandsaw uses a long, continuous blade. You use it for straight cuts in thick metal pieces. Bandsaws are great for cutting bundles of metal or making repeated cuts. They’re common in workshops and can handle tough jobs.
Metal Cutting Wheels

Metal cutting wheels attach to tools like angle grinders or chop saws. These wheels are thin and abrasive, letting you make precise cuts in tubes, rods, and sheets. Metal cutting wheels work fast and save time on big projects. You can use them to cut bundled materials, which helps lower costs if you have lots of pieces to cut. They also handle coated metals and composites without trouble.
Here’s a quick table comparing metal cutting wheels to other tools:
| Tool Type | Best Use | Pros | Cons |
|---|---|---|---|
| Metal Cutting Wheels | Tubes, rods, sheets | Fast, precise, versatile | Limited for thick materials |
| Hacksaw | Small rods, pipes | Cheap, easy to use | Slow, not for big jobs |
| Angle Grinder | Thick metal, grinding | Powerful, multi-use | Needs careful handling |
Note: Metal cutting wheels give you faster cutting rates than methods like laser or EDM. They’re efficient and precise, but you need to choose the right wheel for your metal type.
Now you know the main cutting tools for metal. Pick the tool that matches your project and metal thickness. If you’re unsure, start with manual tools and move up as you gain experience.
Tool Selection Tips
Choosing the right cutting tools makes your project easier and safer. You want to match your tool to the type of metal and the job you need to do. If you pick the wrong tool, you might damage your metal or waste time. Let’s look at some tips that help you make smart choices.
1. Know Your Metal
You should check what kind of metal you have before you start. Soft metals like aluminum or copper cut easily with tin snips or aviation shears. Hard metals like steel or iron need stronger tools, such as a hacksaw or angle grinder. If you work with thick metal, you need power tools. Thin sheets work well with manual tools.
2. Think About Thickness
Metal thickness matters. Thin metal sheets let you use tin snips or metal cutting wheels. Thick rods or pipes need an angle grinder or bandsaw. If you try to use tin snips on thick metal, you will struggle and might bend your material.
3. Start Simple
If you are new to cutting metal, begin with manual tools. Hacksaws and tin snips help you learn how metal reacts. You get more control and can fix mistakes easily. Once you feel confident, you can try power tools or metal-cutting wheels.
4. Use Metal Cutting Wheels Wisely
Metal cutting wheels work fast and give you clean cuts. You can use them with angle grinders or chop saws. These wheels handle tubes, rods, and sheets. If you need to cut coated metals or composites, metal cutting wheels do the job well. Always check the wheel size and type before you start. Some wheels work better on steel, while others suit aluminum.
Tip: Never force a metal cutting wheel through your material. Let the wheel do the work. If you push too hard, you might break the wheel or damage your metal.
5. Match the Tool to the Cut
Straight cuts need hacksaws, bandsaws, or metal cutting wheels. Curved cuts work best with jigsaws or tin snips. If you want to cut bundles of metal, use metal cutting wheels for speed and accuracy.
Here’s a quick table to help you decide:
| Metal Type | Thickness | Best Tool |
|---|---|---|
| Aluminum Sheet | Thin | Tin Snips, Aviation Shears |
| Steel Rod | Thick | Angle Grinder, Bandsaw |
| Copper Pipe | Medium | Hacksaw, Metal Cutting Wheels |
| Coated Metal | Any | Metal Cutting Wheels |
6. Safety First
Always wear your safety gear. Check your tools before you start. If you feel unsure, ask for help or look up a video.
You can make clean cuts and avoid mistakes if you follow these tips. Take your time and choose the right tool for your metal cutting project.
Choosing and Preparing Metal
Before you start cutting metal, you need to know what kind of metal you have and how to get it ready. Picking the right material and preparing it the right way makes your project easier and helps you get better results.
Metal Types
You will see a few common types of metal in beginner projects. Each one has its own strengths and weaknesses. Here’s a quick table to help you spot the differences:
| Metal Type | Properties |
|---|---|
| Carbon Steel | Strong, durable, affordable, simple to weld, but can rust. |
| Stainless Steel | Strong, resists rust, easy to work with, forms a protective layer. |
| Aluminum | Light, strong, versatile, resists corrosion, does not rust. |
You can check the color, weight, and if a magnet sticks to help figure out what metal you have. If you see rust, you probably have carbon steel. If the metal feels light and does not rust, it’s likely aluminum. Stainless steel looks shiny and does not rust easily.
Thickness and Hardness
The thickness and hardness of your metal change how you cut it. You need to match your tool to the job. Here’s what you should know:
- Thicker and harder materials need advanced cutting methods like plasma, waterjet, or laser cutting.
- The tool you pick should be tough enough for the metal. Some tools work better with softer metals, while others handle hard metals without wearing out.
If you try to use tin snips on thick steel, you will have a hard time. For thin sheets, manual tools work well. For thick rods or hard metals, you need power tools or special blades.
Tip: Always check the thickness before you start. If you are not sure, measure it with a caliper or ruler.
Marking and Measuring
Getting your measurements right is one of the most important steps in cutting metal. A small mistake can ruin your whole project. Here are some best practices to help you stay accurate:
- Use a measuring tape the right way. The metal end moves for inside and outside measurements.
- Measure to the smallest mark, like 1/16 inch, to avoid mistakes.
- Measure twice before you cut. This helps you catch errors.
- Make a thin, sharp mark with a razor or marking knife. Pencils and markers can be too thick.
- Use a speed square to draw straight lines, especially for right angles.
- Mark which side of the line you want to cut. This keeps your piece the right size.
- Remember the blade thickness (kerf). Cut on the correct side of your line.
- Use a stop block if you need to make the same cut more than once.
If you take your time with marking and measuring, you will save yourself a lot of trouble later. Careful prep leads to cleaner, more accurate cuts every time.
Metal Cutting Technology: Step-by-Step

Wear Safety Gear
Before you start cutting metal, you need to put on the right safety gear. This step keeps you safe from sharp edges, sparks, and flying debris. You should wear cut-resistant gloves to protect your hands. Safety goggles or a face shield will guard your eyes against tiny metal pieces. Ear protection helps block out loud noises from high-speed cutting tools. Steel-toed boots keep your feet safe if you drop anything heavy. A protective jacket or apron shields your body from sparks and hot metal. Some people also wear helmets to protect their heads from falling objects.
Tip: Always check your gear before you begin. If you see any damage, replace it right away. Good gear helps you work with confidence and keeps accidents away.
Secure the Metal
You need to secure your metal before you make any cuts. If your workpiece moves, you can lose control and hurt yourself. Place your metal on a stable surface. Use clamps to hold it tight so it does not slip. Make sure your workspace is clear of bystanders and flammable objects. Keep a fire extinguisher nearby because sparks can fly during high-speed cutting. Good ventilation helps you avoid breathing in dust and fumes. Wearing a mask is a smart choice if you see lots of particles in the air.
Here are some best practices for securing your metal:
- Clamp your workpiece to a sturdy table or workbench.
- Double-check that the metal does not wiggle or shift.
- Use reliable fixturing systems for large sheets or pipes.
- Inspect and clean your metal before you start. Dirt or rust can mess up your cut.
- Align your metal carefully to avoid crooked cuts and wasted material.
If you take time to secure your metal, you will get cleaner cuts and avoid accidents. This step also helps you keep a steady cutting speed.
Set Up the Tool
Setting up your tool is a key step for safe and effective cutting. You want your tool ready for high-speed cutting and smooth operation. First, check that you have the right tool for your metal type and thickness. Read the instructions for your saw, grinder, or snips. Make sure all guards are in place to protect you from moving parts and flying debris.
If you use a variable-speed saw, adjust the speed to match your metal. Lower speeds work better for thick or hard metals. Higher speeds help you cut thin sheets quickly. For high-tension hacksaws, tighten the blade so it does not bend. This setup boosts your cutting speed and gives you straighter cuts.
Here’s a simple checklist for setting up your tool:
- Put on your personal protective equipment.
- Check that all machine guards are secure.
- Adjust the cutting speed for your metal type.
- Make sure your blade or wheel is sharp and clean.
- Apply a few drops of machine oil to reduce friction and keep the temperature down.
- Confirm the blade direction. The teeth should point forward.
- Mark your cut location with a sharp line.
- Test your tool on a scrap piece to make sure everything works.
Remember, a well-set tool makes your job easier and safer. You will get better results and keep your cutting speed steady.
| Tool Type | Setup Tip | Why It Matters |
|---|---|---|
| Variable Speed Saw | Adjust speed for metal thickness | Prevents overheating, cleaner cut |
| High-Tension Hacksaw | Tighten the blade, check direction | Faster cuts, less blade bending |
| Angle Grinder | Use the correct wheel, check guards | Safe, efficient high-speed cutting |
| Jigsaw | Use a metal-cutting blade, set the speed | Smooth curves, steady cutting speed |
Note: Always follow safe operating procedures. If you feel unsure, ask for help or watch a tutorial.
Now you are ready to move on to making the cut. Taking these steps helps you avoid common mistakes and keeps your cutting speed consistent.
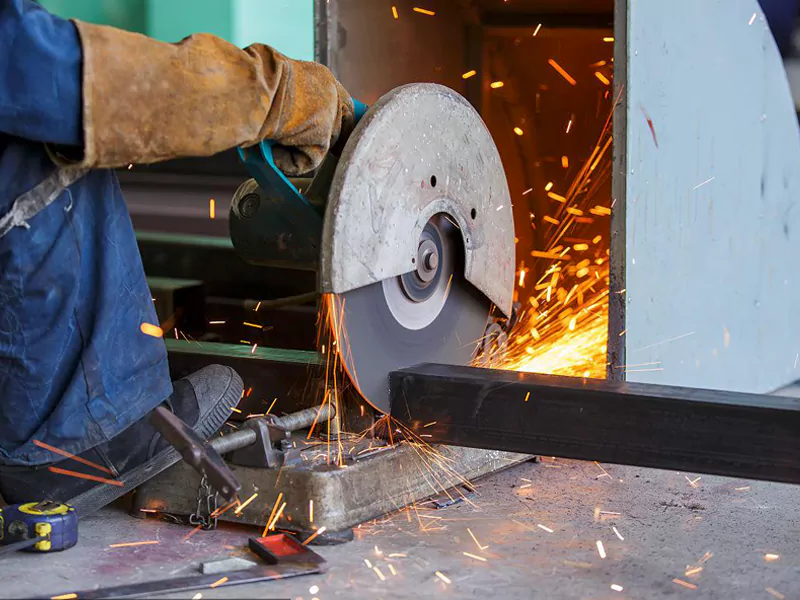
Make the Cut
Now you’re ready to start cutting metal. This is the exciting part! You’ve got your safety gear on, your metal is secure, and your tool is set up. Let’s walk through the steps so you get a clean, straight cut.
- Line Up Your Tool
Place your tool right at the mark you made. Make sure the blade or wheel touches the metal where you want to start. Double-check your line before you begin. - Start Slow
Begin with a gentle touch. Let your tool get up to speed before you push into the metal. If you use a variable-speed saw, set the speed low for thick metal and higher for thin sheets. You want the blade to bite into the metal, not jump or skip. - Keep a Steady Speed
Move your tool along the line at a steady speed. Don’t rush. If you go too fast, you might bend the metal or make a crooked cut. If you go too slow, the blade can get stuck or overheat. Listen to the sound of your tool. A smooth, even sound means you’re using the right speed. - Let the Tool Do the Work
You don’t need to force the blade. Just guide it along the line. The tool’s speed and sharpness will cut through the metal. If you feel resistance, slow down and check your alignment. - Watch for Sparks and Debris
Sparks can fly when you cut metal, especially with power tools. Keep your eyes on the cut and stay alert. If you see too many sparks, you might be pushing too hard or using the wrong speed. - Finish the Cut
As you reach the end, slow down even more. Support the metal so it doesn’t fall or snap. Complete the cut with a steady speed and lift the tool away when you’re done.
Tip: If you’re new to cutting metal, start with straight cuts. Curved cuts need more control and a slower speed. Practice on scrap pieces until you feel confident.
Here’s a quick table to help you match your speed to your tool and metal type:
| Tool Type | Metal Thickness | Recommended Speed Setting | Notes |
|---|---|---|---|
| Hacksaw | Thin | Medium | Use long, steady strokes |
| Hacksaw | Thick | Low | Tighten the blade for best speed |
| Angle Grinder | Any | High | Let the wheel reach full speed |
| Jigsaw | Thin | High | Go slow for curves |
| Bandsaw | Thick | Low to Medium | Keep a steady speed |
Remember, speed is your friend, but only if you control it. The right speed gives you a clean cut and keeps your tool in good shape.
Inspect the Cut
You finished cutting metal, but your job isn’t done yet. You need to check your work to make sure everything looks good and fits right.
- Check the Edge
Look at the edge you just cut. Is it straight? Are there any rough spots or burrs? If you see jagged edges, you might need to slow down your speed next time. - Measure Your Piece
Grab your tape measure and check the size. Did you cut on the correct side of the line? If your piece is too short or too long, review your marking and speed for future cuts. - Test the Fit
Try fitting your metal piece where it belongs. Does it slide in easily? If it’s too tight, you may need to file or sand the edge. If it’s too loose, double-check your measurements. - Clean Up Debris
Brush away any metal shavings or dust. These can be sharp and dangerous. Cleaning up keeps your workspace safe and ready for the next step.
Note: If you see uneven edges or crooked cuts, don’t worry. Everyone makes mistakes when learning. You can fix small problems with a file or grinder. Practice helps you improve your speed and accuracy.
Here’s a checklist to help you inspect your cut:
- Edge is smooth and straight
- Piece matches your measurements
- No sharp burrs or splinters
- Metal fits where you need it
- Workspace is clean and safe
You did it! You’ve learned how to cut metal with the right speed and care. Keep practicing, and you’ll get better every time.
Finishing Up

You’ve finished cutting metal, but your project isn’t complete until you take care of the final details. Let’s walk through what you need to do next so your work looks sharp and your tools stay in great shape.
Smoothing Edges
After you finish cutting metal, you’ll notice rough edges or sharp burrs. These can cause injuries or make your project look messy. You need to smooth those edges before you call it done. Here are some popular ways to get a clean finish:
- Manual deburring with sanding tools—grab a file or sandpaper and rub along the edge.
- Mechanical deburring—Use a special machine to remove burrs quickly.
- Die or punch deburring—press the edge with a die to flatten sharp spots.
- Hole deburring—clean up the inside of drilled holes.
- Tumbling—place small pieces in a tumbler with abrasive media.
- Thermal deburring—use heat to burn away tiny burrs.
- Freezing or cryogenic deburring—freeze the metal and break off brittle burrs.
- Magnetic deburring—use magnets and abrasive particles for a smooth finish.
- Electrochemical deburring—remove burrs with a chemical process.
- Robotic deburring—let a robot handle the job for big projects.
Tip: For most beginner projects, manual deburring works best. You can use a metal file or sandpaper to smooth the edges. Always wear gloves to protect your hands from sharp bits.
Cleaning Tools
If you want your tools to last, you need to clean them after every project. Dirt, resin, and tiny bits of metal can build up and damage your blades or bits. Here’s a simple cleaning routine:
- Wipe down your tools after use to remove built-up material and debris.
- Use a gentle solvent to get rid of sticky resin or adhesives.
- Skip abrasive cleaning methods so you don’t scratch or weaken your tools.
- Dry your tools completely to stop rust from forming.
Note: Clean tools work better and keep you safe. If you see rust or sticky spots, clean them right away. Store your tools in a dry place so they stay sharp and ready for your next cutting metal project.
Storing Materials
Leftover metal pieces can be dangerous if you leave them lying around. You want to store them safely and keep your workspace organized. Place metal coils and sheets in a cool, dry spot with steady temperatures. Avoid humid areas because moisture causes corrosion. Good airflow helps dry out any wet metal and prevents damage.
Use sturdy containers that match the weight of your metal. Heavy-duty plastic bins work for lighter pieces, while metal bins are better for heavy scraps. Label each container with the type of metal and any hazards. Clear signs help you find what you need and warn others about sharp or heavy materials.
Keeping your leftover metal organized makes your shop safer and more efficient. You’ll spend less time searching for materials and avoid accidents.
Now you know how to finish up after cutting metal. Smooth your edges, clean your tools, and store your materials the right way. These steps help you stay safe and make your next project easier.
Troubleshooting
Crooked Cuts
You might notice your cuts look crooked after you finish. This problem happens a lot when you work with metal. Let’s figure out why your cuts go off track and how you can fix them. Here are the most common causes and solutions:
- Your blade is dull. Replace it if you see the cut time grow by more than half.
- You push the saw too hard. Try to reduce the feed force when the cut starts to curve.
- The saw drops faster than it cuts. Slow down the rate of the fall to keep your cut straight.
- Guide arms sit too far from the piece. Move them close to the metal for better support.
- The blade does not have enough teeth touching the metal. Use a blade with the right number of teeth for your material.
- You forgot to use coolant. Make sure the blade stays lubricated to avoid overheating.
- You use the wrong speed for your metal. Adjust cutting speeds to keep the blade sharp.
Tip: Always check your blade before you start. A sharp blade and steady hands help you get straight cuts every time.
Tool Issues
Sometimes your tools cause problems when you work with metal. You might see chipping, heat marks, or even broken blades. Here are some steps you can take to fix tool issues:
- Make sure your machine setup is solid. Loose parts cause vibrations and chipping.
- Increase the lead angle to spread out cutting forces.
- Lower the speed to control heat.
- Slow down the feed rate to keep things cool.
- Cut with less depth to avoid heat buildup.
- Pick a tool grade that stays hard at high temperatures.
- Upgrade to carbide or coated tools for tough metals like stainless steel.
- Use coolant or an air blast to keep your blade cool.
- Keep a log of tool use and replace blades before they fail.
- Adjust guide arms for better blade support.
- Check coolant flow and type to stop heat and chip welding.
- Always use sharp blades and follow good cutting techniques.
Note: If you use a coolant made for steel and feed the metal slowly, you will see fewer problems. Good setup and sharp tools make cutting metal easier.
Uneven Edges
You might see rough or uneven edges after cutting metal. These edges can look messy and feel sharp. You can fix them with a few simple techniques:
- Manual deburring works well for small projects. Use a file or sandpaper to smooth the edge.
- Grinding and rolling give you a fast and smooth finish. Try a grinder for bigger pieces.
- Thermal deburring removes burrs from many pieces at once. This method uses heat to clean up the edges.
Tip: For most beginner projects, manual deburring is enough. Always wear gloves when you smooth edges to protect your hands.
If you follow these steps, you will get cleaner cuts and safer pieces. Troubleshooting helps you learn and improve every time you work with metal.
When to Ask for Help
Sometimes, you might feel stuck or unsure when working with metal. That is normal. Even experienced people need help from time to time. Knowing when to ask for help can keep you safe and save your project.
You should ask for help if:
- You do not understand how to use a tool.
- Your cuts keep turning out wrong, even after you try to fix them.
- You see sparks, smoke, or hear strange noises from your tools.
- The metal moves or slips while you are cutting metal.
- You feel nervous about your safety or the safety of others.
- You notice damage to your tools or see cracks in the metal.
- You cannot get a straight or smooth edge, no matter what you try.
Tip: If you feel unsure, stop and ask someone with more experience. It is better to ask a question than to make a mistake that could hurt you or ruin your metal.
Here are some people you can turn to for help:
| Who to Ask | How They Can Help You |
|---|---|
| Shop Teacher | Shows you how to use tools and stay safe |
| Experienced Friend | Gives tips and checks your work |
| Hardware Store Staff | Recommends the right tools for your metal |
| Online Forums | Answers questions and shares advice |
| Professional Fabricator | Solves tough problems and repairs tools |
You can also look for help online. Many websites and videos show you how to fix common problems. Sometimes, you just need to see someone else do it first.
If you ever feel unsafe, stop right away. Safety comes first. Do not keep going if you feel scared or confused. Take a break and talk to someone who knows more about metal work.
Note: Asking for help is not a sign of weakness. It shows you care about learning and want to do a good job. Everyone needs help sometimes, especially when learning new skills.
You will get better at cutting metal with practice and support. Do not be afraid to reach out. Most people are happy to help you learn and stay safe.
You know the basics now, but safety is always most important. Here are some easy safety tips experts want you to remember:
- Always wear goggles, gloves, and a helmet.
- Check that machine guards are in place before you begin.
- Keep your workspace neat.
- Be careful about health risks and fire dangers.
- Take good care of your equipment.
Lots of beginners have questions like these:
| Concern/Question | Description |
|---|---|
| Equipment Compatibility | Will my tools work for this job? |
| Safety Measures | How do I avoid getting hurt? |
| Material Waste | What if I mess up and waste metal? |
| Importance of Precision | Does accuracy really matter? |
It’s okay if you make mistakes. Each cut helps you learn more. Keep practicing and stay interested. You will get more confident as you go. Do you have a story or a question? Share it in the comments—I want to hear from you!
FAQ
Aluminum is the easiest. It feels light and soft. You can cut it with simple hand tools. You will not need much force. Try aluminum first before moving to harder metals.
Mark your line with a ruler and a sharp marker. Clamp your metal down tight. Go slow and steady. Let your tool follow the line. Practice on scrap pieces to build your skill.
No, you should not. Wood blades can break or get dull fast. Always use blades or wheels made for metal. Check your tool’s label before you start.
Stop right away. Turn off your tool. Check for any jammed pieces. Remove the blade if needed. Clean out any debris. Start again only when everything feels safe.
Use a metal file or sandpaper to smooth the edge. Always wear gloves. Check your work with your hand, but move slowly. If you feel a sharp spot, file it down more.
You might push too hard or use the wrong speed. Make sure you use the right blade for your metal. Keep your tool clean. Replace blades when they look dull or chipped.
Yes! Safety gear protects your eyes, hands, and skin. Even small jobs can cause injuries. Always wear goggles, gloves, and long sleeves. Stay safe every time you cut.
Yes, you can. Use tin snips or a jigsaw for curves. Go slow and follow your line. Practice on scrap metal first. Curved cuts take patience and a steady hand.
