You perform broaching machining by following a series of precise steps. First, you secure your workpiece in the machine fixture. Next, you select the right broach for your part. You then start the broaching process, letting the broach remove material in a single pass. After broaching, you inspect the part to check for accuracy. Each step in broaching helps you achieve high precision and keeps the process safe. When you follow these steps, you get reliable results from your broaching projects.
Key Takeaways
- Clamping the Workpiece on the machine so it does not move.
- Pick the right broaching machine for your workpiece’s size and shape.
- Choose the broach tool by looking at the material and finish you want.
- Get your workpiece ready with care to make sure cuts are correct.
- Keep your work area neat and clean to help you stay safe and work well.
- Check and take care of your broaching machine often so it works its best.
- Watch the broaching process closely to find problems early and protect your tools.
- Always wear the right safety gear to keep yourself safe while working.
Table of Contents
Tools and Materials
Broaching Machine Types
You have to pick the right broaching machine for your job. Each machine type is made for certain tasks. The table below shows the main types and what they do:
| Type of Broaching Machine | Features and Applications |
|---|---|
| Hydraulic Broaching Machine | Uses hydraulic power for strong cutting. Works well for high-quality processing. |
| Automatic Broaching Machine | Loads and unloads parts by itself. Offers online inspection and a small working area. |
| Hard Broaching Machine | Gives high precision and strong support. Runs at fast cutting speeds. |
| Helical Broaching Machine | Makes spiral shapes, like gun barrels or gears with spiral teeth. |
| Vertical Broaching Machine | Stands upright. Handles large and heavy workpieces with good stability. |
| Horizontal Broaching Machine | Lays flat. Good for long cuts and continuous broaching operations. |
You need to match the machine to your workpiece and the cut you want. For big and heavy parts, use a vertical broaching machine. For long cuts, use a horizontal broaching machine.
Broach Tool Selection
Picking the right broach helps you get good results. You should think about the material, the shape, and the finish you want. The table below tells you what to look for:
| Criteria | Description |
|---|---|
| Material Properties | Choose a broach with high wear resistance and hardness. Powder metallurgy grades last longer. |
| Surface Treatment | Pick broaches with coatings like nitriding or PVD for better durability. |
| Cutting Methods | Use roughing blades for fast cuts. Use finishing blades for smooth surfaces. |
| Applications | Select special broaches for gears, splines, or other precise shapes. |
Always match the broach to the workpiece and the job. This helps you get the right shape and a smooth finish.
Workpiece Prep
You must get the workpiece ready before broaching. Good prep stops mistakes and keeps things safe.
- Hold the workpiece tight in the broaching machine. This keeps it from moving while you cut.
- Make sure the workpiece is lined up right. Good alignment keeps the cut straight.
- Choose the right broach for the shape and size you need. The correct tool gives you the best results.
Tip: Check your setup twice before you start processing. Even a small mistake can cause big problems later.
Doing these steps helps you do better broaching. Careful prep makes the process easier and more exact.
Support Equipment
You need the right support equipment to make broaching machining safe and efficient. The right tools help you get accurate results and protect both you and your machine. Here are some important types of support equipment you should use:
- Live broaching units
These units help you work faster. You do not need to stop and set up the machine for each part. Live broaching units let you handle more parts with less effort. They also lower the chance of mistakes because you do not have to move the workpiece as much. This keeps your parts lined up and helps you avoid errors. - Custom broaching fixtures
You use these fixtures to hold your workpiece in the perfect spot. Custom fixtures keep your part steady and make sure it does not move during cutting. When your workpiece stays in place, you get a cleaner and more accurate cut. Custom fixtures also help you make the same part over and over with the same quality. - Proper maintenance tools
You need tools to keep your broaching machine in good shape. Wrenches, cleaning brushes, and inspection gauges help you check and fix your machine. Good maintenance keeps your machine safe to use. It also helps your machine last longer and work better.
Tip: Always check your support equipment before you start broaching. Clean and inspect each tool. If you find damage or wear, replace the tool right away. This keeps your work safe and your results accurate.
Support equipment does more than just help you work. It keeps you safe and helps you make better parts. When you use the right equipment, you spend less time fixing mistakes and more time making quality products. You also protect your machine from damage. Good support equipment is a smart investment for any broaching job.
Setup for Broaching Machining
Work Area
You need to keep your work area clean. Remove things you do not need. Only keep the tools and parts you will use. Put your tools where you can reach them easily. This helps you work faster and keeps you safe. Clean the floor and tables so you do not slip or fall. Use labels to show where tools belong. Change signs and labels often so you remember safety rules.
Tip: Always wear the right personal protective equipment (PPE). This means gloves, goggles, and ear protection. Check your PPE and machine guards before you start. Good habits help you stay safe every time you use a broaching machine.
Look for dangers in your work area. Watch out for sharp edges or loose wires. Make a plan to fix these problems. When you think about safety, you protect yourself and others.
Machine Check
Check your broaching machine before you use it. Look at all cables and see if they are damaged or loose. Check hydraulic lines for leaks and make sure the oil level is good. Look at the ram, guides, and slides for wear or if they are not straight. Test the machine to see if everything moves smoothly.
Use this table to help you check your machine:
| Inspection Step | Description |
|---|---|
| Visual Inspection of Cables | Check for wear, damage, or loose connections to prevent electrical failures. |
| Hydraulic Line Inspection | Look for leaks or damage; ensure hydraulic oil levels are adequate. |
| Tool Inspection | Examine tools for wear and damage; replace or recondition as necessary. |
| Operational Verification | Ensure the machine functions smoothly and all axes move correctly. |
| Routine Inspection of Components | Check ram, guides, slides, and hydraulic systems for wear or misalignment. |
| Broach Tool Examination | Look for wear indicators like chipping or dull edges to maintain cutting quality. |
| Power Distribution Check | Inspect cabinets and wiring for dust or damage to ensure stable operation. |
Check the broach for burrs or dirt. Make sure the broach fits in the holder. Check that clamps and fixtures hold tight. This keeps broaching safe and helps you get good results.
Tool Install
Now you can put in the broach tool. First, pick the size you need. Choose the right material for your broach tool. Drill a pilot hole in your workpiece with the right size and depth. Make a lead chamfer to help guide the broach.
If you use an adjustable rotary broach tool holder, center it before you start. Adjust the tool so it is in the right spot. Use measuring tools to check if the tool is set up right. This helps you avoid mistakes when broaching.
Set the speed and feed rate for your job. Change the spindle speed and hydraulic pressure if you need to. These settings help you get the best results from your broaching machine.
Note: Always check your setup twice before you begin. Even a small mistake can cause bad cuts or damage your machine.
When you follow these steps, you learn how to use a broaching machine safely and well. Clamp the workpiece tight and check every detail. This helps you get clean and accurate cuts every time.
Secure Workpiece
Securing your workpiece is one of the most important steps in broaching machining. If your workpiece moves during cutting, you will not get a clean or accurate cut. You might even damage your tool or machine. You need to make sure your workpiece stays in place from start to finish.
Start by choosing the right fixture for your part. Fixtures hold your workpiece steady while the broach moves through it. You can use standard fixtures for simple shapes. For complex or odd-shaped parts, you may need a custom fixture. Always check that your fixture fits your workpiece tightly.
Here are some key steps to secure your workpiece:
- Place your workpiece in the fixture so it sits flat and does not rock.
- Tighten all clamps and bolts on the fixture. Make sure nothing feels loose.
- Check that the workpiece lines up with the broach path. Misalignment can cause bad cuts.
- Use stops or guides if your fixture has them. These help keep your part in the right spot.
- For long or heavy workpieces, add extra supports under the part. This stops bending or sagging.
Tip: Always double-check your setup before you start the machine. A quick check can save you from costly mistakes.
You should also look at the fixture itself. Make sure it is clean and free from chips or oil. Dirt or debris can make your workpiece slip. Inspect the fixture for wear or damage. Replace any worn parts before you begin.
Some broaching machines use hydraulic or pneumatic clamps. These clamps give strong and even pressure. If your machine has these, check the pressure settings. Make sure the clamps hold the workpiece firmly but do not crush it.
You can use a checklist to help you remember each step:
- Is the workpiece flat in the fixture?
- Are all clamps tight?
- Is the broach path clear?
- Are extra supports in place if needed?
- Is the fixture clean and in good shape?
When you secure your workpiece the right way, you get better results. Your cuts will be straight and smooth. You will also protect your tools and machine from damage. Taking time to set up your workpiece pays off with every part you make.
Broaching Machining Steps
Position Workpiece

You start broaching machining by positioning your workpiece. This step sets the foundation for accurate results. Begin by marking your workpiece so you know exactly where to place it. Always mount the workpiece in the same direction for each cycle. This keeps your cuts consistent.
Follow these steps to position your workpiece:
- Mark the workpiece with a reference point.
- Place the workpiece in the fixture, making sure it sits flat.
- Use clamps to hold the workpiece tightly. Clamping the workpiece prevents movement during broaching.
- Rotate the mounting position every 90 degrees if you need to broach multiple workpieces. Cover all four positions from 0 to 270 degrees.
- Identify the maximum run-out position. This helps you avoid errors and keeps your cuts straight.
Tip: Double-check your markings and alignment before you start. Small mistakes can lead to big problems later.
When you position your workpiece correctly, you set yourself up for success in broaching keyways and other shapes.
Align Broach

You need to align the broach with your workpiece before you begin cutting. Proper alignment keeps your tool from drifting and ensures you get the right dimensions. If you do not align the broach, you risk tool deflection and uneven cuts.
Here are some important points for alignment:
- Make sure the driven broaching head lines up with the workpiece. This prevents tool deflection.
- Check that the broach, workpiece, and ram are all in a straight line. This is the most critical factor in broaching operations.
- Use measuring tools to confirm alignment. Even a small error can cause drifting or breakage.
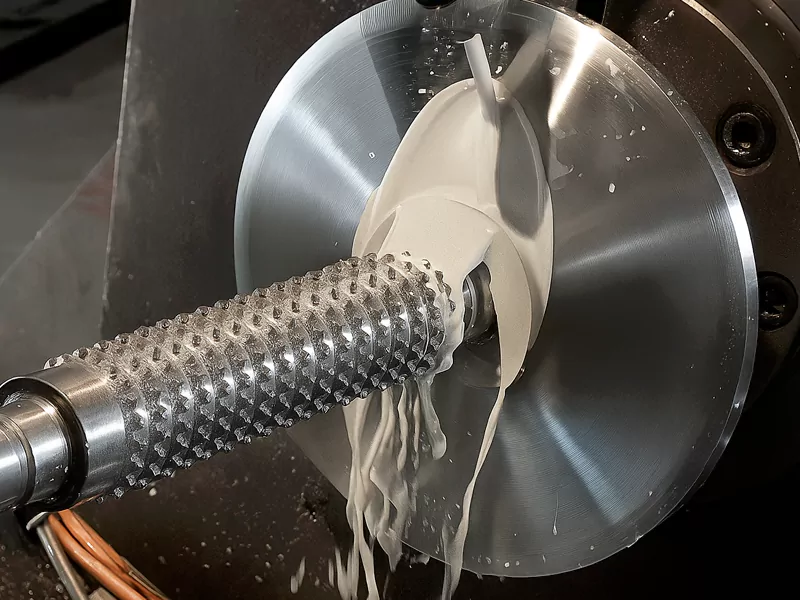
- For rotary broaching, insert the broach into a pre-drilled pilot hole. The spindle rotates the workpiece while the broach holder spins and wobbles. This motion helps you form precise internal and external polygonal shapes.
Note: Accurate alignment is essential for consistent keyway dimensions and smooth surfaces.
When you align the broach properly, you avoid problems and get better results from your broaching machine.
Start Cycle

You are ready to start the broaching cycle once you have positioned and aligned everything. This step involves several actions that set the process in motion.
Follow these steps to start the cycle:
- Select the right broach and broaching machine for your job.
- Mount and clamp the broach in the broaching machine. Make sure it fits tightly.
- Fix the workpiece in the machine. Check that it is secure.
- Plan the tool and work motions. Decide how the broach will move through the workpiece.
- Adjust the tool and set processing parameters. Choose the correct speed, feed rate, and pressure.
- Install the broach fixture and guide device. These keep everything stable and accurate.
- Start processing by activating the broaching machine.
Tip: Always check your setup before you start. A careful check helps you avoid mistakes and keeps your broaching safe.
When you set processing parameters and start the cycle, you begin the actual cutting process. You use the broaching machine to shape your workpiece with precision.
Monitor Cut
You need to watch the broaching process closely to get the best results. When you monitor the cut, you can spot problems early and protect your tools. You also make sure your part meets the right quality standards.
Start by paying attention to the sound and feel of the machine. A smooth, steady sound means the cut is going well. If you hear loud noises or feel strong vibrations, stop and check your setup. These signs can mean the tool is wearing out or the workpiece is not secure.
You should also keep an eye on key indicators during the cutting process. These indicators help you catch tool wear, microcracks, or other issues before they cause damage. The table below shows what you should monitor:
| Indicator Type | Description |
|---|---|
| Cutting Force Measurements | Shows how hard the tool works. High force can mean tool wear or a dull broach. |
| Recurrence Quantification Analysis Parameters | Includes RR, DET, L, and LMAX. These help you find microcracks and tool wear. |
| Sensor Utilization | Use sensors for sound, vibration, force, and temperature. Sensors help you spot problems early. |
Sensors play a big role in modern broaching. You can use acoustic sensors to listen for changes in sound. Vibration sensors help you find out if the tool is shaking too much. Temperature sensors warn you if the tool gets too hot. These tools help you keep your process safe and your parts accurate.
You should also watch for changes in cutting force. Many things can affect cutting force, such as how fast you cut, how much material you remove, and how sharp your tool is. The table below explains these factors:
| Factor | Influence on Cutting Force |
|---|---|
| Material Removal Rates | More material means higher cutting force. |
| Cutting Speed | Faster speeds can change how the tool cuts. |
| Tool Wear | Worn tools need more force and can damage your part. |
| Machine Tool Dynamics | Machine movement affects how much force the tool feels. |
Tip: If you see a sudden jump in cutting force or hear a strange sound, pause the machine. Check the broach and the workpiece for problems. Fixing small issues early can save you time and money.
For rotary broaching, you should also watch the rotation of the workpiece and the broach. Make sure the broach spins smoothly and does not wobble. If you see chips building up, stop and clear them away. This keeps the cut clean and prevents tool damage.
By monitoring the cut, you keep your broaching process safe and your parts high quality. You also make your tools last longer and avoid costly mistakes.
Inspection and Post-Processing
Clean Workpiece
After you finish broaching, you need to end processing and clean up. Cleaning removes chips, oil, and any leftover debris from the cutting process. If you skip this step, dirt can hide defects or make inspection harder. Use a brush or compressed air to clear away chips. Wipe the surface with a clean cloth to remove oil and dust. For tough grime, use a mild solvent that does not harm the metal. Always check that the workpiece is dry before you move to the next step. Clean parts help you spot problems early and keep your workspace safe.
Tip: Clean your tools and fixtures too. This keeps your broaching machine in good shape and ready for the next job.
Measure Dimensions

You must measure the dimensions of your workpiece to make sure it meets the required standards. Accurate measurement is key in broaching machining. Use the right tools for each feature. Adjustable parallel blocks help you set a reference point. Parallel blocks give you a stable base. Pins let you check specific sizes, especially for holes or slots made by the broach. Base plates help you level your setup. An outside micrometer gives you precise readings for thickness or diameter.
Here is a table showing common measurement tools and their uses:
| Equipment Type | Description |
|---|---|
| Adjustable parallel blocks | Used for setting the measurement reference. |
| Parallel blocks | Provides a stable base for measurement. |
| Pins | For specific sizes of the broached part. |
| Base plates | Used for leveling the measurement setup. |
| Outside micrometer | For precise measurement of dimensions. |
Check each critical dimension against the blueprint or tolerance chart. If you find a mistake, mark the part and set it aside for rework. Measuring helps you catch errors before the part moves to the next stage.
Check Finish
You need to check the surface finish after broaching. A good finish means the part will work well and last longer. Look for smooth surfaces without scratches or chatter marks. Use a surface roughness tester if you have one. This tool tells you if the finish meets the required value. Visual inspection helps you spot defects like burrs or uneven spots.
Several factors affect surface finish in broaching:
- Cutting speed: Higher speeds can make the surface smoother, but watch for tool wear.
- Feed rate: Slower feed rates usually give you a better finish.
- Depth of cut: Lighter cuts reduce tool load and improve the finish.
- Tool condition and selection: Sharp, well-maintained broaches make cleaner surfaces.
If you see problems, check your broach for wear or damage. Replace dull tools to keep your finish high quality. Good surface finish means your part is ready for use or further processing.
Note: Always inspect both the dimensions and the finish. This ensures your broaching machining produces reliable and accurate parts.
Deburr
After broaching, you may see sharp edges or leftover metal called burrs. Burrs can make parts unsafe to touch. They can also cause trouble when you put parts together. You need to take off these burrs so your part is smooth and safe. This makes it ready for use or more work.
There are different ways to deburr broached parts. Each way works best for certain shapes and jobs. Here are the main deburring methods:
- Mechanical Deburring
You use brushes, files, or abrasive wheels to remove burrs. You can do this by hand or with machines. Mechanical deburring is good for finishing many parts fast. It works well for simple shapes and flat surfaces. Tumbling machines can clean lots of pieces at once. - Thermal Deburring
This method uses heat to burn away burrs. You put parts in a chamber with a gas mix. When you light the gas, a quick flame removes burrs from all surfaces. It works even in tight spots or on tricky shapes. Thermal deburring is best for parts with many surfaces. It costs more and is used for special jobs. - Electrochemical Deburring
You use an electrolyte solution and electric current to dissolve burrs. This way does not touch the part. It is very exact and does not harm the rest of the metal. Electrochemical deburring is great for delicate or complex parts. It is often used for tough metals and jobs needing high accuracy.
Tip: Pick your deburring method based on your part’s shape, size, and material. For simple, flat parts, mechanical deburring works well. For tiny holes or complex designs, thermal or electrochemical deburring may be better.
Deburring makes your broached parts safer and work better. It helps parts fit together in assemblies. Clean parts help you avoid problems later. After deburring, check your work. Feel the edges for sharp spots. If you find any, deburr again until it feels smooth.
Taking off burrs is an important step in broaching machining. It helps you make high-quality, reliable parts every time.
Safety
PPE
You need to wear the right personal protective equipment when you work with a broaching machine. PPE keeps you safe from flying chips, sharp edges, and chemicals. You should check your gear before each job. Replace anything that looks worn or damaged.

Here are the main types of PPE you should use:
- Eye protection shields your eyes from high-speed debris. Safety glasses or goggles work best.
- Face shields give extra coverage. They protect you from sparks and chemical splashes.
- Gloves help keep your hands safe. Use cut-resistant or puncture-resistant gloves for handling broach tools and workpieces.
- Cotton clothing covers your skin. It protects you from hot chips and sharp edges.
Tip: Always wear PPE that fits well. Loose gear can get caught in the broaching machine.
You must keep your PPE clean and ready. Dirty or damaged equipment does not protect you. Make a habit of checking your gear before you start broaching.
Machine Guards
Machine guards play a big role in keeping you safe during broaching. These guards stop chips from flying out and keep your hands away from moving parts. You should never remove or bypass a guard on a broaching machine.
Common machine guards include:
- Shields that block chips from the cutter.
- Covers over moving parts to stop accidents.
- Sensors that shut down the broaching machine if something goes wrong.
You need to inspect guards before you use the machine. Make sure they are tight and not cracked. If you see damage, fix it before you start broaching. Guards help you avoid injuries and keep your workspace safe.
Here is a table showing what to check:
| Guard Type | What to Inspect | Action to Take |
|---|---|---|
| Chip Shields | Look for cracks or loose parts | Replace or tighten |
| Moving Part Covers | Check for missing pieces | Install new covers |
| Safety Sensors | Test for proper function | Repair or recalibrate |
Note: Machine guards work best when you use them every time. Do not skip safety steps, even for quick jobs.
Emergency Steps
You must know what to do if something goes wrong during broaching. Quick action can prevent injuries and damage. Every broaching machine should have clear emergency procedures.
Follow these steps if you face an emergency:
- Hit the emergency stop button on the broaching machine. This shuts down power right away.
- Move away from the machine if you see sparks, smoke, or hear loud noises.
- Alert others in the area. Shout or use alarms to warn your team.
- Check for injuries. If someone is hurt, call for help and use first aid.
- Report the incident to your supervisor. Write down what happened so you can prevent future problems.
⚠️ Always keep emergency exits clear. Know where fire extinguishers and first aid kits are located.
You should practice emergency drills with your team. Training helps you react fast when something happens. Keep a log of safety events to improve your broaching operations.
Clean work areas, good PPE, and working machine guards help prevent most safety incidents. You can learn how to use a broaching machine safely by following these steps every time you work.
Tool Handling
Handling broaching tools with care keeps you safe and helps your tools last longer. You work with sharp, heavy, and sometimes expensive equipment. You need to follow good habits every time you pick up, use, or store a broach.
Start by inspecting your broach tool before you use it. Look for chips, cracks, or dull edges. If you see any damage, set the tool aside and choose another one. Damaged tools can break during machining and cause injuries.
When you move broach tools, always use both hands. Hold the tool by the shank or handle, not by the cutting edge. You protect your fingers from cuts and keep the tool from slipping. If the broach is large or heavy, ask for help or use a lifting device.
Tip: Never toss or drop broaching tools. Even a small fall can damage the cutting edge or bend the tool.
You need to keep your workspace organized. Place broach tools on a clean, flat surface. Use tool racks or holders to keep them from rolling or falling. Store each tool in its own slot or case. This stops tools from bumping into each other and getting chipped.
Here is a table showing safe handling practices:
| Handling Step | What You Should Do | What You Should Avoid |
|---|---|---|
| Inspecting | Check for wear and damage | Ignore cracks or chips |
| Carrying | Use both hands, hold by shank/handle | Grab by cutting edge |
| Storing | Use racks, cases, or holders | Pile tools together |
| Cleaning | Wipe with soft cloth, use brush for chips | Use harsh chemicals |
| Installing | Align carefully, tighten securely | Force tool into holder |
Clean your broach tools after each use. Wipe off oil, chips, and dust with a soft cloth. Use a brush to remove chips from the teeth. Do not use harsh chemicals that can damage the tool surface.
When you install a broach tool in the machine, make sure it fits the holder. Align the tool with the workpiece and tighten all clamps. If you feel resistance, stop and check for obstructions. For rotary broaching, check that the tool spins freely before you start the machine.
You should wear gloves when handling broach tools, but take them off when you need to feel for alignment or tightness. Gloves protect your hands from sharp edges, but they can make it hard to sense small movements.
⚠️ Always keep your focus when handling tools. Distractions can lead to accidents.
If you need to change tools during a job, turn off the machine first. Wait for all moving parts to stop. Remove the old tool carefully and place it in its holder. Install the new tool using the same careful steps.
Good tool handling keeps you safe and helps you make better parts. You avoid injuries, protect your equipment, and work more efficiently. Practice these habits every time you use a broaching machine.
Care and Maintenance
Clean Routine
You need to keep your broaching machine clean to make sure it works well and lasts longer. Dust, chips, and oil can build up on the machine and cause problems. Start by wiping down the surfaces after each use. Use a soft cloth to remove metal chips from the work area. Clean the guides and slides so they move smoothly. If you see oil or coolant spills, clean them right away. This stops slippery spots and keeps your workspace safe.
You should also check the broaching machine for hidden dirt. Look under covers and inside guards. Use a brush or compressed air to reach tight spaces. Clean the broach tool after every job. Remove chips from the teeth and wipe off any oil. A clean broach cuts better and lasts longer.
Set up a cleaning schedule for your shop. Clean the broaching machine at the end of each shift. Deep clean once a week to remove grime from hard-to-reach places. When you keep your machine clean, you avoid breakdowns and get better results.
Tip: Always wear gloves and safety glasses when cleaning. Sharp chips can hurt your hands or eyes.
Lubricate
Lubrication helps your broaching machine run smoothly. Moving parts need oil or grease to stop wear and reduce friction. You should check the lubrication points on your machine every day. Add oil to the ram, slides, and guides. Use the right type of lubricant for each part. Some machines need special oils for hydraulic systems.
If you skip lubrication, parts can grind together and wear out fast. This can cause the broaching machine to break down. Always follow the manufacturer’s guide for oil types and amounts. Mark the lubrication points with labels so you do not miss any spots.
Make a habit of checking oil levels before you start broaching. If you see leaks or dry spots, fix them right away. Proper lubrication keeps your broaching machine accurate and safe.
Inspect Tools
You need to inspect your broach tools and machine parts often. Look for signs of wear, cracks, or chips on the broach. Damaged tools can ruin your workpiece and hurt your machine. Check the broaching machine for loose bolts, worn guides, and bent fixtures. Tighten bolts and replace worn parts before you start broaching.
Use a checklist to help you remember what to inspect:
- Broach teeth for chips or dull edges
- Machine guides for straightness
- Hydraulic lines for leaks
- Clamps and fixtures for tightness
Regular inspections help you catch problems early. You save money and avoid downtime. Well-maintained tools give you better broaching results.
Here is a table showing key maintenance routines for broaching machines:
| Maintenance Routine | Description |
|---|---|
| Regular Inspections | Inspect and maintain the broaching machine to keep accuracy and performance. |
| Proper Lubrication | Lubricate all moving parts to reduce wear and tear. |
| Operator Training | Train operators to understand broaching and machine operation. |
Note: Good maintenance keeps your broaching machine working well and helps you make high-quality parts.
Calibrate
Calibration makes sure your broaching machine stays accurate. You check and adjust the machine so it makes parts the right size and shape. If you skip calibration, your machine might cut parts that do not fit. You need to calibrate your broaching machine often. This keeps your work exact and stops mistakes.
First, gather the tools you need. Here are some common calibration tools:
| Calibration Tool | Purpose |
|---|---|
| Dial Indicator | Measures tiny movements and alignment |
| Gauge Blocks | Sets reference sizes for calibration |
| Feeler Gauges | Checks gaps and clearances |
| Calibration Rods | Checks length and straightness |
| Digital Calipers | Measures thickness and diameter |
You use these tools to see if your machine moves correctly. For example, a dial indicator shows if the ram moves straight. Gauge blocks help you set the right distance for the broach. Feeler gauges check for gaps between moving parts.
Here are the steps to calibrate your broaching machine:
- Turn off the machine and clean every surface.
- Put the dial indicator on the ram or slide. Move the part and look for errors.
- Use gauge blocks to set the broach tool in the right spot.
- Check if the broach and workpiece line up. Use calibration rods to make sure everything matches.
- Measure test cuts with digital calipers for thickness and diameter.
- Change the machine settings if you find mistakes. Repeat the measurements until you get the right results.
Tip: Write your calibration results in a logbook. This helps you see changes and find problems early.
Calibrate your broaching machine after big repairs or if parts do not come out right. You also need to calibrate after moving the machine. Regular calibration keeps your machine working well and your parts correct.
To get the best results, make a calibration schedule. You can check the machine every month or after 100 hours of use. Use a checklist so you do not miss any steps.
- Clean all surfaces
- Check ram movement
- Set broach position
- Measure test cuts
- Adjust settings
Calibration helps you make good parts every time. You save time and money by finding problems early. Keeping your broaching machine calibrated gives you better results and safer work.
You get the best results in broaching machining by being careful with each step. Always think about doing good work and staying safe. Here are some important things to remember:
- Watch how chips look, check your tool, and see if it gets hot.
- Look at machine parts often and clean them.
- Put oil or grease on moving parts when needed.
- Check the hydraulic fluid and make sure the pressure is right.
- Look for worn tools and keep them sharp.
- Watch the chip shape to see if you are cutting well.
- Test safety features and check electrical systems.
- Follow a daily plan to take care of your machine.
Go over safety and maintenance steps many times. Keep learning and practicing so you get better at broaching machining.
FAQ
Broaching machining uses a special tool called a broach to cut shapes into metal. You move the broach through the workpiece to create keyways, splines, or holes. This process gives you precise and repeatable results.
You look at the material, shape, and size of your part. Pick a broach with the right hardness and coating. Use finishing broaches for smooth surfaces. Always match the tool to your job for best results.
You need safety glasses, gloves, and ear protection. Wear cotton clothing to protect your skin. Check your gear before you start. Good safety habits help you avoid injuries.
You can broach soft metals like aluminum or brass. Use a broach with less aggressive teeth. Softer materials need lower cutting speeds. Always check your tool for wear after each job.
You should clean and inspect your machine after every shift. Lubricate moving parts daily. Calibrate the machine monthly or after major repairs. Regular maintenance keeps your machine accurate and safe.
Linear broaching moves the tool straight through the workpiece. Rotary broaching spins the tool to cut shapes like hexagons or squares. You choose the method based on the part you need.
You measure the part with micrometers and gauges. Look at the surface finish for scratches or burrs. Clean the part before inspection. Good checks help you catch mistakes early.
You remove burrs with a file, brush, or deburring machine. Check all edges for sharp spots. Clean the part after deburring. Smooth edges make your part safe and ready for use.
