You might wonder what brass spinning means. Brass spinning is a way you shape flat brass into round objects. You use a spinning lathe and special tools to do this. Brass spinning lets you form bowls, lamps, and many other shapes. You press a brass sheet against a form as it spins. You watch the brass stretch and change shape right in front of you. Brass spinning does not need fancy machines. You can learn brass spinning with patience and practice.
Key Takeaways
- Brass spinning is a way to shape flat brass by hand. You use a spinning lathe and special tools to do this. You can make round objects from the brass.
- Use thin brass sheets because they are easier to shape. Try to use brass that is 0.8 mm to 1 mm thick.
- Put your brass blank in the center of the mandrel. This helps stop it from wobbling. It also makes your work smooth and balanced.
- Move your tools gently and sweep them across the brass. Use even pressure when you shape it. Do not press too hard or the brass might tear.
- Feathering strokes help make the brass smooth. They also fix wrinkles and small mistakes as you spin.
- Cut the edges of your piece before your last pass. This gives your work a clean and even look.
- Always wear safety gear like safety glasses and gloves. This keeps you safe while you work.
- Be patient and take your time. Mistakes will happen, but they help you learn brass spinning.
Table of Contents
What Is Brass Spinning?
Brass spinning is a hands-on way to shape brass sheets. You start with a flat piece of brass. You use a spinning lathe and simple tools. The goal is to make round, hollow objects. You press the brass against a form called a mandrel. The mandrel spins very fast. This helps the brass change into a curved shape. You can make things like bowls or lampshades. Brass spinning is part of metal spinning. Metal spinning is a group of ways to shape metal. Some methods use machines. Others, like brass spinning, use your hands and skill. You can make easy or hard shapes. Brass spinning is good for beginners. You see the metal change as you work.
Brass spinning is one type of metal spinning. Metal spinning uses a lathe to shape metal. Some ways use machines to do most of the work. Brass spinning needs careful hand movements. You can make simple or fancy shapes. It helps you learn how metal spinning works. You watch the metal change shape as you spin it.
The Brass Spinning Process
You can split the brass spinning process into steps. Each step helps you turn a flat disc into a finished part.
- Set up your lathe. Put the brass disc on the mandrel. Make sure it is in the center.
- Use a spinning tool. Press the brass against the mandrel. Move the tool in wide sweeps to shape the disc.
- Use gentle strokes with the tool. These strokes smooth out small wrinkles. They keep the surface even.
- Change to a flatter tool for the last passes. This tool helps finish the part. It makes the surface smooth.
- Trim the edge if needed. This removes rough spots or uneven areas.
- Take the finished piece off the mandrel. Loosen the tailstock spindle to remove it safely.
Sometimes you need extra steps. You might heat the brass if it gets stuck. You can use gentle strokes to lower pressure at the end. You may trim the part before the last step. These steps help you get a smooth, even part.
Brass spinning uses a few main ways:
- Conventional spinning keeps the wall thickness the same.
- Multi-pass spinning changes the thickness with each pass.
- Planishing is the last step. It smooths and polishes the surface.
Brass spinning is easier than some other metal spinning methods. You do not need fancy machines. Tooling costs are lower. You can see how it compares in this table:
| Aspect | Brass Spinning | Other Techniques |
|---|---|---|
| Complexity | Needs skilled manual work | Some methods use machines |
| Suitability for Shapes | Best for even shapes | Can make even and uneven shapes |
| Material Efficiency | Makes less waste | Waste depends on the method |
| Tooling Costs | Tools are simple and cheap | Tools often cost more |
| Production Volume | Good for small or medium batches | Stamping or casting is better for big batches |
| Quality Consistency | Depends on the operator | Machines give more even results |
| Safety Risks | Fast spinning can be risky | Risks change with each method |
Uses of Brass Spinning

You can use brass spinning to make many useful things. It is popular in factories and art. Here are some common uses:
| Application Category | Description |
|---|---|
| Agricultural Equipment | Used for parts that need to last and resist rust. |
| Energy Sector | Good for electrical connectors because it conducts well and resists rust. |
| Food Processing Equipment | Works for machines because it fights germs and rust. |
| Furniture and Lighting | Looks nice, so it is great for decorations and lights. |
| Medical and Scientific Instruments | Used for tools that need to be clean and strong. |
You also see brass spinning in:
- Lampshades
- Decorative bowls
- Musical instruments like cymbals
Brass spinning lets you make custom shapes. You can make special pieces or small batches. It works well for things that need to look good and last long.
Tip: If you want to try brass spinning, start with easy shapes. Practice helps you get better. Always wear safety gear. Keep your workspace neat.
Tools and Materials for Brass Spinning
Brass Blanks and Material Selection

Choosing Brass for Spinning
You need to start with the right brass blank. Brass comes in different grades, but most beginners use standard sheet brass. Look for sheets that are clean and free from dents. The quality of your blank affects how easy it is to spin and how smooth your final piece will look.
Sizing and Thickness Tips
When you pick a brass blank, pay attention to its size and thickness. Thinner gauges are easier to spin than thicker ones. If you are new to brass spinning, choose a thinner sheet. This makes it easier to shape the metal over the mandrel. The wall thickness of the blank stays almost the same during the spinning process. If you want to make a larger object, start with a bigger blank, but remember that thicker blanks need more skill and strength.
Tip: Start with a small, thin blank. You will find it easier to control and shape.
Lathes and Machining Equipment
Types of Lathes for Beginners
You can use many types of lathes for brass spinning. Wood lathes and metal lathes both work. Many beginners use compact or mini wood turning lathes. These are easy to set up and control. Some people use dedicated spinning lathes, but you do not need one to get started. Variable speed wood turning lathes are also a good choice. They let you adjust the speed to match your skill and the type of metal you are spinning.
Setting Up Your Lathe
Set up your lathe on a stable surface. Make sure the lathe bed supports all the other parts during machining. Attach the mandrel to the spindle. The headstock controls the speed and supports the spindle and mandrel. The tailstock holds the blank in place and applies pressure. Always check that everything is tight and centered before you start spinning.
Spinning Tools and Mandrels
Tool Shapes and Functions
You need a few basic tools for brass spinning. The roller shapes the workpiece over the mandrel and helps keep the wall thickness even. The spindle rotates the mandrel during the forming process. The follower clamps the workpiece in place as you apply pressure. You may use internal tooling, where you form the material over the mandrel, or external tooling, where you form the material inside a hollow mandrel. Collapsible tooling lets you make parts with variable diameters.
Here is a table showing common spinning tools and their functions:
| Tool | Function |
|---|---|
| Mandrel | Gives the blank its final shape |
| Roller | Shapes the workpiece over the mandrel |
| Spindle | Rotates the mandrel |
| Headstock | Controls RPM, supports the spindle and mandrel |
| Tailstock | Clamps the blank in place |
| Follower | Holds the workpiece as you apply pressure |
Mandrel Selection
The mandrel is the form you shape your brass over. Choose a mandrel that matches the shape you want to make. Mandrels can be made from steel, aluminum, or even hardwood for simple projects. The mandrel must be smooth and strong enough to handle the pressure of spinning. If you want to try different types of metal spinning, you can use different mandrel shapes to create new designs.
Note: The right tools and setup make brass spinning safer and more enjoyable. Always check your equipment before you begin.
Safety Gear and Workspace Setup
When you start brass spinning, safety comes first. You work with spinning tools and sharp edges. You must protect yourself and keep your workspace organized. Good safety habits help you avoid injuries and make your projects more enjoyable.
Eye and Hand Protection

Your eyes and hands face the most risk during brass spinning. Tiny metal shavings can fly off the spinning blank. The spinning tools can slip or catch. You need to wear the right gear every time you work.
- Safety Glasses or Face Shield: Always wear safety glasses. A face shield gives even more protection. These keep your eyes safe from flying chips and dust.
- Gloves: Use snug-fitting gloves made for metalwork. Loose gloves can get caught in the spinning lathe. Choose gloves that let you grip tools well but still protect your skin from sharp edges.
- Hearing Protection: Lathes and spinning tools can be loud. Earplugs or earmuffs help protect your hearing, especially if you work for long periods.
- Dust Mask: Brass dust can irritate your lungs. Wear a dust mask if you sand or polish your workpiece.
Tip: Never wear jewelry, loose sleeves, or long hair untied. These can get caught in the spinning lathe and cause accidents.
Safe Workspace Practices
A clean and organized workspace keeps you safe and helps you work better. You need to set up your area before you start spinning.
- Clear the Area: Remove clutter from your workbench. Keep only the tools and materials you need for your project.
- Good Lighting: Make sure your workspace is well-lit. You need to see your tools and the spinning blank clearly.
- Stable Surfaces: Place your lathe on a sturdy, level table. The table should not wobble or move during use.
- Tool Storage: Store sharp tools in a safe place. Use racks or holders to keep them off the bench when not in use.
- Emergency Plan: Know where your first aid kit and fire extinguisher are. Keep them within easy reach.
Note: Always unplug your lathe before changing tools or cleaning. This simple step prevents accidental starts.
You should check your safety gear and workspace before every session. Good habits protect you and help you focus on learning new skills. When you respect safety rules, you can enjoy brass spinning and create beautiful projects with confidence.
Getting Started with Metal Spinning
Before you begin your first project, you need to set up your workspace and tools the right way. Good preparation helps you stay safe and makes your work easier. Follow these steps to get started with metal spinning.
Preparing Your Workspace
A safe and organized workspace is the foundation for every successful project. Here is a checklist to help you get ready:
- Wear safety glasses to protect your eyes from flying chips.
- Keep your workspace clean and free of clutter.
- Check your tools for wear or damage before you use them.
- Take your time—do not rush through any step.
- Ask for help if you need to lift heavy items.
- Know where your first aid kit is and make sure it is stocked.
- Use a buddy system for tasks that could be dangerous.
- Keep walkways clear so you can move safely.
- Make sure your workspace has good lighting.
- Stay focused and avoid distractions while working.
Tip: A clean and well-lit area helps you see your work clearly and prevents accidents.
Setting Up the Lathe and Mandrel
Setting up your lathe and mandrel correctly is key to both safety and quality results. Here is how you do it:
- Place your lathe on a stable, level surface.
- Attach the mandrel securely to the spindle.
- Center the brass blank on the mandrel to avoid imbalance.
- Use a back stick to help prevent creasing and guide the metal toward the headstock.
- Apply a small amount of beeswax or other lubricant to the blank to make spinning smoother.
- Secure the blank and start the lathe at a low speed.
- Bring the forming tool into contact with the metal and apply gentle pressure.
- Gradually push the blank over the mandrel in several passes.
- Watch the pressure you use to avoid wrinkling or tearing the brass.
- If the brass becomes hard to shape, pause and anneal it to restore softness.
- Use feathering strokes to smooth the surface and remove small imperfections.
- Trim any extra material for a clean edge.
- After spinning, remove the part and check it for quality.
Note: Practice and patience are important. Watching videos can help, but hands-on experience is the best way to learn how to metal spin.
Preparing the Brass Blank

Proper preparation of your brass blank makes spinning easier and gives you a better finish. Here are some steps to follow:
- Lightly sand the brass blank for a few seconds to brighten and polish the surface.
- Remember that sanding removes the protective layer, so the brass will start to oxidize right away.
- Sand the blank just before you begin spinning. Do not sand it too early, as the clean surface cannot be stored for long.
- Make sure the blank is free from dents or deep scratches.
Tip: Always prepare your brass blank right before spinning. This helps you get a smooth, shiny result.
By following these steps, you set yourself up for success in metal spinning. Careful preparation and attention to detail help you avoid mistakes and create beautiful, strong pieces. As you gain experience, you will find your own rhythm and style.
Step-by-Step Brass Spinning Guide
Centering the Blank
Why Centering Matters
You need to center your brass blank before you start spinning. If the blank is off-center, your finished piece will wobble or look uneven. Centering helps you get a smooth, balanced result. When you spin a well-centered blank, you avoid extra vibration and reduce the risk of mistakes. You also protect your tools and make the spinning process safer.
Note: Taking time to center your blank saves you trouble later. A centered blank means your shapes will look better and your work will go more smoothly.
Centering Techniques
You can use simple steps to center your brass blank on the lathe. Follow this method to get the best results:
- Place the brass blank in the chuck. Tighten it just enough to hold it, but not so tight that you cannot move it.
- Bring a dial indicator up to touch the end of the blank.
- Turn the chuck by hand. Watch the dial indicator as you rotate to find the highest and lowest readings.
- Adjust the chuck to get the highest reading you can.
- Tap the top of the blank gently with a small hammer. Keep tapping until the indicator shows a reading halfway between the highest and lowest points.
- Rotate the chuck again. Look for a new set of high and low readings.
- Repeat these steps. Keep adjusting and tapping until the difference between the high and low readings is very small.
- Tighten the chuck firmly. Make sure you do not move the blank out of position.
Tip: Patience is important. Small adjustments make a big difference in the final result.
Spinning and Shaping
Applying Pressure with the Spinning Tool
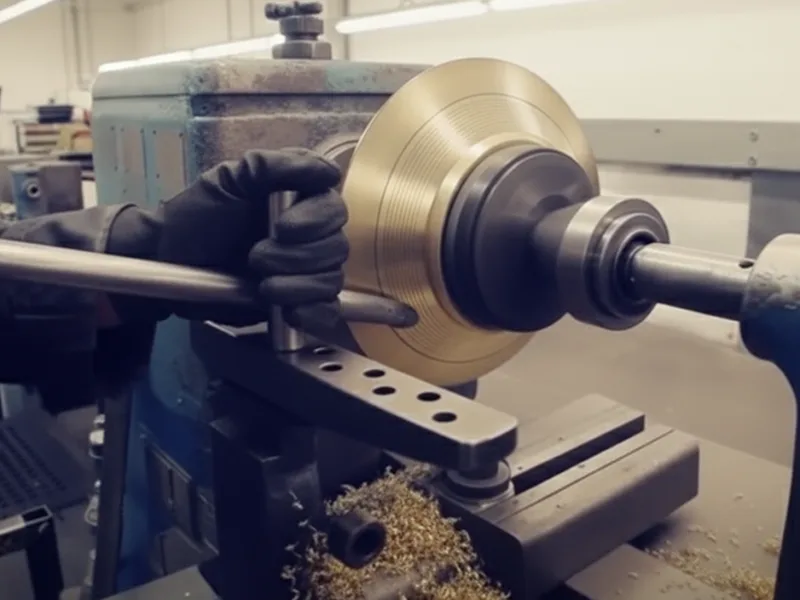
You start spinning by pressing the tool against the brass. Begin at the nose end of the form. This helps you press the metal down tightly. Use a backing stick to control any waviness that appears as you work. Move the spinning tool from the rim toward the center. This method keeps the metal from thinning or stretching too much.
Keep the lathe running at about 1700 rpm. Focus on your technique, not just the tool you use. Smooth, steady pressure gives you the best results. If you push too hard, the brass may wrinkle or tear. If you use too little pressure, the metal will not form to the mandrel.
Tip: Practice makes perfect. Try different techniques to see what works best for you.
Forming Curves and Shapes
You shape the brass by guiding the tool along the mandrel. Use gentle, even strokes. Start with wide sweeps to form the basic curve. As the brass takes shape, use smaller, more careful movements to refine the design. The right techniques help you create smooth curves and sharp edges.
Watch the brass as you work. If you see wrinkles or bumps, adjust your pressure or change the angle of your tool. Keep your hands steady and your eyes on the spinning blank. Over time, you will learn how to form different shapes and styles.
Note: Each project is a chance to improve your skills. Try new techniques and see how the brass responds.
Removing the Finished Piece
After you finish shaping and trimming your brass piece, you need to remove it from the lathe. This step is important for both your safety and the quality of your work. If you rush or skip steps, you might damage your project or hurt yourself. Follow these steps to remove your finished piece the right way.
Safe Removal Methods
You must use care when taking your brass piece off the mandrel. The metal edges can be sharp, and the part may still be warm from spinning. Here is how you can remove your work safely:
- Turn Off the Lathe: Always switch off the lathe and unplug it before you touch the workpiece. This prevents the machine from starting by accident.
- Let the Piece Cool: If the brass feels warm, wait a few minutes. Hot metal can burn your hands.
- Wear Gloves: Put on snug-fitting gloves to protect your hands from sharp edges.
- Loosen the Tailstock: Gently loosen the tailstock or follower that holds the brass in place. Do not use force. If it feels stuck, check for burrs or rough spots.
- Support the Piece: Hold the brass piece with one hand as you loosen it. This keeps it from falling or spinning unexpectedly.
- Remove the Piece: Slide the brass part off the mandrel slowly. If it sticks, twist it gently back and forth. Do not pry with sharp tools, as this can scratch or bend your work.
- Check for Burrs: If you feel resistance, look for small burrs or rough edges. Use a file or sandpaper to smooth them before trying again.
Tip: Always keep your fingers away from the mandrel and spinning parts. Move slowly and stay focused during removal.
Inspecting Your Work

Once you remove your brass piece, you need to check it for quality. Careful inspection helps you spot mistakes early and learn how to improve your next project.
- Look for Cracks or Splits: Hold your piece up to the light. Turn it slowly and look for any cracks, splits, or thin spots. These can happen if you used too much pressure or spun the brass too thin.
- Check the Shape: Place your piece on a flat surface. See if it sits evenly or wobbles. A well-spun piece should have a smooth, even curve and a balanced shape.
- Feel the Edges: Run your finger (with a glove) around the rim. The edge should feel smooth, not jagged or sharp. If you find rough spots, use a file or sandpaper to fix them.
- Test the Fit: If your piece needs to fit with another part (like a lid or base), check the fit now. Make small adjustments if needed.
- Check the Finish: Look at the surface. It should be free from deep scratches, dents, or tool marks. Light sanding or polishing can improve the finish if needed.
Note: If you find a problem, do not worry. Every project teaches you something new. Write down what worked and what did not. This helps you get better with each piece you spin.
By following these steps, you make sure your finished brass piece looks good and lasts a long time. Careful removal and inspection are the final touches that turn your hard work into a project you can be proud of.
Tips and Safety for Beginners
Brass spinning is rewarding, but you will learn faster and safer if you know what to watch out for. Many beginners make similar mistakes, but you can avoid them with the right approach and a focus on safety.
Common Mistakes to Avoid
Uneven Pressure
Applying uneven pressure is a frequent mistake. If you press too hard with your tool, the brass may stretch too much or even tear. If you use too little pressure, the metal will not form to the mandrel. You need to find a balance. Start each stroke with care. The first stroke centers the disc and sets the base for every other technique you use. Adjust your grip and body position so you can move the tool smoothly. Practice helps you learn how much force to use.
Overheating the Brass
Overheating the brass can cause problems. If the metal gets too hot, it may become brittle or lose its shape. Always check the temperature as you work. If the brass feels too warm, stop and let it cool. You can also anneal the brass if it becomes hard to shape, but do not overdo it. Too much heat can weaken the metal and ruin your project.
Here is a table showing common mistakes and how to fix them:
| Mistake | What Happens | How to Fix It |
|---|---|---|
| Pressing too hard | Brass stretches or tears | Use lighter, controlled strokes |
| Not enough pressure | Brass does not form to the mandrel | Apply steady, even pressure |
| Overheating the brass | Metal becomes brittle or warped | Let it cool, avoid excessive heat |
| Rushing the process | Poor shape and surface finish | Slow down, focus on each technique |
Troubleshooting and Improving Technique
Wobbling or Off-Center Pieces
If your piece wobbles or looks off-center, check your setup. Make sure the blank is centered on the mandrel before you start. The first stroke with your spinning tool is important. It helps center the disc and gives you a solid base for the rest of your work. Adjust the tool rest so you can control the vertical movement of the handle. This technique keeps your strokes even and your piece balanced.
Cracking or Tearing
Cracks or tears often happen when you use too much pressure or spin the brass too thin. If you see cracks, stop and check your pressure. Use gentle, even strokes. If the brass feels hard, anneal it to restore softness. Always inspect your work after each step. If you find a problem, adjust your technique before moving on.
Remember: Every mistake is a chance to learn. Take notes on what works and what does not. Over time, your technique will improve.
Safety Best Practices
Personal Protective Equipment

You must protect yourself every time you spin brass. Wear safety glasses or a face shield to guard your eyes from flying chips. Use snug-fitting gloves to protect your hands, but never wear loose clothing or jewelry. Ear protection helps if your workspace is noisy. A dust mask is useful if you sand or polish your work.
Safe Lathe Operation
Operate your lathe with caution and good judgment. Always check that your blank is centered and secure before you start. Use safety guards when possible. Release the tail spindle pressure quickly if you need to stop the process. Never leave the lathe running unattended. Keep your workspace clean and free of clutter. Know where your first aid kit is and have an emergency plan.
Here is a table of common injuries and how to prevent them:
| Injury Type | Description | Prevention Strategy |
|---|---|---|
| Hand or finger cuts | Sharp edges or slips | Wear gloves, use proper tool technique |
| Eye injuries | Flying chips or dust | Wear safety glasses or a face shield |
| Burns | Hot metal or tools | Let parts cool, use gloves |
| Muscle strain | Poor posture or heavy lifting | Use supports, maintain good posture |
Safety is not just a rule—it is a habit. Make it part of every project you do.
By following these tips and focusing on each technique, you will avoid common mistakes and stay safe. Practice, patience, and attention to detail will help you become a skilled brass spinner.
Project Ideas and Next Steps
Are you ready to try your first brass spinning project? You can start with simple shapes that help you learn the basics. As you finish each project, you will see your skills grow. Here are some ideas to help you begin and keep moving forward.
Simple Brass Spinning Projects
Small Bowl
A small bowl is a great first project. You use a round brass blank and a basic mandrel. As you spin, you press the brass over the form. You watch the sides curve up and take shape. This project teaches you how to control the tool and keep the wall thickness even. You can practice feathering strokes to smooth out small wrinkles. If you trim the edge before the last pass, you get a clean, even rim. When you finish, you have a useful bowl and a sense of pride.
Candle Holder
A candle holder is another beginner-friendly project. You start with a flat disc and a simple mandrel. You spin the brass to form a shallow cup for the candle. You can add a small base or a handle if you want to try something new. This project helps you practice centering the disc and using steady pressure. You learn how to keep the shape balanced and the edges smooth. Candle holders make great gifts and show off your new craft.
Tip: Keep your lathe speed between 800 and 1800 RPM. Adjust the speed for the size and thickness of your brass. This helps you avoid problems and get better results.
Advancing Your Metal Spinning Skills
Experimenting with Shapes
Once you finish a few successful metal spinning projects, you can try more complex shapes. You might want to make a vase, a lampshade, or a musical instrument part. Try using different mandrels to create new designs. Practice developing spinning skills by changing the curve or adding details. Use short, back-and-forth strokes with less pressure to fix small flaws. Always make sure your disc is centered before you start. This helps you avoid wobbling and keeps your work looking professional.
- Try new shapes like cones, domes, or flared edges.
- Use feathering strokes to smooth the surface.
- Trim the edge just before the last pass for a neat finish.
- Adjust your lathe speed for each project.
Joining a Community or Workshop
You can learn even more by connecting with others who enjoy metal spinning. Look for local workshops or online groups. Many people share tips, answer questions, and show their work. You can ask for advice or watch videos to see new techniques. Joining a community helps you stay motivated and learn faster. You might even find friends who want to spin brass with you.
Note: Sharing your progress and asking for feedback is a great way to improve. Every project, big or small, helps you become a better spinner.
You have many ways to keep learning and growing in this craft. Start with simple projects, then try new shapes and join a group. Each step brings you closer to mastering brass spinning.
Brass spinning is simple and accessible for anyone willing to learn. You only need basic tools and a bit of courage to start. Remember these key points:
- Set your lathe speed between 800 and 1800 RPM.
- Center your disc carefully.
- Use sweeping motions and even pressure.
- Feather strokes smooth out wrinkles.
- Trim edges before the last pass.
Mistakes will happen, but patience and practice help you improve. Take your time, stay safe, and enjoy the creative journey. Start spinning today and watch your skills grow!
FAQ
You should start with thin brass, around 0.8 mm to 1 mm thick. Thin brass is easier to shape and control. Thicker brass needs more skill and strength.
Yes, you can use a wood lathe for brass spinning. Make sure the lathe is stable and strong. Always check that your tools are sharp and your setup is safe.
You can smooth out small wrinkles by using gentle, even strokes with your spinning tool. If wrinkles stay, try using less pressure or anneal the brass to soften it.
Manual metal spinning is when you shape metal by hand using a lathe and simple tools. You press the metal against a form as it spins. This method lets you create many shapes without machines.
You do not need to heat the brass before you start. If the brass gets hard or cracks, you can anneal it. Annealing makes the brass soft again and easier to spin.
You must center your blank carefully on the mandrel. Use a dial indicator or tap the blank gently until it spins evenly. A well-centered blank helps you get a smooth, balanced result.
Brass spinning can be safe if you follow all safety rules. Always wear safety glasses, gloves, and hearing protection. Ask an adult for help if you are new or if you use power tools.
Yes, you can spin other metals like aluminum or copper. Each metal has its own feel and needs different pressure. Start with brass, then try other metals as you gain skill.
