You want to see your brass shine like a mirror, right? You can do it, even if you’ve never tried brass polishing before. You’ll find every tool, material, and safety tip you need listed right at the start. It’s easy to follow each step. You’ll learn how to apply gentle, steady pressure when wet sanding, keep the sandpaper lubricated, and avoid scratches. With expert tips and AFI Industrial Co., Ltd’s machining know-how, you get a finish that lasts and looks professional.
Key Takeaways
- Get the tools you need, like soft cloths, wet sanding abrasives, and polishing compounds, before you begin. Clean the brass well to take off dirt and tarnish. This helps make the surface smooth for polishing. Use sandpaper with different grits, starting with rough and moving to smooth. This removes scratches and makes the brass look nice. Buff the brass with the right polishing compounds to make it shiny. This helps you get a mirror-like finish. Put on a protective coating like wax or lacquer. This keeps the shine and stops tarnish. Always wear safety gear like gloves and goggles to stay safe while you polish. Check your brass for damage before you start polishing. This helps you avoid problems and get the best results. Keep your polished brass looking good by cleaning it gently and doing touch-ups often.
Table of Contents
Brass Polishing Tools and Materials
Before you start polishing brass, you need the right tools and materials. The right supplies make the job easier and help you get that mirror finish you want. Let’s break down what you’ll need, what can take your results to the next level, and how to stay safe while you work.
Essential Brass Polishing Supplies
You don’t need a fancy workshop to polish brass at home. Here’s what you should have on hand:
- Soft cloths, like cotton rags or microfiber, for buffing and wiping without scratching.
- A soft-bristled brush to reach into detailed spots and corners.
- Wet sanding abrasives, such as sandpaper sheets or discs, for smoothing the surface.
- Polishing compounds, either homemade or store-bought, are used to bring out the shine.
- Rubber gloves to protect your hands and keep fingerprints off your brass.
- Safety goggles to shield your eyes from splashes or dust.
- Use gentle dish soap for the first cleaning step.
- A bowl or basin for soapy water.
- Household ammonia or vinegar for tough cleaning jobs (never mix ammonia with bleach).
When you use these supplies, you remove scratches, tarnish, and dirt. This helps your brass look smooth and shiny. If you want a really bright finish, start sanding with 220 grit paper, then move up to 600, 1200, and even 2000 grit. Finish by buffing with a polishing compound on a soft cloth. Many professional machinists use 3M plastic-backed abrasives or a Micro-Mesh kit for the finest results.
Tip: Always sand in a figure-8 pattern. This helps you get an even surface and avoids swirl marks.
Optional Machining Tools for Advanced Results
If you want to take your brass polishing to a professional level, you can use some advanced tools. These are the kinds of tools AFI Industrial Co., Ltd recommends for precision and quality:
| Tool/Technique | What It Does |
|---|---|
| TiN Coated Tools | Reduces friction and heat, making your tools last longer and your finish smoother. |
| TiCN Coated Tools | Offers similar benefits, especially for tough polishing jobs. |
| Manual Polishing | Gives you control for detailed, mirror-like finishes on special pieces. |
| Automatic Polishing | Great for polishing lots of parts at once, giving you a uniform look. |
| Electroplating | Adds a durable, decorative layer—think nickel, chrome, or gold. |
| Powder Coating | Protects your brass with a tough, colorful finish. |
| Passivation | Keeps your brass shiny and helps prevent tarnish. |
| Lacquering | Seals the surface to keep it looking new, perfect for display pieces. |
You can also use tumbling machines for small parts. Just pick the right media for the finish you want. AFI Industrial Co., Ltd’s machining expertise means you get the best advice and the highest quality tools for every step.
Safety Gear for Brass Polishing
Safety always comes first. When you polish brass, you should protect yourself from dust, chemicals, and sharp edges. Here’s what you need:
- Gloves to keep your hands safe from chemicals and sharp bits.
- Safety goggles to protect your eyes from splashes and flying particles.
- Face shields for extra protection, especially if you use power tools.
- Respiratory protection, like a dust mask, if you’re sanding or buffing for a long time.
Note: Always work in a well-ventilated area. Good airflow helps keep you safe from fumes and dust.
With the right tools, materials, and safety gear, you’re ready to polish brass like a pro. The right choices make your work easier and your results better. AFI Industrial Co., Ltd’s experience in machining and finishing means you can trust their recommendations for every tool and technique.
Prepare and Clean Brass
Getting ready to polish brass starts with a good cleaning. You want your brass free from dirt, grease, and tarnish before you move on. This step makes the whole brass polishing process easier and helps you get that mirror finish.
Initial Cleaning Steps

Remove Dirt and Grease
You don’t want any grime standing between you and a shiny surface. Here’s how you can clean brass before you polish it:
- Fill a basin with warm water. Add a few drops of mild dish soap.
- Dip a soft cloth into the soapy water. Wipe the brass gently.
- Use a soft-bristled brush, like a toothbrush, for corners and detailed spots.
- Rinse the brass with clean water. Make sure you remove all soap.
- Dry the brass completely with a clean towel.
Tip: Always dry your brass before you start polishing. Water spots can ruin your hard work.
Handle Tarnish and Oxidation
Tarnish makes brass look dull. You can tackle it with a simple homemade paste.
- Mix equal parts white vinegar and salt. This creates a gentle cleaning paste.
- Rub the paste onto tarnished areas using a soft cloth. Move in a circular motion.
- For stubborn tarnish, let the paste sit for a few minutes.
- Rinse the brass with warm water. Wipe it dry.
If you see any green or black spots, don’t worry. That’s just oxidation. The vinegar and salt paste works well for these, too.
Note: Never mix ammonia with bleach. It creates dangerous fumes.
Inspect Brass for Damage
Before you polish brass, check it for damage. You want to make sure you’re working with solid brass and not a plated item. Here are some quick ways to inspect your brass:
- Use a magnet. If it sticks, your item isn’t solid brass.
- Look for stamps or markings. You might see “EPNS” or other labels. These mean the item is plated.
- Check the color. Real brass has a golden look. Brass-plated items may show a different metal underneath if scratched.
- Feel the weight. Solid brass feels heavy. Brass-plated items are lighter.
If you spot deep scratches, dents, or cracks, you may need extra work before polishing brass. Small marks can often be smoothed out during the sanding step.
Tip: Take your time with inspection. It saves you trouble later and helps you get the best results from brass polishing.
Now your brass is clean, dry, and ready for the next step. You’ve set yourself up for a smooth, shiny finish.
Polish Brass with Sanding Techniques

Ready to make your brass shine like a mirror? The sanding step is where the magic happens. You’ll smooth out scratches and prepare the surface for that final, brilliant polish. Let’s walk through the sanding process together.
Sandpaper Grit Progression
You want to use the right sandpaper grits in the right order. This helps you remove marks and get a flawless finish. Here’s a simple table to guide you:
| Grit Size | Purpose |
|---|---|
| 400 grit | Removes deep scratches and oxidation. |
| 800 grit | Refines sanding marks. |
| 1200 grit | Smooths surface to satin finish. |
| 2000 grit | Pre-polish clarity. |
| 3000 grit | Final sanding before buffing. |
Start with the coarsest grit you need, then move up step by step. Each grit erases the marks from the one before it. By the time you reach 3000 grit, your brass will look almost like glass.

Start with Coarse Grit
Begin with 400 grit sandpaper. This grit removes old scratches, tarnish, and any rough spots. Use gentle, even strokes. Don’t press too hard. Let the sandpaper do the work. If your brass has deep marks, you might need to spend a little more time here.
Move to Medium Grit
Switch to 800 grit next. This step smooths out the lines left by the coarse grit. You’ll see the surface start to look more even. Keep your sandpaper wet if possible. Wet sanding helps prevent scratches and keeps dust down.
Finish with Fine Grit
Now, grab 1200, 2000, and finally 3000 grit sandpaper. Each one makes the brass smoother and shinier. By the end, you’ll see a soft reflection on the surface. This is the secret to a true mirror finish.
Sanding Methods
You can choose between hand sanding and power tools. Both work well, but each has its own style.
Hand Sanding vs. Power Tools
Hand sanding gives you control. You can feel the surface and focus on tricky spots. Use a sanding block or wrap the paper around your fingers for curves. Power tools, like a rotary sander or a Dremel with sanding discs, make the job faster. They’re great for large, flat areas or lots of small parts. If you use a machine, keep the speed low and check your progress often.
Sanding Direction and Pressure
Always sand in one direction for each grit. Change direction with each new grit. This helps you spot any missed scratches. Use light, steady pressure. Too much force can leave grooves or heat up the brass. If you see dust building up, wipe it away with a soft cloth.
Tip: AFI Industrial Co., Ltd’s machining standards focus on precision and surface quality. Take your time with each step. Careful sanding now means less work later and a better result.
You’re almost done with the polishing process. With patience and the right sanding technique, you’ll set yourself up for a stunning, professional shine.
Buff Brass for Mirror Finish
You’ve sanded your piece, and now it’s time for the real magic—buffing. This is where you turn a smooth surface into a true mirror finish. Let’s walk through how to select the right polishing compounds, choose your buffing method, and get that flawless shine.
Select Polishing Compounds

The right polishing compound makes all the difference when you buff brass. You’ll find two main types: paste and liquid. Each has its own strengths.
Paste vs. Liquid Compounds
- Liquid polishing compounds are easy to use. You can spread them quickly over large areas. If you’re new to brass polishing or working on a big project, liquid is a great choice.
- Paste polishing compounds give you more control. They’re perfect for small, detailed spots. Paste also tends to last longer, so you get more protection and shine.
- Beginners often like liquid for its speed. If you want precision, go with paste.
Recommended Brands and Products
You’ll see lots of brands at the store, but some stand out for their results. Here’s a quick guide to help you pick:
| Brand | Comments |
|---|---|
| Simichrome | Gives a lasting polish, but can be a bit messy to remove. |
| NeverDull | Easy to wipe off, works well on nickel too. |
| Tarnite | Budget-friendly, works better than most, easy to find at hardware stores. |
| Brasso | A favorite for solid brass, used by many professionals. |
| Bright Boy | Good for polishing, found at cleaning supply stores. |
| Wenol | Highly recommended, often found at shows. |
| Victory Metal Polish | Less expensive, does a great job, available at hardware stores. |
If you want to know which compounds work best in the lab, check out this table:
| Polishing Compound | Description |
|---|---|
| Green Rouge | Great for high luster, removes small blemishes on both hard and soft metals. |
| White Rouge | Delivers an outstanding final shine, especially on hard metals. |
Tip: Try Green Rouge for the first buff, then finish with White Rouge for that extra sparkle.
Buffing Methods
You can buff brass by hand or with a machine. Both methods help you remove extra product and bring out a smooth, even shine. The right choice depends on your project and what tools you have.
Manual Buffing
Manual buffing is simple. Grab a soft, clean cloth and apply your chosen compound. Rub the surface in small circles. This method gives you control, especially on detailed or delicate pieces. You can see the shine appear as you work. If you notice any dull spots, just go over them again.
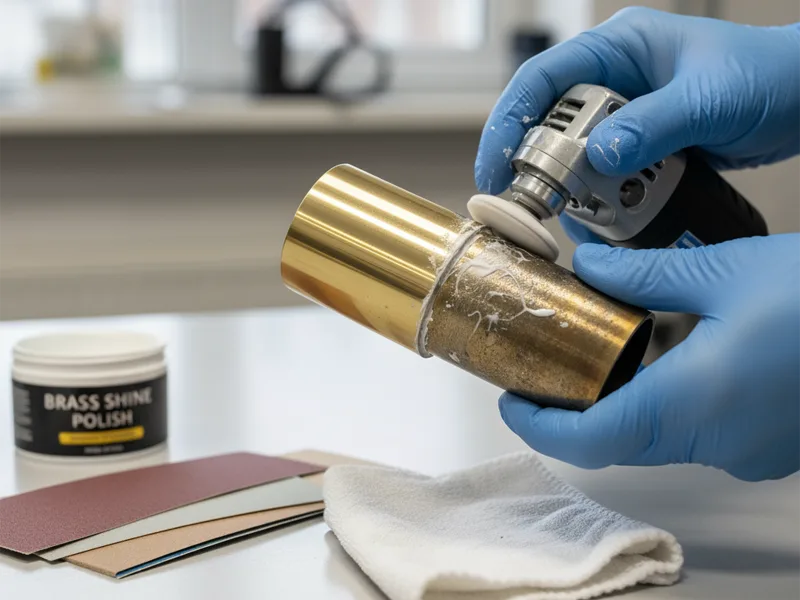
Machine Buffing
Machine buffing uses a cloth wheel and a bit of power. You load the wheel with your compound, then gently press the brass against it. This method is fast and gives a super-bright finish. It’s perfect for larger pieces or when you want a uniform look. Machines can also use special wheels and compounds for different effects.
- Polishing with abrasive belts or discs removes scratches and levels the surface.
- Buffing with a cloth wheel and fine compound brings out the gloss and removes any last marks.
- Buffing usually comes after polishing to erase lines and imperfections.
Note: Always wear safety gear when using a buffing machine. Keep your hands and hair away from moving parts.
Achieve Mirror Finish
You want your brass to reflect like a mirror. Here’s how you know you’ve made it:
- The surface should look like glass, with no visible scratches or haze.
- A true mirror finish means the surface roughness (Ra) is about 0.02 micrometers or less. That’s super smooth!
- You’ll see your reflection clearly, and the brass will shine from every angle.
AFI Industrial Co., Ltd recommends a few advanced techniques if you want the ultimate shine:
- Try electrochemical polishing for an ultra-smooth surface.
- Use a magnetic polishing machine for multi-angle grinding and a flawless effect.
- For the best results, consider a custom polishing service from AFI Industrial Co., Ltd. Their team uses professional tools and strict quality control to deliver a perfect mirror finish every time.
Callout: Take your time with each step. The more care you put into buffing, the brighter your brass will shine.
When you buff brass with the right compounds and methods, you unlock that stunning, professional look. Whether you use your hands or a machine, you can achieve a mirror finish that stands out. Trust in AFI Industrial Co., Ltd’s expertise for the highest quality results in surface finishing and quality control.
Final Cleaning and Protection

You are almost finished. Now you need to keep your brass shiny and safe for a long time. This last step helps remove any leftover stuff, seals your work, and stops tarnish.
Remove Residue
After buffing, you may see some compound or dust left. Do not skip this step. Take a clean, soft cloth and gently wipe the brass. If you find tough spots, use a damp cloth with warm water. For small details, use a soft brush. Make sure the brass is dry before you go on. Any water left can make spots or dull the shine.
Tip: Use a lint-free cloth for the last wipe. This stops streaks and keeps your brass looking perfect.
Apply Protective Coating
A protective coating keeps the shine and helps brass look new. You can pick waxing or lacquering. Both have good points.
Waxing Brass
Waxing is fast and simple. Rub a thin layer of paste wax on the brass. Let it dry, then buff with a soft cloth. Wax works best for indoor pieces that are not touched much. It gives a soft glow and makes cleaning easier.
- Waxing is easier than lacquer.
- It is good for decorations.
- You need to add wax every few months for the best results.
Lacquering Brass
Lacquering takes more time but protects longer. Use clear lacquer spray or brush-on lacquer. Put on thin coats and let each coat dry. Lacquer is great for brass that faces water, humidity, or outdoor air.
- Lacquer can protect brass for many years.
- It lasts longer than wax and is tough.
- The process is harder, but the results last longer.
Here is a quick comparison:
| Method | Ease of Application | Durability of Protection | Ideal Use Case |
|---|---|---|---|
| Waxing | Easier | Less durable | Decorative indoor pieces |
| Lacquering | More complex | More durable | Items exposed to humidity or outdoors |
You can also choose from these top protective coatings:
| Coating Name | Best For | Features |
|---|---|---|
| Everbrite™ | Brass Outdoors | Strong, graffiti resistant, blocks UV, stops fading and tarnish. |
| ProtectaClear® | Shiny brass indoors | Very tough, safe for food after curing, good for taps and fixtures. |
| CrobialCoat™ | High-touch surfaces | Has ProtectaClear® plus germ protection, safe for food after curing. |
Prevent Future Tarnish
You want your brass to stay shiny. The best way is to keep it sealed and clean. Here are some top ways:
| Coating Type | Application Area | Key Features |
|---|---|---|
| Everbrite™ Protective Coating | Brass Outdoors | Seals brass, stops tarnish, stable in sunlight, does not turn yellow. |
| ProtectaClear® | Brass Indoors | Great for items you touch, sticks well. |
| CrobialCoat™ | High touch items | Protects and fights germs. |
Note: Always touch polished brass with clean hands or gloves. Skin oils can make tarnish happen faster.
If you do these steps, your brass will stay shiny for years. A little care now saves you work later!
Brass Polishing Tips and Troubleshooting
Polishing brass can feel tricky, but you can get pro-level results with a few smart tips. Let’s look at how you can avoid common mistakes, fix little problems, and keep your brass shining for a long time.
Avoid Common Mistakes
You want your brass to look perfect, so watch out for these easy-to-make mistakes:
- Skipping the cleaning step: If you don’t clean your brass first, you’ll rub dirt into the surface. That makes scratches worse.
- Using the wrong grit: Starting with sandpaper that’s too fine won’t remove deep scratches. If you skip grits, you’ll see lines in the finish.
- Pressing too hard: Heavy pressure can leave grooves or even warp thin brass. Let the sandpaper and polish do the work.
- Not changing direction: Sanding in the same direction every time can hide scratches. Change direction with each grit.
- Forgetting safety gear: Brass dust and polish can irritate your skin and eyes. Always wear gloves and goggles.
Tip: If you’re not sure which grit to use, start with a coarser one and test on a small spot.
Quick Fixes for Imperfections

Sometimes, you spot a scratch or dull area after you finish. Don’t worry! You can fix most small problems fast.
| Problem | Quick Fix |
|---|---|
| Light scratches | Go back one grit size and sand lightly. |
| Dull spots | Buff with a soft cloth and a bit more polish. |
| Streaks or haze | Wipe with a clean, lint-free cloth. |
| Tarnish returns | Clean with vinegar and salt, then re-wax. |
If you see a deep scratch, use a coarser sandpaper just on that spot. Then, work your way up through the finer grits again. For stubborn tarnish, a little extra time with your cleaning paste will help.
Note: AFI Industrial Co., Ltd’s machining team always checks for imperfections under bright light. Try this at home to catch any missed spots.
Pro Tips for Lasting Shine
You want your brass to stay shiny as long as possible. Here’s how you can make that happen:
- Seal the surface: Use a good wax or lacquer to block air and moisture.
- Handle with gloves: Skin oils can cause tarnish. Clean hands or gloves keep brass bright.
- Store smart: Keep polished brass in a dry place. Use soft cloths or bags to prevent scratches.
- Clean gently: Wipe dust with a soft, dry cloth. Avoid harsh cleaners.
- Regular touch-ups: A quick buff every few months keeps the shine strong.
Callout: AFI Industrial Co., Ltd recommends regular inspections and gentle cleaning. Their machining experts know that a little care goes a long way for a mirror finish.
If you follow these tips, you’ll get a professional look every time. Don’t rush. Take your time, check your work, and enjoy the process. Your brass will thank you with a shine that lasts!
You’ve learned how to polish brass to a mirror finish step by step. Start with a good cleaning, sand with care, buff for shine, and protect your work. Stick to these steps for the best results and a long-lasting glow.
- Wipe your brass with a soft cloth often.
- Use wax or lacquer to keep tarnish away.
- Store pieces in a dry place.
Tip: For perfect shine every time, trust the expert advice and machining skills from AFI Industrial Co., Ltd!
FAQ
You can check with a magnet. If it sticks, your item is not solid brass. Look for scratches or worn spots. Plated brass may show a different metal underneath.
Some work, but always test first. Avoid harsh chemicals. Mild dish soap, vinegar, or a brass-specific polish is best. Never mix ammonia with bleach.
That green color is tarnish. Just clean it with a vinegar and salt paste. Rinse and dry well. Apply wax or lacquer to help prevent it from coming back.
It depends on where you keep it. For display pieces, polish every few months. For items you touch often, check them monthly. Wipe with a soft cloth to keep the shine.
Power tools work great for large, flat pieces. For small or detailed items, hand polishing gives you more control. Always use safety gear with machines.
| Method | Lasts Long? | Easy to Apply? |
|---|---|---|
| Wax | ❌ | ✅ |
| Lacquer | ✅ | ❌ |
Wax is quick but needs reapplying. Lacquer lasts longer but takes more effort.
Yes! Gloves keep your hands safe from chemicals and stop fingerprints from causing tarnish. Clean hands work too, but gloves are best for a pe
