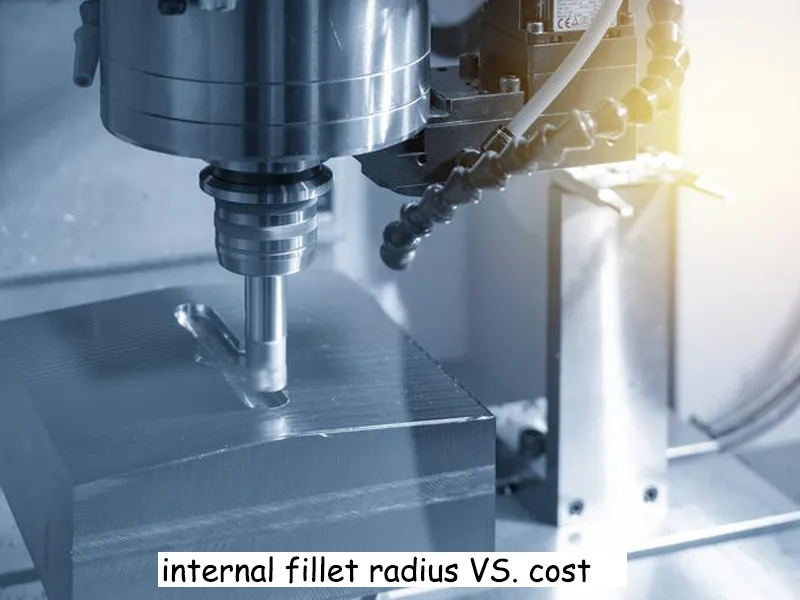
Product engineers strive to design industrial products that meet market demands with superior performance and cost-effectiveness. This article aims to introduce product engineers to the CNC machining process for internal radii, helping them optimise internal corner radii to reduce CNC machining costs, thus giving their products a competitive edge right from the design stage. Here is a quick look at how smart internal radius design helps with machining:
| Benefit | Description |
|---|---|
| Reduced Tool Stress | Internal radius design lowers tool stress and vibration for smoother machining. |
| Improved Surface Finish | Smoother machining makes the parts look better. |
| Cost Savings | Using standard tools for internal radius design saves money and makes cnc design cheaper. |
| Increased Machining Speed | A good internal radius design lets the machine go faster without stopping the tool. |
| Reduced Vibration | The right internal radius design stops vibration marks during machining. |
Utilise CNC machining design techniques and follow CNC machining design guidelines to ensure optimal results for the project. If you want to save money on CNC, you should focus on internal radius design.
Table of Contents
Why Internal Radius Design Matters for CNC Machining Cost
When manufacturing CNC parts, the size and shape of the inner radius will affect the entire machining process. To reduce costs, we need to understand how the inner radius affects tool selection, machining time, and part quality.
Tooling and Standard Cutter Sizes
Tool Diameter and Internal Radii
The tool diameter determines the minimum inner radius that CNC metal parts manufacturers can machine. If the inner radius is larger, a larger cutting tool can be used. Bigger tools cut faster and last longer. If the inner radius is small, a smaller cutting tool can be used. Small tools are weak and slow. They also cannot cut very deeply. This makes the job cost more and take longer.
- A larger inner radius allows for the use of larger cutting tools, which enables faster cutting and saves costs.
- A smaller radius means smaller tools are required, which increases costs and limits the cutting depth of the part.
- Tight corners can make the surface look worse because the tool rubs too much.
Tool Life and Wear
In machining processes, using standard-sized tools can save money. Standard tools are easy to buy and do not cost much to replace. Using special-sized tools will result in higher costs. Standard cutting tools last longer; standard cutting tools have a longer lifespan, therefore, frequent shutdowns are not necessary during metal parts machining. This helps lower CNC machining costs.
| Design Recommendation | Impact on Cost and Feasibility |
|---|---|
| Use Standard Sizes | Less material waste and tool wear, so costs go down and work is easier. |
Machining Time and Complexity
Multiple Passes vs. Single Pass
If a metal parts manufacturer machines smaller internal radii, the cutting tool must pass through the corner multiple times. This consumes more time and increases machining difficulty. Larger internal radii allow the cutting tool to pass through the corner in a single pass. This helps optimise the tool path and reduce CNC machining cost.
| Radius Size | Effect on Machining Time | Effect on Process Complexity |
|---|---|---|
| Smaller | Takes longer because the tool must make many moves | Makes programming harder and needs special tools |
| Larger | Takes less time and is easier to program | Makes the job simpler and faster |
Setup and Programming Time
Programming is easier when machining larger inner radii. The machinist can set up the job faster. The toolpath is simple, so there are fewer mistakes and less time spent on the machine. This is important for making parts easy to machine.
Surface Finish and Quality
Smooth Internal Corners
We all want the surface of the machined metal parts to be smooth. When processing smaller radii, the tool can shake and leave marks. A bigger radius lets the tool move smoothly and gives a better finish. This is important for how the part looks and works.
Stress Concentration
Sharp corners can make stress build up in the part. This can cause cracks or breaks. With proper internal fillet design, stress will be distributed, thereby improving the strength and safety of the part. Rounded corners also help make the part easier to machine and the toolpath better.
Tip: AFI Parts always try to use the biggest internal radius that fits customers’ design. This helps lower cnc machining costs and makes the part better.
By focusing on internal radius design, designers can spend less, get better quality, and make the job easier. So please check your designs for the best internal radius before sending them to AFI Industrial Co., Ltd for machining.
Actionable Tips for Optimising Internal Corner Radii to Reduce CNC Machining Costs

Use Standard Tool Sizes in Machining
Recommended Internal Radius Dimensions
When designing CNC parts, check if the internal corners can be machined using standard tool sizes. This step helps save money and makes machining faster. Using a common tool size, like a 3 mm or 6 mm end mill, means we do not need special tools. Try to make the internal radius the same as, or a little bigger than, the tool radius. For example, if using a 6 mm end mill, the inner radius should be set to at least 3 mm.
Here are some sizes we like to use:
- For shallow pockets or holes, we pick an internal radius that is at least one-third of the pocket’s depth.
- For small features, we use at least 0.030″ (about 0.76 mm), but we go bigger if we can.
- Please look at the standard tool sizes at AFI Industrial Co., Ltd, and match your design to those.
This way, the process stays simple and works well.
Standardization Benefits
There are many good things when you use standard sizes for inside corners in your designs:
- You can save money because you do not need special tools.
- The machinist spends less time changing tools, so more parts get made each day.
- The parts stay high quality and look the same every time.
- It can cut the average die-change time from 30 minutes to 15 minutes, which gives us more time to make parts.
| Aspect | Standard Dimensions | Non-Standard Dimensions |
|---|---|---|
| Average Die-Change Time | 15 minutes | 30 minutes |
| Changes Per Day | 4 | 4 |
| Annual Capacity Freed | 48 hours | 0 |
| Estimated Labor Savings | Thousands of dollars | N/A |
Tip: Please always use the industry standard bend radius if you can. This easy step is one of the ways to save your money.
Increase Internal Radii Where Possible
Minimum vs. Optimal Radii
Many product design engineers believe that the smallest radius is best suited for a tight fit. Now, we know that making the inside corners bigger helps lower CNC cost and makes better parts. When designers choose the smallest radius, they will need smaller tools for machining. These tools cut slower and wear out faster. By increasing the radius, larger tools can be used, resulting in faster cutting speeds and longer tool life.
Here is what I do:
- Always try to use the biggest radius that fits the design.
- Compare the smallest radius (like 0.5 mm) to a better size (like 2 mm or more).
- Making the radius bigger, from 0.5 mm to 2 mm, lets me use bigger, faster tools. This change saves time and money.
Cost Comparison Example
We tested two parts. One had sharp corners (R0), and the other had a 3 mm inside radius. The part with sharp corners needed EDM, which added extra steps and cost. The part with a 3 mm radius was machined in one setup, which saved time and money.
| Design Change | Cost Impact | Machining Process |
|---|---|---|
| R0 corners | Higher costs due to EDM | Needs extra steps |
| 3mm radius | Lower costs | Machined in one setup |
Note: Making the inside radius bigger can cut machining time by up to 30%. This is a big win for any cnc project.
Avoid Sharp Internal Corners
Cost Impact of Sharp Corners
The sharp inside corners make CNC machining harder. The tool cannot reach the corner easily. Therefore, smaller tools or special machining methods are required. This makes the job cost more and slows down production. Sharp corners also wear out tools faster and cause more shaking, which can make the surface look bad.
| Evidence Description | Cost Impact Description |
|---|---|
| Sharp corners make it hard for tools to reach. | This makes it tough to make exact inside shapes, so costs go up. |
| Smaller CNC cutting tools are needed for sharp corners. | This means slower cutting and less production. |
| Hard inside shapes need special tools or methods. | This makes the job cost more because it is harder. |
| Hard designs with sharp corners need expert workers and special tools. | This makes cnc machining cost more overall. |
| Hard designs make it tough to make parts and cost more. | Skipping sharp corners can help keep CNC costs down. |
Tip: Please skip hard features like sharp corners. This helps me save money and keep things simple.
Alternative Design Approaches
When you require a precise fit or a special shape, you can contact the mechanical engineers at AFI Parts, who will provide you with the most suitable solution. The following are some commonly used methods:
| Design Approach | Description |
|---|---|
| Avoiding sharp corners | Allow for small changes in the corner radius while keeping the part working right. |
| T-bone | Add a corner cut where the tool moves into the corner, making space for parts to fit together. |
| Dog bone | Use a more complex cut that goes in two ways, which looks good and works well. |
| Electrical Discharge Machining (EDM) | Use EDM for shapes that must have sharp corners, but this costs more. |
| Die-Sink EDM | Use a custom die for sharp corners, but only if the part really needs it. |
| Wire EDM | Use a thin wire to cut sharp corners, but I try not to use this unless I have no other choice. |
Try to make the part shape simple and use standard hole sizes. This makes the part easier to machine and keeps the cost low.
Note: Making inside corners bigger is one of the best ways I have found to save money and get better CNC results.
Design for Tool Clearance in Machining
Tool Entry and Exit Space
When machining parts using CNC machine tools, machinists always consider tool clearance. They check if there is enough space for the tool to go in and out. If this is ignored, the cutting tool may not be able to reach all positions, leading to machining problems. This can cause problems during the part’s production. For example, if a tapped hole is too close to a wall, the tool could break through the side.
Specialized Tooling Reduction
When the design has enough space, it does not need special tools. Special tools take longer to set up and cost more money. They also slow down the CNC process. By designing products that can be manufactured using standard tools, manufacturers can complete production more quickly and easily.
Tip: Our customers always discuss their designs with the machinist at AFI Industrial Co., Ltd. We look for features that might need special tools. We find ways to use standard tools and keep costs down.
Collaborate with Machining Experts Early
Design for Manufacturability Reviews
Working with CNC machining experts early is very important. The advice they provide can help product designers identify problems before they occur. We talk about tool paths, tool clearance, and the best way to make each part. This teamwork helps many of our customers avoid mistakes that cost a lot.
During a manufacturability review, the machinist might say to use a bigger internal radius or a different pocket shape. It also helps me learn more about CNC machining and how to design better parts.
Feedback on Internal Radii
Here is a table that shows why working with machining experts early is good:
| Advantage | Description |
|---|---|
| Improved Product Quality | Finding problems early makes the product better and stronger. |
| Reduced Costs | Fixing design issues early lowers costs and helps make more money. |
| Faster Time-to-Market | Making designs match what machines can do helps finish the product faster. |
| Enhanced Collaboration | Talking often with machinists and designers helps fix problems together. |
Working together early makes CNC parts better, costs less, and gets them done faster.
Note: If you want to lower cnc machining cost and get great parts, talk to your machining experts early. Their advice can really help.
Practical Examples and Dimensions for Optimizing Internal Radii
Internal Radius Guidelines by Material
When designing CNC parts, please check the optimal inner diameter for the material being used. Each material has its own rules for what works best. Following these rules will result in better processing results and lower costs. Below is a table used to select the appropriate inner diameter for different materials:
| Material | Minimum Bend Radius (Inches) | T: 1-6 mm | T: 6-12 mm | T: 12-25 mm |
|---|---|---|---|---|
| Mild Steel | 3/16″ | 0.8 x T | 1.2 x T | 1.5-2.5 x T |
| Aluminum | 1/4″ | 1 x T | 1.5 x T | 2-3 x T |
| Stainless Steel | 1/4″ | 2 x T | 2.5 x T | 3-4 x T |
| Copper | 3/16″ |
- T = material thickness
Aluminum Parts
For aluminum materials, I typically use a minimum inner radius of 1 times the thickness T for thin parts. If the part is thick, increase the thickness to 2-3 times the original thickness T. This helps prevent cracks and maintain part strength. I’ve found that a minimum bend radius of 1/4 inch works well for most aluminum parts
Steel Parts
When processing steel, the inner radius used is smaller than when processing aluminum. For thin steel plates, an inner radius of 0.8 x T is recommended; for thick steel plates, an inner radius of 1.5-2.5 x T is recommended. This keeps the cost down and makes machining faster.
Plastics and Composites
Plastics and composites need a bigger internal radius. For most plastics, use an inner radius of at least 2 times T. This stops the material from cracking or breaking. If you use the right radius, you can get a better finish and save on cost.
Tip: Please remember match the internal radius to the material and thickness. This simple step helps you avoid problems and keeps my cnc projects on track.
Before-and-After Design Comparisons
I have seen how small changes in internal radius can make a big difference. Here are some examples from my own work.
Small vs. Large Internal Radius
When we increase the internal corner radius, I see big improvements. For example, if I change a sharp 0.5 mm corner to a 3 mm fillet, the machining time drops by over 30%. The tool moves faster, and I do not need special tools. This change also lowers the risk of tool breakage.
| Design Modification | Benefit |
|---|---|
| Increasing internal corner radii | Reduces machining time by over 30% |
| Avoiding sharp corners | Lowers costs by simplifying machining process |
| Using standard tools and optimized paths | Enhances manufacturability and reduces costs |
- Replaced sharp internal corners with a 2 mm or 3 mm fillet. This made the part easier to machine and improved the surface finish.
- Adjusted wall thickness in some parts. This made the part stronger and easier to hold during machining.
Sharp vs. Rounded Corner
Sharp corners cause problems in CNC. The tool cannot reach the corner easily, so we need to use smaller tools or even EDM. This adds time and cost. When we use a rounded corner, the tool moves smoothly, and the part is finished faster. In die casting, we always avoid sharp internal edges and use at least a 0.5-1 mm radius. This reduces tool stress and the risk of cracks.
Cost Impact Analysis for Machining
Here is a table that shows how the internal radius changes the machining process and cost:
| Design Radius | Required Tool | L/D Ratio | Estimated Cost/Time Impact | Notes |
|---|---|---|---|---|
| R3mm | D6mm | 3.3:1 | 1x | Efficient and stable. |
| R1mm | D2mm | 10:1 | 3x – 5x | High risk of tool breakage. |
| R0.5mm | D1mm | 20:1 | 8x – 15x | Significant part failure rate. |
| R0 | CNC + EDM | N/A | 10x – 20x+ | Requires costly EDM process. |

When it is a 3 mm radius, we can use a 6 mm tool. This is efficient and stable. If it is a 1 mm radius, we need a 2 mm tool. This tool is more likely to break, and the cost goes up three to five times. If it is a 0.5 mm radius, the tool is even smaller, and the cost can be eight to fifteen times higher. If there is no radius at all, we need EDM, and the cost can be twenty times higher.
Estimated Savings
By optimising the internal radius, we see real savings. For example, switching from a sharp corner to a 3 mm radius can cut machining time by 30%. This means we finish jobs faster and spend less on tools. We also avoid extra steps like EDM, which saves even more.
Case Studies
I worked on a project where the original design had sharp corners. The cost was high because we needed EDM. After we changed the corners to a 3 mm radius, we used standard CNC tools. The cost dropped, and the part quality improved. We finished the job faster and with fewer problems.
Note: If you want cost-savings on your project, always check your internal radii. Small changes can lead to big savings and better CNC results.
Common Mistakes in Internal Radius Design That Increase CNC Machining Cost

When designing CNC parts, engineers avoid mistakes that would increase costs. Some common errors in internal radius design can make CNC machining much more expensive. Here are the main mistakes and how they affect the cost.
Specifying Small Radii Unnecessarily
Cost Drivers
I often see designers pick very small internal radii when they are not needed. This choice can drive up the cost of CNC machining quickly. Here is what happens:
- Small internal radii force me to use smaller tools in CNC.
- Smaller tools need more passes to clear out material.
- More passes mean more time on the CNC machine, which raises the cost.
- Small tools break more often and bend easily, so we have to replace them. This adds to the cost.
- The risk of tool failure means we might need to stop machining and start again, which wastes time and money.
Using excessively small corner radii without justification will reduce CNC machining speed and increase costs. Before choosing a small corner radius, please confirm whether such a small corner is truly necessary.
When Small Radii Are Needed
Sometimes, a small internal radius is necessary for the part to work right. For example, if the part must fit with another piece that has a sharp edge, we cannot avoid a small radius. In these cases, industrial product designers have to accept the higher cost and plan for extra machining time. Please talk with your custom metal manufacturer. If it must use a small radius, make sure the rest of the design is as simple as possible to keep the overall cost down.
Overlooking Tool Accessibility
Deep Cavities and Tight Corners
I have learned that tool accessibility is a big deal in CNC. If your design has deep cavities or tight corners, the CNC tool might not reach all the way in. This can cause problems:
- The tool cannot make a smooth path, so the surface finish gets worse.
- Sharp corners in deep pockets are hard for round CNC tools to reach.
- If the corner radius is not increased or the side walls are not thinned, the machinist may need to request new specifications, which delays the project and increases the cost.
- Tool stress goes up in these spots, which can lead to tool breakage and more downtime.
Accessibility Solutions
To address these issues, try adding fillets to the inside corners or reducing the steepness of the side walls. This allows the CNC tool to enter and exit more easily. By doing this, we can machine the entire contour with a single tool, thus speeding up the process and reducing costs. This also avoids the use of variable-depth cavities, which can make CNC tool paths complex and time-consuming. By considering tool accessibility in advance, you can effectively control CNC
machining costs and achieve better machining results.
Ignoring Standard Tool Availability
Custom Tooling Costs
Ignoring standard tool sizes will increase the difficulty and cost of CNC machining. If customers’ design needs a special tool, the machinist must order it or make it. Custom tools cost more and take longer to set up. This delay adds to the total cost of the project. So try to match the internal radii to standard tool sizes to avoid this problem.
Lead Time Issues
Custom tools do not just cost more—they also slow down the whole process. Waiting for a special tool can add days or even weeks to the project. This delay can push back delivery dates and increase the cost even more.
Summary
In contrast, sharp corners or small radii often require specialized tooling or expensive secondary processes like EDM. By prioritizing the largest feasible radius and following “design for manufacturability” (DFM) principles, engineers can significantly lower production expenses and enhance part quality from the initial design stage.
FAQ
In CNC machining, the cutting tools determine the cost. Since most milling cutters are cylindrical, they naturally create rounded internal corners. A larger radius allows the use of larger, more rigid tools that can cut faster and are less prone to breaking, significantly reducing cycle time. Conversely, very small radii require fragile, small-diameter tools and slower feed rates—or even expensive Electrical Discharge Machining (EDM)—which drives costs up exponentially.
To minimize costs, follow the “3:1 Rule”:
- Depth Ratio: The internal radius should be at least 1/3 of the cavity depth. For example, if a pocket is 12mm deep, the radius should be at least 4mm.
- Tool Clearance: It is best to design the radius slightly larger than standard tool sizes (e.g., if using a 3mm radius tool, design a 3.1mm or 3.2mm radius). This prevents the tool from sudden full-load contact in corners, reducing vibration and improving the surface finish.
You can expect the cost to increase by 30% to 100% or more. Because CNC tools cannot physically cut a perfectly sharp internal corner, manufacturers must use EDM (Electrical Discharge Machining) or extremely slow micro-tooling. If a sharp corner is necessary for a mating part, consider using a “Dog-bone Fillet” or an “Undercut,” which allows for standard tool clearance while still achieving the functional fit.
This avoids the high cost of custom tooling. Most machine shops stock standard metric (e.g., 3mm, 6mm, 10mm) or imperial tools. If your design requires a non-standard radius, the shop must purchase specialized cutters and spend more time on machine setup. Standardizing radii across your entire part allows for fewer tool changes (Setup Time), leading to a lower unit price.
Depth is a major cost driver. We recommend that the pocket depth does not exceed 4x the tool diameter.
- Excessively deep pockets lead to tool deflection, breakage, and difficulty in chip evacuation.
- If a deep pocket is unavoidable, ensure you increase the internal radius as much as possible to allow for larger, sturdier tool shanks, which helps maintain precision while keeping machining fees in check.
Yes—the harder the material, the more critical the radius design becomes.
- Aluminum: It is easy to machine, so smaller radii are more manageable.
- Stainless Steel/Titanium: These are “hard-to-machine” materials that wear down tools quickly. Designing larger internal radii for these materials significantly extends the life of expensive cutters, allowing manufacturers to offer you more competitive pricing.
The most effective method is a DFM (Design for Manufacturing) Review. Before placing an order, consult with AFI Industrial’s engineers. We can check for narrow deep slots, tiny radii, or overly thin walls. By making small adjustments to your radii at the design stage, we can often help you save 15% or more on your total machining budget.
