When machining thin-walled parts, we need to prevent bending and shaking. Careful setup alone is not sufficient. Thin-walled pieces present unique challenges. We often observe warping and twisting when they heat up. Tools tend to wear out more quickly because thin walls are prone to bending. Cooling and finishing become more difficult, as thin walls can easily change shape or crack. To achieve optimal results, AFI Parts implements improved machining plans, precise holding tools, and robust controls.
Table of Contents
Causes of Deformation and Excessive Vibration
Thin-Walled Workpiece Rigidity
When we work on a thin-walled workpiece, I see that low rigidity makes it bend and twist. Thin walls are not as strong as thick walls. Even small changes in pressure or heat can make them bend or twist. To keep the shape right, we pay extra attention to how the workpiece is held and supported. We use these steps to help keep the workpiece strong and stop it from bending:
| Process Measure | Description |
|---|---|
| Loosen Clamping | Loosen the clamp before the last cut so the part can relax. |
| Lightly Tighten | After loosening, gently tighten the clamp to hold the part. |
| Apply Clamping Force | Push down on the support surface and in the strongest direction. |
Doing these things helps the thin-walled workpiece go back to its normal shape. It also lowers the chance of bending and twisting.
Cutting Forces and Tool Deflection
Cutting forces are a big reason why thin-walled workpieces bend. If the cutting parameters are set incorrectly, such as going too deep or too fast, they will generate more heat and cutting force. This makes the workpiece bend more and sometimes twist. Tool deflection can also make the surface rough and cause too much shaking. I have learned these things:
- Tool deflection can cause up to 15% of parts to be thrown away.
- Machining takes 40-60% longer if we go slow to stop bending.
- Too much shaking can break tools and cost more to fix.
We always check our tools’ shape and replace old tools quickly. For example, a negative rake angle makes cutting forces go up by 15–20%. We also do not cut deeper than 1.5 mm, because this can make leftover stress go up by 30%. By watching these things, we stop bending and make better thin-walled workpieces.
Clamping Pressure and Fixture Design

Clamping pressure and fixture design are very important for stopping bending and twisting. If the pressure is too high, thin-walled workpieces may bend or fold; if the pressure is too low, the parts may move, leading to dimensional deviations. Bad clamping puts stress in the wrong spots, especially in thin areas. Milling can also make moving forces that bend the part and cut too much.
Tip: We always push down on the support surface and in the strongest direction. This keeps the thin-walled workpiece steady and stops too much shaking.
We make my fixtures to hold the part as much as we can without squeezing it too hard. This balance helps prevent parts from bending and vibrating. It results in better machining performance every time thin-walled workpieces are processed.
Machining Thin Wall Parts: Path Planning and Sequence
When machining thin-walled parts, proper path planning and machining sequence can reduce vibration and deformation by up to 30%. We always plan each step to keep the part stable and avoid tool deflection. Careful planning helps me get better results and saves time.
Roughing and Finishing Passes
Before starting any work, we must first consider how much material needs to be removed and how to process it safely. We use roughing passes to take off most of the material, then finishing passes to get the final shape. This method helps us control deformation and keeps the part strong during the machining of thin wall parts.
Stock Allowance for Final Pass
In the machining process of metal parts, we always leave a small amount of material in the final step, which is called the machining allowance. This step is very important because it removes any subtle bends or marks that may have been created during the previous cutting process. We usually leave between 0.020 and 0.040 inches of stock after roughing. This small layer helps us fix any deformation that happened during roughing. It also gives us a chance to use light cuts, which lowers tool deflection and keeps the surface smooth.
Multiple Light Cuts
We never try to remove too much material at once. Instead, we use multiple light cuts. This approach keeps cutting forces low and reduces the risk of deformation. When using light cutting, we found that both vibration and tool deflection were reduced. The part stays more stable, and we get a better finish. At the same time, because the tools do not need to withstand excessive pressure, their service life is also extended.
Tip: Using thin cuts and leaving a small amount of excess material helps control temperature and stress. This method prevents deformation or warping of thin walls.
Machining Order for Thin Walls

The order of machining features is crucial. Typically, internal features are machined first, followed by the outer walls. This sequence keeps the part strong for as long as possible. If the outer wall is machined first, the part may lose support and be more prone to bending.
Internal Features First
Before machining the outer surface of a part, the holes, grooves, and other internal features are machined first, so that the thick outer shell can support the part during the machining of the internal structures. We machine holes, pockets, and other inside shapes before I touch the outer walls. This way, the thick outer shell supports the part while I work on the inside. After completing the internal features, proceed with external machining. This sequence helps to avoid deformation and tool deflection. We also need to follow a set sequence to keep the part stable:
- Initial facing or squaring with light cuts to set reference surfaces.
- Rough machining to remove most material, leaving a stock allowance.
- Letting the part rest for a few hours if it is complex.
- Semi-finishing to achieve a close approximation of the final size.
- Another rest period to let stress settle.
- Finish machining with very light cuts.
- Adding small features and details last.
This step-by-step process maintains the part’s stability and reduces the risk of deformation during machining of thin-walled parts.
Toolpath Optimization
Optimise the tool path to maintain uniform cutting load and avoid sudden changes in direction. Toolpath optimisation helps reduce vibration and deformation. When planning tool paths, we strive to make the tool movement smooth and avoid unnecessary idle movements. Too much empty travel can cause vibration and waste time.
- Intelligent roughing and finishing toolpaths are used to balance the tool load.
- Guide the tool along the surface’s vector direction during finishing. This step lowers machine vibration and keeps the surface smooth.
- Avoid uneven cutting loads, as this can lead to tool chipping and deformation.
- Use flexible support fixtures and tunable clamping tables to match the stiffness of the part. These supports help me suppress vibration and tool deflection.
We also use advanced methods like magnetic follow-up supports and real-time closed-loop control for wall thickness. These techniques help me keep the part stable, especially when machining thin wall parts with non-uniform thickness.
Note: Optimized toolpaths and proper supports can reduce vibration and deformation by up to 30%. This improvement makes a big difference in the quality of thin-walled components.
We always check our toolpaths before starting machining, look for places where the tool might jump or where the load might change quickly. By fixing these spots, we keep tool deflection low and prevent deformation. The parts come out straighter, smoother, and with fewer defects.
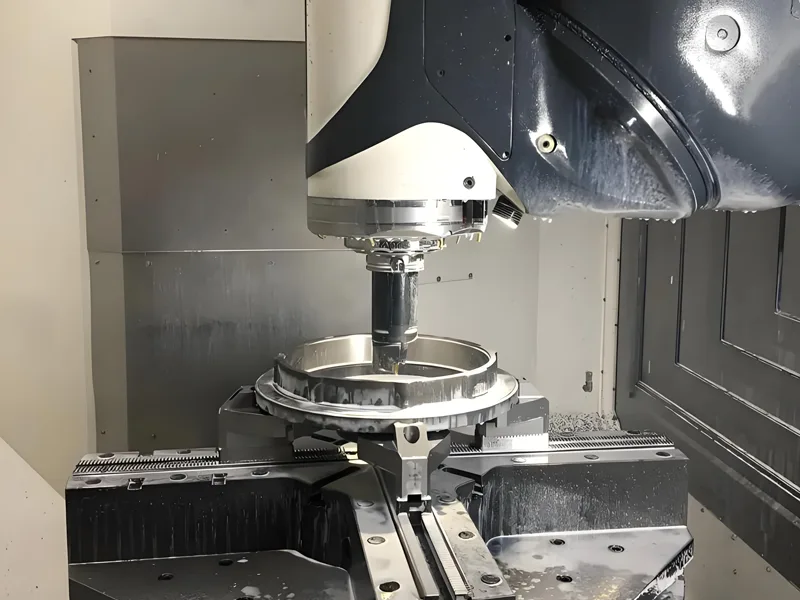
Fixturing Thin-Walled Workpieces
Minimising Clamping Force
When preparing to machine thin-walled parts, minimise the clamping force as much as possible. Thin walls can bend or change shape if pressed too hard. Fixture design is very important for keeping the part steady and stopping it from moving.
The study explains a careful way to design and check a special fixture system made for thin-walled shapes. It focuses on spreading the load evenly and lowering bending to stop stress in weak wall spots. The fixture was tested with finite element analysis (FEA) to see how stress and movement happen when the machine works.
We use these ideas to keep the clamping force low:
- Look at how much of the fixture touches the part. A bigger contact area spreads out the force and helps stop dents or bends.
- Only tighten clamps enough to keep the part still. Too much force can crush or twist thin walls.
- Use torque wrenches or preset stops to make sure I do not use too much force.
Using a smaller clamping force offers several advantages:
- The part keeps its size and stays in place.
- There is less shaking and noise, so the surface looks better and tools last longer.
- The part does not get damaged from squeezing too hard.
- Faster processing speed allows for optimal cutting speed and faster completion of the machining process.
Soft Fixtures and Low-Pressure Clamps

I like to use soft fixtures and low-pressure clamps to protect thin-walled parts. These tools help us stop marks and bending. When I use less force, the finished part looks better and does not bend as much.
- Using less clamping pressure is very important to keep thin walls from bending.
- Soft fixture methods and low-pressure clamps work well for thin-walled parts.
Use soft jaws made from plastic or aluminium. These materials spread out the force and make a cushion for the part. Rubber mats or pads can also be used to prevent slipping and reduce localised pressure. Low-pressure clamps hold the part tight without crushing it. Adjust the clamp until the part feels safe but not squeezed.
Tip: We always do a test run before I start real machining. This helps us find problems with clamping force or how the fixture fits.
Vacuum and Contoured Fixtures
For thin-walled aluminum parts, use vacuum and contoured fixtures. These fixtures use suction to hold the part in place. I think this works well for weak or odd-shaped parts. Vacuum fixtures spread the holding force everywhere, so there are no strong spots that can bend the part.
Vacuum-suction fixtures work great for thin-walled aluminum parts because they can hold odd shapes without bending them. This keeps the size right and the surface smooth, which is very important in machining. The fixtures use suction to keep the pressure even on the part, so there is no extra stress or bending. This makes them perfect for weak materials.
We also use contoured fixtures that fit the part’s shape. These supports hold the part and stop it from bending when the part is machined. The best processing results are achieved when vacuum suction is used in combination with custom-designed support fixtures.
- They help us put the part in the right spot fast.
- They are great for weak materials like aluminum-magnesium and titanium alloys.
- They work well for making special thin-walled aerospace parts.
After using these specialised clamps, I noticed a significant vibration reduction, and the surface finish was much smoother. The part stays steady, and we can use less clamping force the whole time.
Custom Supports for Thin-Walled Aluminum Parts

When machining thin-walled aluminum parts, we use custom-made support fixtures. These supports help keep the part steady and stop it from bending. Thin-walled aluminum parts can change shape fast if they do not have good support. We know that both the process and fixture design matter a lot for these parts.
Use different custom support structures to achieve optimal results:
- Put in temporary ribs or webs inside the blank. These ribs make thin-walled aluminum parts stronger while I machine them. After processing is complete, we will remove these reinforcing ribs to obtain the final shape.
- Use soft, shaped supports that fit the part. These supports hold thin-walled aluminum parts without making marks or dents.
- Use modular fixtures with pins that move. These pins press softly on the surface and stop thin-walled aluminum parts from moving.
- Add backing plates or fillers behind the walls. This helps stop vibration and keeps thin-walled aluminium parts from bending when we cut them.
Tip: A good fit means less chance of bending and a smoother finish.
Cutting Parameters and Tool Selection
Feed, Speed, and Depth of Cut
When setting up the machine tool, it is necessary to observe the feed rate, spindle speed, and cutting depth. These settings control how much force the tool uses. Feed rate is the most important for deformation. If the feed rate is too low, the cutting tool will exert greater force on the workpiece wall, leading to a ploughing effect and causing the workpiece wall to bend. If the feed rate is too high, the chip load will increase, which can also lead to bending of the workpiece wall. Try to find a balance point to maintain the stability of the workpiece wall
- Feed rate changes how much the wall bends, almost 87% of the time.
- Low feed rates can bend the wall because of ploughing.
- High feed rates bend the wall because of bigger chip loads.
- Axial depth of cut changes the cutting force but does not bend the wall as much as the feed rate.
- Spindle speed does not change wall bending much; therefore, the main focus is on the feed rate and depth.
Before officially starting production, we will test different settings using scrap materials. This helps to avoid errors such as parts bending or being damaged due to overheating.
Short Tool Length and Overhang
For thin-walled parts, use the shortest possible cutting tools. Long tools can bend or shake, which makes the wall bend more. Short tools stay stiff and cut better. The tool overhang length should also be kept as short as possible. This means less of the tool sticks out. Short overhang lowers shaking and gives a smoother finish.
If you need to reach deeper areas, use a specialised tool with neck reinforcement. These tools help stop bending and heat problems. We check our tool setup before every job. And make sure nothing is loose or sticking out too far.
Tip: A short, strong tool setup helps control shaking and heat bending during long jobs.
Variable Pitch and Special Tool Designs
We pick tools with variable pitch for thin wall parts. Variable pitch means the space between cutting edges changes. This breaks up shaking patterns and stops chatter. We also use tools with special necks or shapes to lower shaking even more.
| Advantage | Description |
|---|---|
| Breaks up vibration patterns | Helps stop chatter while machining. |
| Cuts down on chatter and shaking | Makes machining smoother and better. |
| Keeps the tool steady at high speeds | Helps the process work well and stay exact. |
| Makes the surface look better | Gives a smoother finish on the part. |
- Use variable pitch tools to lower shaking.
- Pick special neck shapes to stop chatter.
These tool choices help keep the part steady and lower the bending. At the same time, they can make parts have smoother surfaces and fewer heat problems. Using the right tools leads to better parts and reduced waste.
Chatter Suppression for Excessive Vibration
When machining thin-walled parts, chatter problems are frequently encountered. Chatter is a loud, unstable noise that happens when the tool and workpiece vibrate together. This problem can ruin the surface finish and even damage the part. Over time, we have learned several ways to stop chatter and keep my parts smooth.
One of our first steps is to check the balance of our tool holder. If the holder is not balanced, it can cause extra shaking. We always make sure our tool holders spin smoothly. We also look at how we hold the workpiece. A strong, rigid fixture helps keep the part steady. If the part moves, even a little, chatter can start.
Here is a table of the most effective chatter suppression techniques we use:
| Technique | Description |
|---|---|
| Tool Holder Balance | I balance tool holders to minimise unwanted movement. |
| Workpiece Fixture | I redesigned fixtures to hold the workpiece more securely. |
| Tool Path Optimization | I plan tool paths to direct cutting forces into the stiffest areas. |
| Spindle Speed Adjustment | I change spindle speeds and adjust feed rates to find the quietest setting. |
| Corner Machining | I use circular moves and smaller tools to ease sharp corners. |
| Rigid Workpiece | I make the workpiece as solid and secure as possible. |
| Tool Selection | I pick end mills with more flutes for smoother cutting. |
First, select the appropriate rotational speed and feed rate based on the material. If we hear chatter, we try increasing the feed or chipload per tooth. Sometimes, we move the workpiece closer to the spindle to make it stiffer. We also check that my tool run-out stays within safe limits.
Here are the steps we follow to keep chatter away:
- Match my tool shape, feed style, and coolant to the material.
- Use adaptive toolpaths, like high-efficiency milling, to keep the tool load steady.
- Choose tools with variable helix and flute spacing to break up vibration patterns.
We also use shallow cuts and adjust spindle speeds to avoid resonance. Solid vices and double-sided clamping help us hold thin parts tight. We avoid single-end clamping because it lets the part move too much. Picking the right tool with strong geometry and tough materials also helps me cut down on excessive vibration.
Tip: If you hear a high-pitched sound or see marks on the part, stop and check your setup. Small changes in speed, feed, or fixture can make a big difference.
Cooling and Lubrication
Heat Control in Thin Wall Machining
When machining thin-walled parts, we always pay close attention to heat. Thin walls heat up fast because they cannot absorb much energy. If the part’s temperature is too high, it may deform or even crack. Heat control is just as important as tool selection or fixturing.
Use several methods to keep heat under control:
- Reduce spindle speed when the part gets warm. Lower speed means less friction and less heat.
- Use light cuts instead of deep ones. This keeps the tool from rubbing and stops heat from building up.
- Pause between passes to let the part cool down. Even a short break helps the metal relax and return to its normal shape.
- Check the part with your hand or a temperature sticker. If it feels hot, stop and let it cool.
Tip: If we see smoke or discoloration, I know I need to adjust my process right away. Heat damage can ruin a thin wall part in seconds.
Dull tools make more heat and can cause the wall to bend. We change tools before they get too worn. This habit can help our customers and us to time and money in the long run.
Coolant Types and Application
Choosing the right coolant makes a big difference in thin wall machining. Uee coolant to carry heat away from the cutting zone. This keeps the part cool and helps the tool last longer.
Here is a table of the coolants we use most often:
| Coolant Type | Best Use Case | My Experience |
|---|---|---|
| Water-based | Aluminum, magnesium | Good cooling, easy cleanup |
| Synthetic | High-speed steel, titanium | Great for tough materials |
| Oil-based | Stainless steel, finishing passes | Smooth finish, less chatter |
| Mist/Lubricant | Small parts, light cuts | Reduces heat, less mess |
We always apply coolant directly to the cutting edge. We use a steady flow instead of a spray. This method cools the tool and the part at the same time. For very thin walls, we sometimes use a mist system. Mist cools the part without flooding it, which helps prevent thermal shock.
Note: We never let coolant pool on the part. Standing liquid can cause uneven cooling and lead to warping.
We also check my coolant lines before every job. Blocked or weak flow can cause hot spots. Keep coolant clean and replace it when it gets dirty. Clean coolant works better and keeps our parts safe.
By controlling the temperature and using appropriate coolants, the machining accuracy and surface finish of thin-walled parts can be ensured. The parts come out with fewer defects, and the tools last longer.
Temporary Supports and Stress Relief
Backing Materials and Fillers

When we machine thin wall parts, I often use temporary supports to keep the walls from bending or vibrating. These supports give the part extra strength during cutting. We will remove them after I finish machining. We have found that choosing the right backing material makes a big difference in the final result.
We use several types of temporary support materials. Each one has its own benefits:
- Paraffin wax: We melt this wax and pour it into cavities or behind thin walls. It hardens quickly and gives strong support. After machining, we heat the part gently to remove the wax. This method works well for complex shapes.
- Urea melt: We use urea melt for parts that need extra support. It fills gaps and holds thin walls steady. We can dissolve it in water after machining, which makes cleanup easy.
- Low-melting alloys: Sometimes, we use special alloys that melt at low temperatures. These alloys provide solid backing and are easy to remove with heat.
- Epoxy or resin: For some jobs, we use epoxy or resin to fill spaces behind thin walls. These materials cure hard and support the part during cutting. We remove them with heat or solvents.
Using these backing materials helps prevent deformation and keeps the parts stable. This allows for a better surface finish and more precise dimensions.
Post-Machining Stress Relief Methods
After processing, the stress in the product material must be relieved. Thin wall parts often hold onto stress from cutting and heat. If we ignore this, the part can warp or crack later. We use several methods to reduce residual stress and improve part quality.
Here is the process we follow to manage stress in thin-walled components:
- Look at our machining conditions. The direction of the tool feed, the type of milling, and the speed all affect residual stress. We adjust these settings to lower stress during cutting.
- Use up-milling with flood cooling when possible. This method cools the part quickly and reduces surface stress.
- Processing is performed along the rolling direction of the material. This step helps the part stay flat and strong.
- Let the part rest between roughing and finishing passes. This pause gives the metal time to relax and release built-up stress.
- Use low-temperature heat treatment after machining. This process helps the part return to its natural shape and removes hidden stress.
By following these steps, we keep my thin wall parts stable and strong. There are fewer defects and longer part life. We always pay attention to stress relief because it makes a big difference in the final quality.
I learned that using smart fixturing, picking the right tools, and taking careful steps works best for thin wall parts. We always use things like soft jaws, short tools, and light cuts together. This way, we can stop vibration and bending. Here is a simple checklist I follow in AFI Parts:
| Strategy | Why It Works |
|---|---|
| Use soft jaws | Spreads clamping pressure evenly |
| Clamp close to cut | Reduces vibration and movement |
| Short tool overhang | Less tool flex, cleaner cuts |
| Support long profiles | Prevents sagging and chatter |
| Light passes | Lowers cutting forces and heat |
The article says there is no one way to machine all thin wall parts. We always change my steps to fit the part and material for the best results.
FAQ
The hardest part is keeping the part exact and steady. Thin walls bend very easily. I set up my CNC machine carefully and use good clamps. This helps me keep the size right. I always watch for heat that can make the part bigger. I changed my process to keep things accurate.
I check every part to see if it is right. I use tools to measure how exact it is. I watch for heat and change my CNC steps if needed. I write down what I do for each job. These steps help me keep the parts good and the size correct.
I pick short tools and take light cuts. I check my CNC machine to see if it shakes. I use special fixtures to hold the part still. I watch for heat and change how much coolant I use. These steps help me make the part very exact.
Heat makes thin wall parts get bigger or smaller. I look for heat when I use my CNC machine. If the part gets hot, it can change size. I use coolant and stop between cuts to cool the part. This keeps the part the right size.
I use strong fixtures and soft jaws to hold the part. I do not use too much force. I put backing under thin walls for support. I plan my CNC toolpaths so the tool does not turn fast. These steps help me keep the part steady and exact.
I use tools with different tooth spaces and short tools. I make sure my tool holders are balanced. I check my CNC machine for loose parts. I use smart toolpaths and support the part well. These actions help me stop shaking and make better parts.
The clamping design keeps the part from moving. I use soft jaws and clamps that do not squeeze too hard. I spread the force out so the part does not bend. Good clamping helps me keep the part exact and steady. It also keeps the size right when I use my CNC machine.
Yes, I can use precision machining with CNC for thin wall parts. I pick the best tools and fixtures. I control heat and shaking. I always check if the part is steady and exact. This way, I can make thin wall parts very precise.
