You can fix most aluminum sandblasting problems by starting with the basics. Choosing the right blasting media so you do not get warping or gouging. Change your equipment settings and keep tools in good shape for the best results. Using the wrong media or too much pressure can bend thin aluminum sheets. This can lead to costly delays and wasted materials. When you look for aluminum sandblasting problems and solutions, remember that careful setup and smart choices matter most.
Key Takeaways
- Pick the correct blasting media. This helps stop warping or damage to aluminum.
- Look for problems early. Check for signs like pitting, streaks, or white residue.
- Use softer abrasives, such as walnut shells, on thin aluminum. This helps prevent surface damage.
- Take care of your equipment often. This stops clogs and keeps it working well.
- Clean and degrease the aluminum before blasting. This gives you better results.
- Move the nozzle slowly and evenly. This helps make the finish smooth and stops streaks.
- Wear safety gear to protect yourself from dust and debris while sandblasting.
- Think about using advanced machining or robotic blasting. These can help you work faster and get better quality.
Table of Contents
Identifying Aluminum Sandblasting Problems
When you sandblast aluminum, you should look for problems early. Finding issues fast helps you save money and time. First, check the surface for any changes you can see. Next, pay attention to how the aluminum acts during and after blasting. Always think about the type and thickness of the aluminum before starting.
Visual Cues
Many sandblasting problems are easy to spot. Watch for these signs:
Surface pitting
Surface pitting looks like tiny holes or dents on the metal. This often happens when the blasting pressure is too strong or the abrasive is too rough. Pitting makes the metal weaker, and the surface feels bumpy.
Streaks and uneven finish
Streaks or uneven spots mean the blasting was not even. You might notice lines or patches that do not match the rest. This can happen if you move the nozzle too quickly or too slowly, or if the media flow changes.
White residue
White residue is a powdery layer left on the aluminum. It usually shows up when water gets into the blasting media or air. Sometimes, it means the media is dirty. If you see white powder, clean the aluminum right away.
Tip: Always check the color and shine of your aluminum parts after blasting. If they look different, there may be a problem.
Here is a table to help you find common visual cues:
| Visual Cue | Description |
|---|---|
| Color Difference | Big color changes between products can make them look bad and less appealing. |
| Gloss Inconsistency | Different shine levels can make the finish look messy. |
| Roughness Inconsistency | Bumpy or uneven texture can hurt how the product works, especially in important jobs. |
Performance Signs
Sometimes, problems show up in how the aluminum works after blasting. Look for these clues:
Reduced efficiency
If blasting takes longer or the surface does not clean well, the reason is nozzle wear and clogging. It can also mean the nozzle is blocked or the compressor is weak.
Inconsistent texture
A good sandblasted surface should feel the same everywhere. If you touch the aluminum and feel rough or smooth spots, the blasting was not even. This can make it hard for paint or coatings to stick later.
Note: Always check the surface by touching and looking at it. Both ways help you find problems early.
Why Aluminum Type and Thickness Matter
Before sandblasting, check what kind of aluminum you have and how thick it is. Thin sheets can bend or break more easily. Here is a quick guide:
| Aluminum Thickness | Sandblasting Risk | Recommended Action |
|---|---|---|
| < 1.5mm | High chance of damage or bending | Do not sandblast; use bead blasting |
| < 1mm | Very high chance of breaking | Do not sandblast; use bead blasting |
| > 1.5mm | Safer for sandblasting | Okay for sandblasting |
Never sandblast aluminum that is thinner than 1.5mm. For thin pieces, bead blasting is safer. Thicker aluminum can handle sandblasting better, but you still need to pick the right settings and media.
Remember: Checking the aluminum before blasting helps you avoid mistakes and saves money.
Common Challenges in Sandblasting Aluminum
When you work with aluminum, you can run into problems. These issues can change how your finished product looks. If you know what causes these problems, you can fix them. This helps you get good results every time you sandblast aluminum.
Surface Damage and Pitting
Causes (e.g., wrong blast media and pressure)
Surface damage and pitting happen for a few reasons. Using the wrong abrasive can hurt the aluminum. If the blast media or pressure is too high, it can cause damage. Steel grit is very strong and can harm thin aluminum quickly. Soda and walnut shells are safer and do not damage the surface as much. Thin aluminum is easy to damage. If you use harsh abrasives or too much pressure, you get tiny holes or dents.
| Feature | Walnut Shell Blasting | Sandblasting |
|---|---|---|
| Abrasiveness | Soft and non-damaging | Varies from soft to harsh |
| Surface Sensitivity | Good for delicate surfaces | Can be too aggressive |
Solutions (adjust pressure, use softer abrasives)
You can fix pitting by lowering the pressure. Use a softer abrasive to help protect the aluminum. Soda blasting is good for thin or delicate aluminum. Walnut shells are also safe to use. Never use steel grit on thin aluminum. If you see pitting, stop and check your settings right away.
Tip: Media blasting lets you change the force and type of abrasive. This helps you clean the surface without hurting it.
Prevention (small spot test, regular checks)
Test your setup on a scrap piece before you start. This shows if your settings are safe for the job. Check your equipment and media often. Make sure you use the right abrasive each time. Regular checks help you find problems before they ruin your work.
Uneven Finish and Streaks

Causes (inconsistent movement, media flow issues)
Uneven finishes and streaks happen for many reasons. If you move the nozzle at different speeds, you get streaks. Changes in media flow can also cause problems. The amount and type of abrasive matter. Nozzle distance and shape change the finish, too. If your hose is too long or the air is weak, the finish can look patchy.
| Factor | Impact on Surface Finish |
|---|---|
| Quantity of abrasive | Changes how even the finish looks |
| Abrasive brand and size | Alters the texture and quality |
| Nozzle distance | Affects intensity and uniformity |
| Nozzle shape and size | Impacts abrasive spread |
| Hose length | Can lower pressure and media flow |
| Type of air used | Changes the quality of the finish |
Solutions (steady hand, re-blasting)
To fix streaks, keep your hand steady. Move the nozzle at the same speed. If you see uneven spots, re-blast those areas. Make sure the media flow stays the same the whole time.
- Decide what kind of finish you want before you start.
- Change your blasting settings to match your goal.
- Use the same abrasive and amount for the whole job.
Prevention (proper technique, even media distribution)
Practice good technique to prevent uneven finishes. Hold the nozzle at the same distance from the surface. Move at a steady pace. Make sure the media is spread out evenly. Check your equipment for clogs or leaks before you begin.
Note: Always set your blasting parameters for the finish you want. This helps you avoid streaks and get a smooth surface.
Surface Contamination and White Residue

Causes (moisture, contaminated media)
White residue and contamination come from moisture or dirty abrasives. Oils and adhesives left on the aluminum can also cause problems. Tape, paint, or other metals may create issues, too. If you do not clean the surface well, you may see white spots or uneven coatings.
- Foreign materials
- Machining oils
- Adhesives
- Tape
- Paint
- Other metals
- Anodic coatings
- Intermetallic particles
Solutions (cleaning, solvent use)
To remove white residue, clean the surface with a chemical cleaner or solvent. Mechanical cleaning, like polishing, can help but may not remove everything. Solvents work well for some contamination, but it depends on what is on the surface.
| Cleaning Method | Description | Effectiveness in Removing Residue |
|---|---|---|
| Chemical Cleaners | Dissolve residues with specific chemicals | High |
| Mechanical Cleaning | Physical methods like sandblasting or polishing | Moderate to High |
| Solvent Cleaning | Uses solvents to dissolve and remove contaminants | Variable |
- Use chemical cleaning agents for tough residues.
- Try mechanical methods if the residue is light.
- Pick the right solvent for the type of contamination.
Prevention (dry media, air supply checks)
Keep your blasting media dry and clean to prevent contamination. Check your air supply for moisture. Store abrasives in a dry place. Clean the aluminum before blasting to remove oils and adhesives. Always rinse and dry the parts well after blasting.
Tip: Check your compressor and air lines for water or oil often. Dry, clean air and media help you avoid white residue and other contamination.
If you know about these common challenges, you can avoid mistakes. This helps you get a better finish every time you sandblast aluminum.
Aluminum Sandblasting Problems and Solutions
When you work with aluminum, you will see different aluminum sandblasting problems and solutions. If you know how to find and fix these problems, your finish will look better. This also helps you save money and avoid mistakes. This part talks about equipment problems, picking the right media, and how new machines and robots can help.
Equipment-Related Problems

If you do not take care of your sandblasting equipment, you can have many problems. You should check your tools often to keep everything safe and working well.
Clogged nozzles
Clogged nozzles make your work slow and uneven. Dust, broken media, or water can block the nozzle. If blasting gets weak or looks strange, stop and clean the nozzle. Always use dry, clean media to help stop clogs.
Worn parts
Worn parts like hoses, seals, and nozzles can leak air and lose pressure. This makes your blasting results worse. If you see cracks or feel air leaks, change those parts. Worn nozzles can also make the spray look rough or patchy.
Maintenance tips
Doing regular maintenance helps your equipment last longer. It also helps you avoid sudden problems. Here is a table that shows important maintenance jobs and why they matter:
| Maintenance Task | Importance |
|---|---|
| Leak Inspection | Stops pressure loss and keeps things working well. |
| Nozzle Cleaning | Stops grit from building up and keeps things fast. |
| Pressure Check | Make sure the system works at the right level. |
| Inspect Hoses and Fittings | Finds worn parts before they break. |
| Monitor Media Flow | Keeps blasting even and steady. |
| Lubricate Moving Parts | Stops slowdowns and keeps parts from wearing out. |
| Replace Air Filters | Keeps air clean for better blasting. |
| Drain Moisture Traps | Stops water from causing rust inside. |
| Visual Inspection of Seals | Stops pressure drops and keeps things safe. |
| Cleaning Equipment | Stops rust and keeps everything working well. |
Tip: Make a checklist for these jobs and use it before each blasting job. This helps you stop most equipment problems.
Media Selection and Handling
Picking the right blast media is one of the most important aluminum sandblasting problems and solutions. The media you pick changes how your finish looks, how fast you work, and how safe you are.
Choosing the right abrasive

There are many types of abrasive media. Each one works best for certain jobs:
- Aluminum Oxide: Good for getting surfaces ready and taking off paint.
- Glass Beads: Make a smooth finish and are gentle on metal.
- Plastic Media: Soft and good for delicate surfaces.
- Silicon Carbide: Cuts fast and works on hard surfaces.
- Steel Media: Takes off rust and paint quickly.
- Avoid Sand: Sand can hurt your tools and is not safe to breathe.
When you choose your abrasive, think about these things:
- Hardness & Durability: The media should clean but not hurt the aluminum.
- Particle Size & Shape: Using different sizes helps stop clogs and gives a better finish.
- Reusability: Some media can be used again, which saves money.
- Dust Control & Safety: Less dusty media keeps the air cleaner and safer.
- Environmental Compliance: Use media that follows local rules.
Note: Always pick the right abrasive for your job. Using the wrong media can hurt the surface or leave it unfinished.
Recycling and replacing media
Your blasting results depend on your media’s condition. Old or broken media can leave some spots dirty and others too clean. This means you might have to redo your work or put coatings on a bad surface. When the media breaks down, it makes dust that can wear out your nozzle and fill the air. This can make your results worse and your workspace less safe.
Check your media often. Change it if you see too much dust or if the finish looks uneven. Reuse media that is still good to save money, but never use media that is dirty or worn out.
Avoiding contamination
Contamination is a common issue in aluminum sandblasting problems and solutions. Dirty media or bad handling can ruin your finish and hurt your equipment. Here are some good habits:
- Wear safety gear like N95 masks, goggles, and gloves.
- Use good ventilation and dust collectors to keep the air clean.
- Keep media in closed containers to stop water and dirt from getting in.
- Throw away used media the right way.
Tip: Always clean your workspace and tools after each job. This helps stop contamination and keeps your results the same.
Advanced Machining and Automation
New machines and robots can fix many aluminum sandblasting problems and solutions. These new ways help you get better finishes, save time, and stay safe.
Role of machining in surface prep
Machining, like what AFI Industrial Co., Ltd offers, gives you more control over surface prep. If you machine before sandblasting, your surface will be more even and clean. This helps coatings and paints stick better. Here is a table that shows how advanced machining helps with surface prep:
| Benefit | Description |
|---|---|
| Enhanced Adhesion | Makes small dents so coatings and paint stick better. |
| Uniform Texture | Gives a smooth texture and stops finish differences. |
| Aesthetic Appeal | Makes a matte or satin finish for a better look. |
Note: Machining can help you avoid many sandblasting problems by giving you a better surface to start with.
Benefits of robotic blasting
Robotic blasting is changing how you fix aluminum sandblasting problems and solutions. Robots can work in dangerous places, so people stay safe from dust and chemicals. Robots also give you more control over speed, angle, and pressure. This means you get the same result every time.
Some big benefits of robotic blasting are:
- Keeps workers safe from dangerous places.
- Gives better accuracy and works faster.
- Makes results the same every time.
- Works all the time without stopping, so you get more done.
- Lowers costs for work and supplies.
- Uses less energy and media, so you spend less.
- Makes the surface texture even.
- Lets you change jobs quickly, so you lose less time.
- Wastes less media and gets more good parts.
Tip: If you want better results and more work done, try robotic blasting. It works well with machining for the best surface prep.
If you know about these aluminum sandblasting problems and solutions, you can make better choices for your tools, media, and process. This helps you get a good finish every time and keeps your work running smoothly.
Best Practices for Sandblasting Aluminum
You get the best results from aluminum sandblasting when you follow a few key steps. Good preparation, smart media selection, and careful equipment setup make your work easier and your finish better. If you want a high-quality surface, you should also consider machining before sandblasting. Machining helps create a smooth, even base that makes blasting more effective.
Preparation Steps

Cleaning and degreasing
Start by cleaning the aluminum. Use soap and water or a degreasing agent to remove dirt, oil, and debris. A clean surface lets the abrasive work evenly and prevents spots or streaks. If you skip this step, you might see poor results or have to redo your work.
Masking sensitive areas
Next, protect any parts you do not want to blast. Cover these areas with tape or plastic sheeting. This keeps them safe from accidental damage and helps you control where the abrasive hits. Masking is especially important for threads, holes, or polished sections.
Tip: Always double-check your masking before you begin. Even a small missed spot can lead to costly repairs.
Media and Equipment Tips
Blast Media Choice
Choosing the right blasting media is important. Softer media like walnut shells or corn cob grit work well for delicate surfaces. Harder media like aluminum oxide or garnet are better for tough jobs. Use this table to help you pick:
| Media Type | Hardness (MOHS) | Mesh Sizes |
|---|---|---|
| Aluminum Oxide | 6-7.5 | 12-80 |
| Crushed Glass | 5-6 | 30-325 |
| Steel Grit | 40-65 | 10-120 |
| Garnet | 7-7.5 | 30-120 |
| Glass Beads | 5.0-6.0 | 60-120 |
| Corn Cob Grit | 4-4.5 | 8-40 |
| Walnut Shell Grit | 3-4 | 6-100 |

Compressor power requirements
Your compressor must deliver enough air for the blast pot and nozzle. If the compressor is too small, blasting slows down or stops. If it is too big, you waste energy and money. Make sure your compressor matches your nozzle size and sandblast pressure needs. Most blast pots need at least 50 PSI to seal the valve and work best at 90 PSI. The compressor must keep up with the air flow, or blasting will not work right.
- Check the compressor’s CFM rating.
- Match the compressor to your nozzle size and pressure.
- Remember, the workshop compressor supplies different equipment at the same time, which will cause inconsistent air pressure and be insufficient for sandblasting.
Technique and Safety
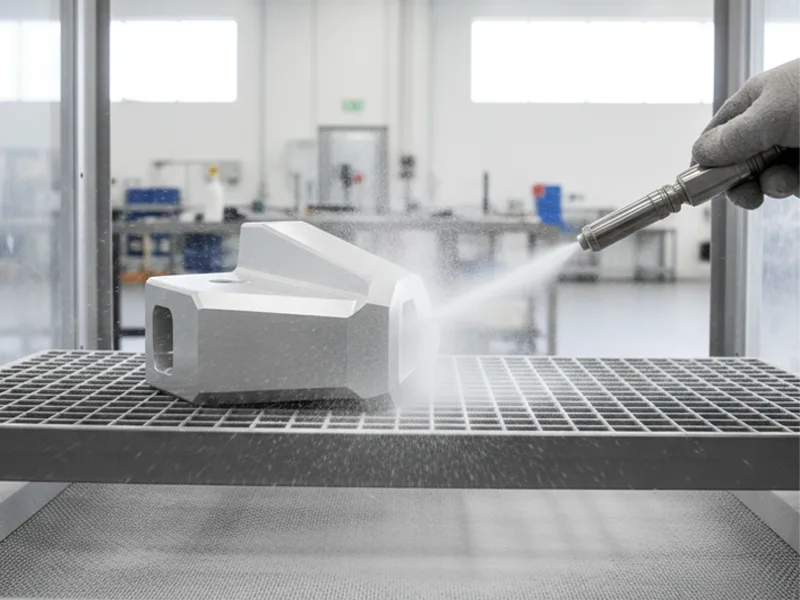
Nozzle distance and angle
Hold the nozzle about 2 inches from the surface. Keep the angle close to 75°. This angle gives you strong cleaning power but stops the abrasive from bouncing back too much. Moving the nozzle at a steady speed and distance helps you get a smooth, even finish.
The optimal nozzle angle for achieving a uniform finish in aluminum sandblasting is around 75°. This angle allows for strong impact while preventing abrasive ricochet, which can crowd and slow the stream.
Personal protective equipment
Always wear the right safety gear when sandblasting. During the sandblasting process, excessive dust generation, noise, and flying particles may injure you. Wearing appropriate safety equipment can help you avoid injury.. You should use:
- Safety goggles or a full-face shield
- Dust mask or respirator
- Earplugs or earmuffs
- Long-sleeved shirts and pants
- Heavy-duty gloves
- Steel-toe boots
- Barrier creams or coveralls for skin protection
Note: Personal protective equipment protects your eyes, lungs, skin, and hearing. Never skip this step, even for small jobs.
By following these best practices, you make your sandblasting safer and more effective. Careful preparation, the right media, and good technique help you get a professional finish every time. For the highest quality, use machining to prepare your surface before blasting. This step gives you a smooth, even base and helps coatings stick better.
Troubleshooting Checklist
Quick Reference
When you run into trouble during aluminum sandblasting, use this checklist to find and fix problems fast. Keep it nearby while you work. It helps you spot issues early and take the right steps to solve them.
Problem identification
Start by looking for these common signs that something is wrong:
- No abrasive comes out when you press the pedal.
- The blasting stops and starts, or feels weak.
- You see uneven blasting or streaks on the aluminum.
- The abrasive keeps flowing even when you release the pedal.
- The finish looks rough, patchy, or has white residue.
- The cabinet fills with dust, or the air feels damp.
- You notice trash or debris in the blasting media.
- The compressor sounds strained, or the airflow drops.
Matching symptoms to solutions
Use this table to match what you see to possible causes and fixes:
| Symptom | Likely Cause | What You Should Do |
|---|---|---|
| No blast when pedal pressed | Blocked pressure pot or sand flow valve | Check and clear blockages; inspect valves |
| Abrasive keeps flowing without the pedal | Worn foot pedal diaphragm | Replace the diaphragm; check regulator settings |
| Weak or inconsistent blasting | Moisture in the airline, worn abrasive, and air leaks | Drain moisture; replace abrasive; fix leaks |
| Uneven blasting or streaks | Too much media in the cabinet; trash in the media | Remove excess media; sift out debris |
| Finish looks rough or patchy | Old or broken abrasive; pickup tube covered | Replace the abrasive; clear the pickup tube |
| Airflow drops or compressor strains | Moisture in the airline; clogged filters | Drain lines: clean or replace filters |
Step-by-step fixes
Follow these steps to solve most sandblasting problems:
- Check the abrasive flow
Look for trash or broken pieces blocking the flow. Remove any debris from the media and cabinet. - Inspect the media level
Make sure you do not overfill the cabinet. Too much media can cause uneven blasting. - Test the air supply
Drain any water from the compressor and lines. Moisture lowers performance and can cause residue. - Examine the pickup tube
If the tube is covered with media, clear it so air and abrasives can move freely. - Adjust the valves
Set the air and sand flow valves for a balanced mix. If blasting is inconsistent, fine-tune the settings. - Replace worn parts
Swap out old nozzles, hoses, or seals. Worn parts can cause leaks and weak blasting. - Check the foot pedal
If abrasive drives without pressing the pedal, the diaphragm may be worn. Replace it if needed. - Clean and maintain equipment
After each job, clean the cabinet, change filters, and store media in a dry place.
Tip: Use this checklist every time you sandblast. It helps you catch small problems before they turn into big ones. A quick check can save you time, money, and frustration.
You can get good results with aluminum sandblasting if you follow simple steps and use the right way to prepare the surface. First, check your tools, blasting media, and safety equipment. Use this table to help you remember what to do:
| Actionable Steps for Aluminum Sandblasting Problems |
|---|
| Put in air dryers, empty moisture traps, and change filters often. |
| Use dust collectors, try wet blasting, and keep air moving. |
| Learn how far to hold the nozzle, the best angle, and speed; use gauges to check your work. |
| Choose the right media hardness and change or reuse it when needed. |
| Change the pressure, pick finer media, and clean up after blasting. |
| Use lower pressure, softer media, and cover areas you do not want to blast. |
| Make workstations comfortable, take breaks, and think about using machines. |
| Wear safety gear like helmets, ear protection, and gloves. |
| Throw away waste the right way and follow local laws. |
Advanced machining and robotic blasting are faster and make the finish more even than doing it by hand. If you use both hand and machine methods, you get strong bonding and a finish that looks the same everywhere. Use these tips each time to keep your aluminum surfaces safe and looking great.
FAQ
Pick softer abrasives like glass beads or walnut shells. Plastic media is also a good choice. These clean aluminum but do not cause damage. They help stop pitting on the surface. Do not use steel grit or sand because they are too rough.
Use less blasting pressure and pick a gentle abrasive. Always try your settings on a scrap piece first. Move the nozzle around so one spot does not get too hot.
White residue shows up if there is water or dirt in your media or air. Make sure your media is dry and check your compressor for water. If you see residue, clean the aluminum with the right solvent.
You can reuse glass beads or plastic media if they are still clean. Sift out any dust or trash after each use. Change the media when it stops working well.
Wear safety goggles and a dust mask or respirator. Put on gloves, long sleeves, and ear protection. Use steel-toe boots and coveralls for more safety. Always protect your eyes, lungs, and skin.
Move the nozzle at the same speed and distance each time. If you see streaks, blast over that spot again with even passes. Check your media flow and nozzle for clogs before you start.
Machining first makes the surface smoother and more even. This helps coatings stick better and makes the finish look nicer. Try machining if you want the best results.
Choose a compressor that fits your nozzle size and pressure needs. Most jobs need at least 90 PSI and enough CFM for steady blasting. Look at your equipment manual to find the right size.
