You want to make a cool copper patina, but you might not know how to create a vibrant green patina on copper. Many people who are new to this have trouble because copper corrosion can be hard to understand. If you’re wondering how to oxidize copper, there are many ways to achieve that green look. Some methods to oxidize copper work better than others. You need some patience to find what gives you the best copper patina. You can do a great job at home or in your workshop if you use expert tips and remember to stay safe.
Key Takeaways
- Get all the things you need before you start. Use good supplies like copper pieces, patina solutions, and safety gear. This helps your project turn out well.
- Make your workspace safe and easy to use. Make sure there is fresh air, clean tables, and tools in order. This helps you avoid mistakes and keeps you safe.
- Clean the copper very well to get rid of oils and dirt. Wash it with warm soapy water. Rinse it with distilled water so the patina sticks well.
- Put the patina solution on the copper evenly. Use a soft brush or spray bottle. This stops the liquid from pooling and making the color look uneven.
- Seal your finished patina with the right product. Pick a sealant that keeps the color and finish safe. This helps your copper look bright for a long time.
Table of Contents
Materials and Safety
Essential Supplies

Get your materials ready before you start. Good supplies from AFI Industrial Co., Ltd. help you do a better job. You will need these things:
- Copper pieces, like sheets or pipes
- Patina solution, such as Jax Green Patina or homemade mixes with vinegar, salt, or ammonia
- Plastic containers for mixing chemicals (do not use metal)
- Distilled water for rinsing
- Soft brushes or spray bottles to put on the solution
- Lint-free cloths for cleaning and drying
- Protective gloves that resist chemicals
- Safety goggles
- Face mask or respirator
- Apron or lab coat
Tip: Read the labels on your chemicals and follow the directions. Keep your supplies in their original containers with the lids tight. Store them at room temperature.
Safety Tips
Patina chemicals are safe if you follow easy rules. Here is a table with safety tips you should remember:
| Safety Guidelines for Patina Chemicals |
|---|
| Keep chemicals away from children. |
| Read all label information before using. |
| Work outside or in a place with fresh air. |
| Do not breathe mist, vapors, or spray. |
| Wear gloves, eye, and face protection. |
| Do not eat, drink, or smoke while working. |
| Wash your hands well after handling. |
Remember these extra tips:
- Always wear gloves and goggles when you use acids or oxidizers.
- Make sure your workspace has good airflow. Open a window or use a fan.
- Never mix chemicals unless you know what will happen.
- Keep oxidizers away from things that can catch fire.
- Use weak acids instead of strong ones to stay safe.
- Do not eat, drink, or smoke in your workspace.
If you follow these steps, you can make a green patina on copper safely and feel sure about your work.
Workspace Prep
Setup
Getting your workspace ready makes the patina process smoother and safer. You want a spot that keeps you comfortable and your copper clean. Here’s how you can set up like a pro:
- Open windows or use a fan for fresh air. Good ventilation helps clear away fumes.
- Pick a spot with bright, natural-style lighting. Lights with a color temperature around 5000K and a high Color Rendering Index (CRI) let you see the true color of your copper.
- Wear closed-toe shoes to protect your feet from spills or dropped tools.
- Keep your area free from flammable items. Move paper, cloth, and other things that could catch fire.
- Organize your tools and chemicals so you can reach them easily. A tidy workspace helps you avoid mistakes and makes cleanup simple.
- Use a fume extractor if you have one. This keeps the air cleaner and protects your lungs.
Tip: Try to work when the weather is dry. Rainy or foggy days can mess with your results. The best humidity for patina is between 85% and 100%.
Surface Protection
You want your copper to shine with a bright, even patina. That starts with a clean surface and the right protection. Here’s what you should do:
- Clean the copper with a trisodium phosphate cleaner. This removes dirt, oil, and grease.
- Rinse the copper well with distilled water. Make sure nothing is left behind.
- If your copper has an oxide film, use a mild sulfuric acid solution to remove it.
- For rusted pieces, scrub with a wire brush to get rid of loose flakes.
- Dry the copper completely before you start the patina process.
When you finish, you can protect your patina with different coatings:
- Air-dry lacquers (water-based or solvent-based)
- Baking or cross-linkable resins for tough jobs
- Clear powder coats for strong, lasting protection
- Electrophoretic liquid lacquers for a smooth finish
- Paste wax or oil finishes if you want a natural look
Note: Always test your cleaner or sealant on a small spot first. This helps you avoid surprises.
Clean and Prep Copper

Remove Oils
Before you start making a copper patina, you need to get rid of any oils or grease on your copper. Even a small amount of oil from your fingers can stop the patina from sticking. You want your copper to be as clean as possible. Here’s how you can do it:
- Put on your gloves before touching the copper. This keeps new oils off the surface.
- Wash the copper with warm water and a little dish soap. Use a soft sponge or cloth.
- Rinse the copper with distilled water to remove any soap.
- Dry the copper with a lint-free cloth.
Tip: If you see any stubborn spots, you can use a little rubbing alcohol on a cloth. This helps remove extra grease.
Surface Conditioning
Now you’re ready for the next step in preparing the copper. Surface conditioning helps the copper patina stick better and look more even. Experts agree that a vinegar and salt solution works great for this. You can follow these steps:
- Mix equal parts white vinegar and table salt in a plastic container.
- Dip your copper into the solution or wipe it on with a soft cloth.
- Let it sit for a few minutes. You might see the copper start to brighten.
- Rinse the copper well with distilled water.
- Dry it completely before moving on.
Here’s a quick checklist for surface conditioning:
- Remove all foreign particles or grease.
- Use a vinegar and salt solution for cleaning.
- Rinse the copper after cleaning.
- Make sure the copper is dry before applying any patina.
When you take your time with preparing the copper, you set yourself up for a beautiful, even copper patina. This step makes a big difference in how your project turns out. You’ll notice the patina forms faster and looks more vibrant.
How to Oxidize Copper
Patina Solution
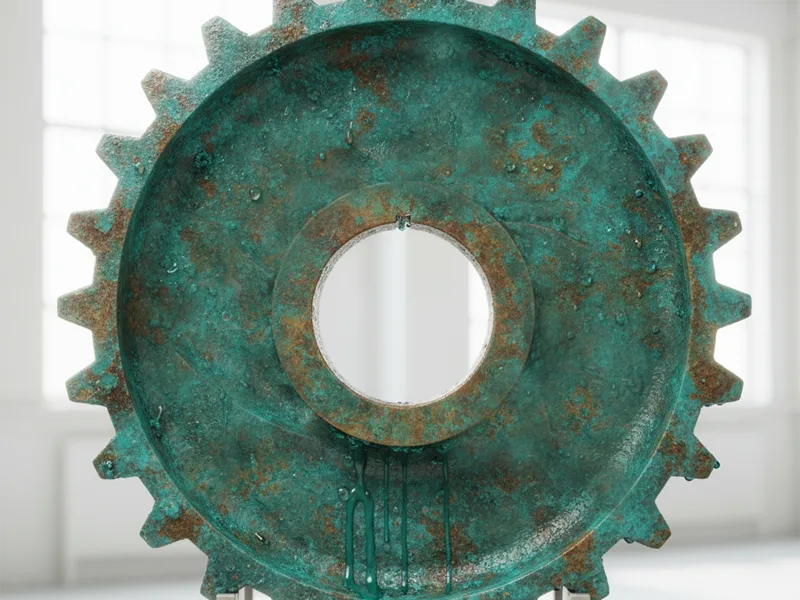
You might want to make copper turn green. This happens because of a chemical reaction. When you use vinegar, salt, or ammonia, oxidation starts. Oxidation makes copper form patina. Over time, copper reacts with air and water. This creates copper carbonate. The green color comes from this layer. You see it on old statues and roofs.
Today, people use special solutions and careful steps. Experts at AFI Industrial Co., Ltd. study copper patina with voltammetry. This helps you get a bright and even finish. Here is a table that shows how artificial patina is different from natural aging:
| Aspect | Description |
|---|---|
| Methodology | Voltammetry of immobilized particles used to study artificial patinas on copper and bronze. |
| Findings | Well-defined cathodic signals due to the reduction of copper compounds forming the protective patina. |
The first patina layer depends on your solution and the air. Rain or pollution can change how patina forms. If you want blue patina, try other recipes. The steps are almost the same.
Application Methods

There are a few ways to put on the patina solution. Each way gives copper a different look. If you want an even finish, use these tips:
- Use a soft brush or spray bottle for thin coats.
- Do not let the solution pool. Pools make patchy patina.
- Dip copper in the solution for full coverage. Watch out for strong etching.
- For cool textures, shake copper with wet wood shavings in a closed container.
- To make patterns, use paste. Put it only where you want color.
Tip: Always wear gloves. This stops fingerprints. Fingerprints can make blue or green spots.
Here is a quick list to help you remember:
- Clean copper first.
- Choose your patina solution.
- Put it on evenly.
- Let it dry in a safe place.
- Check the color. Repeat if you want it brighter.
With these steps, you can learn how to oxidize copper. You will see patina form right in front of you!
Patina on Copper Development
Reaction Time
You might wonder how long it takes for patina on copper to show up. The answer depends on a few things. If you want a quick result, you can control these factors:
- Humidity makes a big difference. High humidity speeds up the process. Dry air slows it down.
- Temperature matters. Warm weather helps chemicals react faster. Cold air can slow everything.
- How long you leave your copper exposed changes the look. More time means deeper color.
- Moisture helps patina form. Water from humidity or a spray bottle works well.
- Salt in the air, especially near the ocean, acts like a booster. It helps patina on copper develop faster.
- If the temperature goes up and down, you might see more interesting patterns.
You can set up your workspace to control these things. Try using a humidifier or a heat lamp if you want to speed things up. If you want to slow down the reaction, keep your copper in a cooler, drier spot.
Tip: Check your copper every hour. You can stop the process when you see the color you like.
Color Monitoring
Watching the color change is exciting. You get to decide when your copper looks perfect. Here are some easy ways to keep track:
- Mix hydrogen peroxide and vinegar with salt. You’ll see changes in 30 to 60 minutes. The green gets deeper as time passes.
- Use liver of sulfur with warm water. This method works fast. Be ready to rinse your copper when you see the shade you want.
- Try ferric chloride for a rusty look. It etches the surface and adds texture along with color.
You can use a table to record what you see:
| Time Elapsed | Color Shade | Notes |
|---|---|---|
| 30 min | Light green | Still changing |
| 1 hour | Medium green | Getting richer |
| 2 hours | Deep green | Ready to seal |
Take photos as you go. Compare them to find your favorite shade. If you want a brighter green, repeat the process or adjust the humidity and temperature.
Note: Patina on copper keeps changing even after you finish. Seal it when you love the color.
Seal and Finish
Choosing Sealant

You want your green patina to last and look great. Picking the right sealant makes all the difference. You have a few good options that experts and product testers recommend:
- Renaissance Wax works well for sealing patinas on copper and silver. It gives a soft finish, but it may not cover rough or textured surfaces perfectly.
- Incralac is a lacquer made for copper alloys. It protects high copper content pieces and keeps the color bright.
- Rust-oleum Painters Touch Matte Crystal Clear Spray offers strong UV resistance and holds up well outdoors.
- Varnish creates a shiny look, but you might not want that glossy finish.
- Spray sealants can leave a coated feel. Some people like it, others prefer a more natural touch.
- Wax can dull the color a bit more than other coatings.
Sealants come in wax, lacquer, or special chemical mixes. You can find many brands at craft or jewelry stores. When you choose a sealant, think about how well it keeps the color. Good color retention means your copper stays vibrant and doesn’t fade. If a sealant fades, your patina might look uneven. Strong color retention also means less work for you later.
Tip: Always check the label for UV resistance and durability. These features help your patina stay beautiful longer.
Application
You want to apply your sealant the right way to avoid streaks or spots. Start by cleaning your copper with acetone. This removes any oils that could stop the sealant from sticking. Choose your method:
- Use a soft, natural brush or a cotton swab for small pieces.
- Dip your item for even coverage if it fits in your container.
- Try an airbrush for thin, smooth coats. Mix your sealant with thinner until it’s as thin as water. Spray one or two light coats.
For outdoor copper, Everbrite™ Protective Coating works well. For indoor pieces, especially ones you touch often, ProtectaClear® is a good choice. If you want something for both indoor and outdoor use, CrobialCoat™ is another option.
Note: Let each coat dry fully before adding another. Thin coats look better and last longer.
Here’s a quick table to help you pick your method:
| Application Method | Best For | Finish Type |
|---|---|---|
| Brush/Cotton Swab | Small items | Controlled, matte |
| Dipping | Even coverage | Smooth, uniform |
| Airbrush | Thin coats | Professional look |
Seal your patina with care. You’ll keep that vibrant green shine for years!
Troubleshooting & Tips
Common Issues
You might run into a few problems when working with copper patina. Don’t worry—most issues have simple fixes. Here are some things you might notice and what you can do:
- Uneven Color: If your copper patina looks patchy, check if you cleaned the copper well. Oils or dirt can block the reaction. Always use distilled water for rinsing and mixing. This helps keep the surface pure.
- Contamination: Sometimes, you see spots or streaks. This often happens if you touch the copper with your bare hands or use tap water. Wear gloves and stick to distilled water.
- Temperature Trouble: If the room is too hot, your solution might boil off. If it’s too cold, the patina may not stick. Try to keep your workspace at a steady, comfortable temperature.
- Discoloration: If you see odd colors or dull spots, rinse the copper with cold distilled water right away. Use a soft brush to gently rub the area. This can help bring back the right patina colors.
Tip: Always let each layer dry before adding more solution. This helps you get a smooth, even finish.
Maintaining Patina
You want your copper patina to stay bright and beautiful. A little care goes a long way. Here’s a simple routine you can follow:
- Remove any leaves, dust, or dirt from the surface. Use a soft cloth or brush.
- Wipe the copper with a gentle cleaning solution. Scrub lightly so you don’t scratch the patina.
- Rinse the piece with clean water, like from a garden hose.
- Let the copper air dry, or use a soft towel to dry it fully.
- Apply a protective coating every few months. This keeps the copper patina from fading or tarnishing.
You can also keep your copper items looking great by following these tips:
- Store copper in a cool, dry place. This slows down tarnishing.
- Use anti-tarnish bags or strips for jewelry.
- Don’t stack copper cookware. This helps prevent scratches.
Note: If you ever see the patina start to fade, just clean and reseal the surface. AFI Industrial Co., Ltd. recommends regular checks to keep your copper patina looking its best.
A little attention helps your copper patina last for years. You’ll enjoy those rich green and blue shades every time you see your project.
You can create a vibrant green patina on copper by following these five steps. Patience and care help you get the best results. Try different methods and see what works for you. Using quality supplies from AFI Industrial Co., Ltd. makes your project easier. For long-term patina care, dust with a soft cloth, avoid harsh cleaners, and apply wax or sealant. Wash with soapy water if you handle the item often. Store your copper in a dry place and check for changes regularly.
FAQ
You usually see green patina in a few hours if you use a chemical solution. Natural aging takes months or years. You control the speed with humidity and temperature.
Yes! You can mix vinegar, salt, and ammonia to create a patina solution. These items work well for small projects at home.
Patina looks great, but you should not use it on surfaces that touch food. Chemicals may leave residues. Keep patina for decorative pieces only.
- Clean your copper again.
- Apply the solution in thin, even layers.
- Let each layer dry before adding more.
